


Modern teams need more than a time tracker. We need a workforce operating system — one that unifies time tracking, project management, team oversight, client billing, and performance reporting into a single workflow.
We developed a full-featured time tracking platform inside Sanity that mirrors the core experience of Harvest — and we built the Multitime tool in less than 3 months.
Our goal was simple: combine the power of professional time tracking with the flexibility of a fully programmable content platform.
This blog breaks down how we built a full Harvest-style time tracking + team management platform inside Sanity, using Next.js and Google OAuth, in less than 3 months.
Why We Looked at Harvest and What Inspired Us

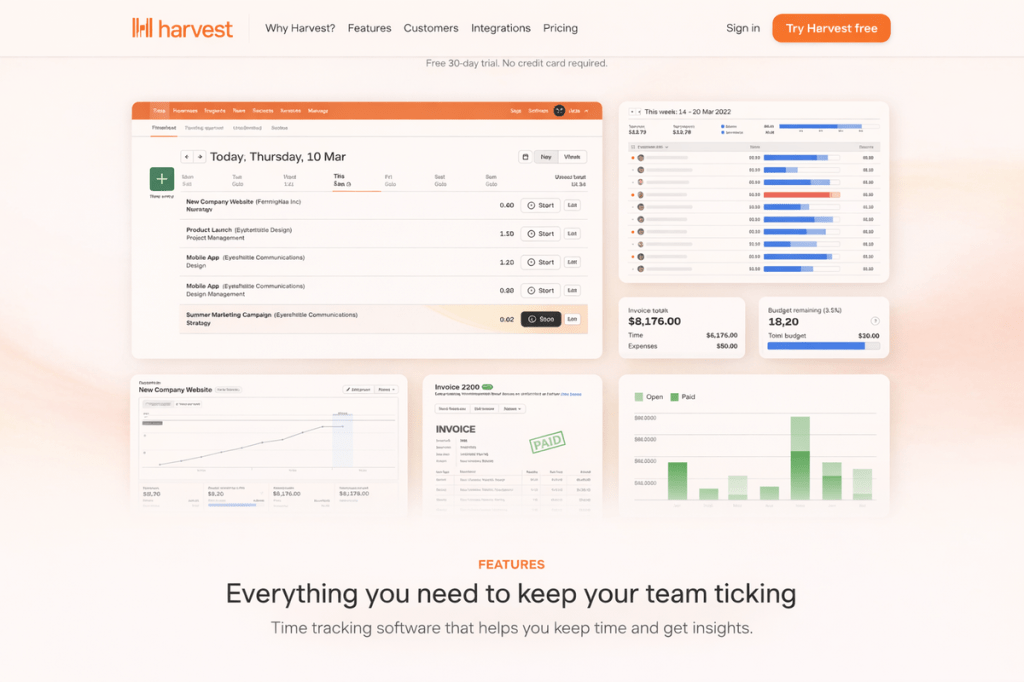
Before building our current system, our team used Harvest for time tracking across multiple client projects. This gave us valuable hands-on experience with what makes a strong time tracking product.
Here are the key features that impressed us:
- Clean week view interface — See your entire week at a glance
- Quick inline editing — Click a cell, type, done
- Project-task hierarchy — Organised structure for billable work
- Team management — Oversight of who’s working on what
- Approval workflows — Managers review before billing
- Comprehensive reporting — Filter, group, and export data
That experience shaped our thinking and became a key reference point as we set out to build our own solution — one that keeps the best of the Harvest model while offering greater flexibility, control, and deep integration with our Sanity-powered ecosystem.
Why We Built This in Sanity
Harvest is a great platform, especially for quickly starting with time tracking. However, for our use case, we needed something more flexible, scalable, and deeply integrated with our existing infrastructure.
What We Needed
- Our requirements went beyond basic time tracking. We needed a platform that could evolve with our business processes, integrate with our existing tools, and give us complete ownership of our data. Here’s what drove our decision:
- More flexibility: We required a system that fits seamlessly into our current Sanity infrastructure and can grow with our custom workflows.
- Fully custom data structure: With Sanity, we design our own content models. This allows us to shape time entries, projects, team structures, and reports exactly the way our organization works.
- Complete control over the frontend: Rather than working inside a fixed interface, we control the entire user experience: timesheet layouts, approval flows, reporting dashboards, export formats — all built to serve our specific needs.
- One unified backend: We already use Sanity extensively. Building Harvest-like time tracking tools inside Sanity keeps everything in one ecosystem.
- Role-based access control: We needed granular permissions (Admin, Manager, User) with different capabilities for each role.
The Sanity Advantage


Sanity provides a programmable content platform that lets developers build custom workflows and applications while giving teams a unified system for all their data.
What Sanity gives us:
- Content Lake — A real-time, structured database storing all our data
- Sanity Studio — A customizable admin interface (though we built our own frontend)
- GROQ — Powerful query language for complex data fetching
- APIs & SDKs — Developer tools to integrate content everywhere
How We Broke Down Harvest’s Core Functionality
Before writing a single line of code, we spent time carefully studying how Harvest handles time tracking. Not just at the surface level, but at the workflow level — what a user experiences, what managers need, and how everything stays connected.
Instead of copying features, we deconstructed the product into building blocks.
1. User & Authentication Management
Security and access control form the foundation of any team tool. We needed a robust system that could handle different permission levels while keeping the login experience simple. Google OAuth provides the convenience users expect, while our pre-invite model ensures only authorized team members can access the system.
- User login system
- Google OAuth integration
- Role-based access (Admin, Manager, User)
- Profile management with capacity and rates
- Active/Inactive/Archived states
This controls who can access the system and what they can do.
2. Client Management
Every billable hour needs to be associated with a client for accurate invoicing. Our client management system serves as the top level of our project hierarchy, connecting companies to projects to time entries. This structure enables powerful reporting by clients and ensures all work is properly attributed.
- Create and manage client companies
- Multiple contacts per client (with primary contact designation)
- Address and currency preferences
- Client status tracking (active/archived)
Clients form the foundation for project billing.
3. Project Management
Projects are where the actual work happens. Each project connects a client to specific tasks and team members, creating a complete picture of what’s being worked on and by whom. Our project management module handles everything from initial setup through completion, with budget tracking to prevent overruns.
- Create projects linked to clients
- Project types (Time & Materials, Fixed Fee, Non-Billable)
- Budget tracking (total project hours)
- Assign team members to projects
- Assign tasks to projects
- Project status workflow (Planning → Active → Completed)
Projects organize all billable work.
4. Task Management
Tasks provide the granular detail needed for accurate time tracking and reporting. Rather than creating tasks for each project individually, we built a reusable task library that can be assigned across multiple projects. This ensures consistency in how time is categorized and makes reporting more meaningful.
- Create reusable tasks
- Organize tasks by categories
- Billable vs. non-billable designation
- Common tasks auto-assigned to new projects
Tasks provide granular tracking within projects.
5. Time Entry Workflow
This is the core of the entire system — where team members actually log their hours. We replicated Harvest’s intuitive flow where entering time feels effortless.
The workflow moves from entry to submission to approval, with clear states at each stage so everyone knows where things stand.
6. Team Management
Managers need visibility into their team’s work without micromanaging. Our team management module provides at-a-glance statistics, historical data, and the ability to drill into individual member details. This enables informed decision-making about resource allocation and project staffing.
- Team member listing with weekly stats
- Member details with time entry history
- Capacity tracking (hours/week)
- Hourly rates for billing
- Pin/Archive functionality
- Manager-to-team-member relationships
Team management provides oversight and accountability.
7. Approval Workflow
The approval system bridges the gap between time entry and billing. Without proper approvals, it’s difficult to ensure accuracy and prevent disputes. Our three-state workflow makes it clear what’s been reviewed and what’s still pending, while preventing accidental edits to approved time.
Three-state system:
| State | Description |
|---|---|
| Unsubmitted | User can freely edit entries |
| Pending | Submitted for approval, awaiting manager review |
| Approved | Locked, entries cannot be edited |
Managers review pending entries and approve at the week level.
8. Reporting & Analytics
Raw time data is only valuable when you can analyze and act on it. Our reporting module transforms individual time entries into meaningful insights about project profitability, team utilization, and billing accuracy. The ability to export data ensures compatibility with existing accounting and invoicing systems.
- Time reports with multiple filters (date, client, project, user)
- Group by date, project, team member, or task
- Billable vs. non-billable breakdown
- Export to CSV and Excel
- Visual charts and metrics
Reports turn raw time data into actionable insights.
Core Components & Building Blocks Used in Sanity
Sanity provides a modular architecture made up of powerful building blocks that allow us to design highly customized systems. Understanding these components is essential for anyone considering Sanity as the foundation for a business application.
1. Content Lake (The Foundation)
The Content Lake is Sanity’s real-time database that stores all our structured content. Unlike traditional databases, it’s designed for collaboration and provides instant synchronization across all connected clients. Every time entry, project update, and user change is immediately available throughout the system.
What it gives us:
- Structured content with strong schemas
- Real-time updates
- Versioning and history
- References between documents (user → project → client)
- Reusable across all interfaces
2. Schema System
Sanity’s schema system is where we define the structure of our data. Each schema acts as a blueprint that enforces data consistency, provides validation, and establishes relationships between different entity types. This strong typing prevented countless bugs and made the codebase more maintainable.
Our 11 Document Types:
| Schema | Purpose |
|---|---|
| user | Team members with roles, capacity, rates |
| client | Client companies with contacts |
| project | Projects linked to clients with budgets |
| task | Reusable tasks for time tracking |
| category | Task categories (Development, Design, etc.) |
| timesheet | Individual time records |
| team | Team groupings for managers |
| contact | Embedded client contact type |
| jobcategory | User designations (Developer, PM) |
| uiSettings | Theme and customization |
| report | Saved report configurations |
3. GROQ Query Language
GROQ (Graph-Relational Object Queries) is Sanity’s powerful query language. It enabled us to fetch complex, nested data in single requests — something that would require multiple queries in a traditional REST API. This dramatically simplified our frontend code and improved performance.
- Dashboard aggregations (weekly hours, project counts)
- Filtered reports (by date range, client, project)
- Role-based data access
- Real-time calculations
4. APIs & Integration
Sanity provides a comprehensive set of APIs that makes integration with our Next.js frontend straightforward. The JavaScript SDK handles authentication, caching, and real-time updates automatically, letting us focus on building features rather than infrastructure.
- Content API — Fetch data for frontend
- Mutation API — Create, update, delete records
- Real-time API — Listen for changes
- JavaScript SDK — Easy integration with Next.js
Step-by-Step Implementation Overview
Step 1: Tech Stack & Architecture
Choosing the right tech stack was crucial for development speed and long-term maintainability. We selected technologies that work well together and have strong community support. This combination allowed us to move quickly while building a production-ready application.
Technology Stack:
| Layer | Technology |
|---|---|
| Frontend Framework | Next.js 14 (App Router) |
| UI Library | React 18 |
| Styling | Tailwind CSS |
| CMS/Database | Sanity.io v3 |
| Authentication | NextAuth.js + Google OAuth |
| Charts | Recharts |
| Date Handling | date-fns |
| Export | XLSX library |
| Notifications | React Hot Toast |
Architecture:
Next.js Frontend (Top Layer): The user interface layer built with Next.js 14 App Router. This handles all user interactions, displays data, and manages client-side state. All modules — Dashboard, Timesheets, Team Management, Projects, and Reports — are rendered here.
API Routes (Middle Layer): Next.js API routes serve as the backend logic layer. They handle business operations like creating/updating time entries, managing team data, performing authentication checks, and generating exports. This layer validates requests, enforces permissions before storage.
Sanity Content Lake (Data Layer): Sanity’s real-time database stores all structured content. It houses all document types (Users, Projects, Clients, Tasks, Time Entries) and provides real-time synchronization and powerful GROQ querying capabilities.
NextAuth + Google OAuth (Authentication Layer): Handles all user authentication and session management. Google OAuth provides seamless login, while NextAuth manages JWT sessions and role-based access control throughout the application.
How They Work Together:
- User interacts with the Next.js frontend
- Frontend makes requests to API routes for data operations
- API routes authenticate via NextAuth and query/update Sanity
- Sanity stores data and syncs changes in real-time
- Updates flow back through the API to the frontend
This layered architecture provides clear separation of concerns: frontend handles UI, API handles business logic, Sanity manages data, and NextAuth secures access.
Step 2: Content Modeling in Sanity
We designed a fully structured content system using custom schemas that define how every piece of data is created, validated, and connected. Getting the schema design right was the most important architectural decision — it affected everything from query performance to UI complexity.
Client Schema:
Clients anchor our billing structure. The contacts array with primary contact logic ensures there’s always a clear point of contact.
- Company details
- Contacts array with primary contact logic
- Currency preferences
Here is the code snippet for client schema:
import { defineField, defineType } from 'sanity'
import { FiBriefcase } from 'react-icons/fi'

export default defineType({
  name: 'client',
  title: 'Client',
  type: 'document',
  icon: FiBriefcase,
  fields: [
    defineField({
      name: 'name',
      title: 'Client Name',
      type: 'string',
      validation: (Rule) => Rule.required(),
    }),
    defineField({
      name: 'slug',
      title: 'Slug',
      type: 'slug',
      options: {
        source: 'name',
        maxLength: 96,
      },
      validation: (Rule) => Rule.required(),
    }),
    defineField({
      name: 'contacts',
      title: 'Contacts',
      type: 'array',
      of: [
        {
          type: 'contact',
        },
      ],
    }),
    defineField({
      name: 'address',
      title: 'Address',
      type: 'text',
      rows: 3,
    }),
    defineField({
      name: 'preferredCurrency',
      title: 'Preferred Currency',
      type: 'string',
      options: {
        list: [
          { title: 'USD ($)', value: 'USD' },
          { title: 'EUR (€)', value: 'EUR' },
          { title: 'GBP (£)', value: 'GBP' },
          { title: 'JPY (¥)', value: 'JPY' },
          { title: 'CAD (C$)', value: 'CAD' },
          { title: 'AUD (A$)', value: 'AUD' },
          { title: 'CHF (CHF)', value: 'CHF' },
          { title: 'CNY (¥)', value: 'CNY' },
          { title: 'SEK (kr)', value: 'SEK' },
          { title: 'NZD (NZ$)', value: 'NZD' },
        ],
      },
      validation: (Rule) => Rule.required(),
      initialValue: 'USD',
    }),
    defineField({
      name: 'isActive',
      title: 'Active',
      type: 'boolean',
      initialValue: true,
    }),
    defineField({
      name: 'isArchived',
      title: 'Archived',
      type: 'boolean',
      initialValue: false,
    }),
    defineField({
      name: 'createdAt',
      title: 'Created At',
      type: 'datetime',
      initialValue: () => new Date().toISOString(),
    }),
  ],
  preview: {
    select: {
      title: 'name',
      contacts: 'contacts',
    },
    prepare(selection) {
      const { title, contacts } = selection
      const primaryContact = contacts?.find((contact: any) => contact.isPrimary)
      const primaryName = primaryContact
        ? `${primaryContact.firstName} ${primaryContact.lastName}`.trim()
        : null

      return {
        title,
        subtitle: primaryName ? `Primary: ${primaryName}` : 'No primary contact',
      }
    },
  },
})
User Schema:
The user schema captures everything needed for team management and billing calculations.
- Personal info (name, email, avatar)
- Role (Admin, Manager, User)
- Capacity (weekly hours) and hourly rate
- Notification preferences
- Active/Archived status
Project Schema:
Projects tie together clients, team members, and tasks into a cohesive unit. The assigned users array uses Sanity’s reference filtering to only show eligible team members, preventing assignment errors.
- Client reference (required)
- Assigned users array with filtering
- Task references
- Budget configuration (no budget, total hours)
- Status workflow
Timesheet Schema:
The timesheet schema is the most frequently written document in the system. We optimized it for quick writes while maintaining the relationships needed for reporting.
- User, Project, Task references
- Date and hours
- Timer support (startTime, endTime, isRunning)
- Approval fields (submittedAt, isApproved, isLocked, approvedBy)
- Billable flag
Full schemas available in GitHub repository
Step 3: Building the User Interface
We built a comprehensive admin interface tailored to different user roles. Each module was designed with its primary users in mind — team members need speed, managers need oversight, and admins need control.
3.1 Time Tracking Module
The time tracking module is where users spend most of their time. The week view provides the familiar Harvest-style grid, while the day view offers more detail when needed.
Week View Timesheet:

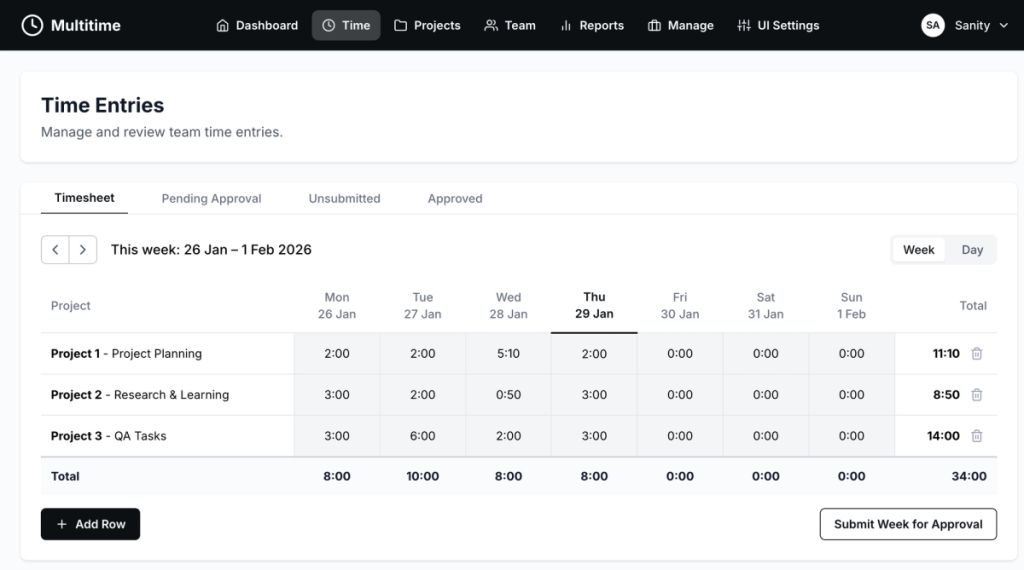
The week view displays a 7-day grid where each row represents a project-task combination. Users can quickly scan their week, enter hours in any cell, and see totals update in real-time. This mirrors Harvest’s core experience that our team already loved.
- 7-day grid (Monday to Sunday)
- Project-Task rows
- Inline cell editing (click → type → save)
- Automatic totals per row and per day
- Copy rows from previous week
- Add new project-task rows
- Delete rows with confirmation
Day View Timesheet:

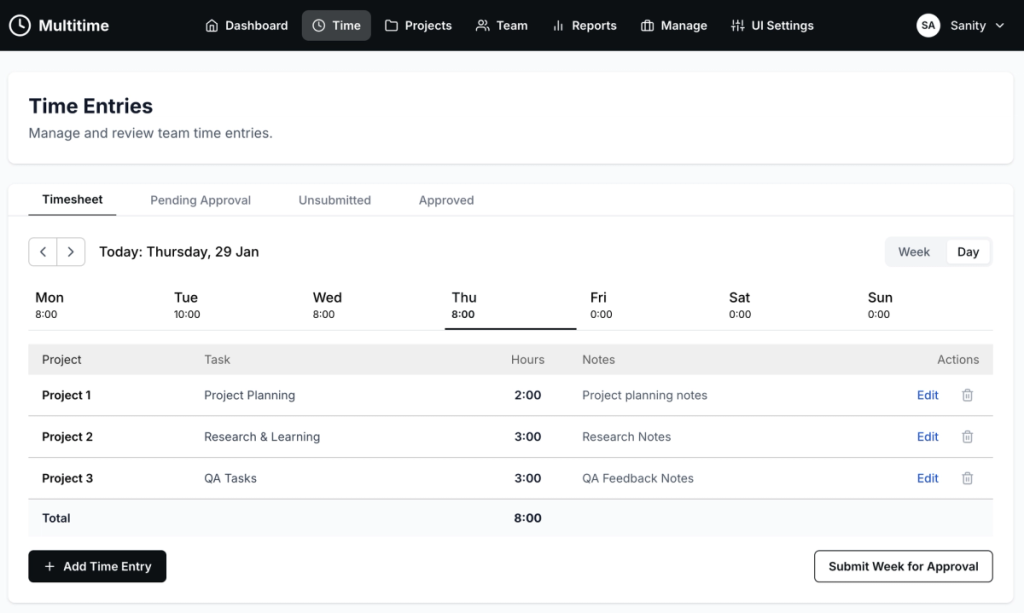
The day view provides a focused look at a single day’s entries with more detail visible. It’s ideal for reviewing or making detailed edits to entries, especially when notes and additional context are important.
- Single day focus
- Detailed entry list with notes
- Modal form for adding/editing
- Day navigation tabs
Key Features:
These features combine to create a time entry experience that feels instant and forgiving. Multiple input formats accommodate different user preferences, while optimistic updates ensure the interface never feels slow.
- Time format support (2:30, 2.5)
- Optimistic UI updates
- LocalStorage persistence for row structure
- Submit week for approval button
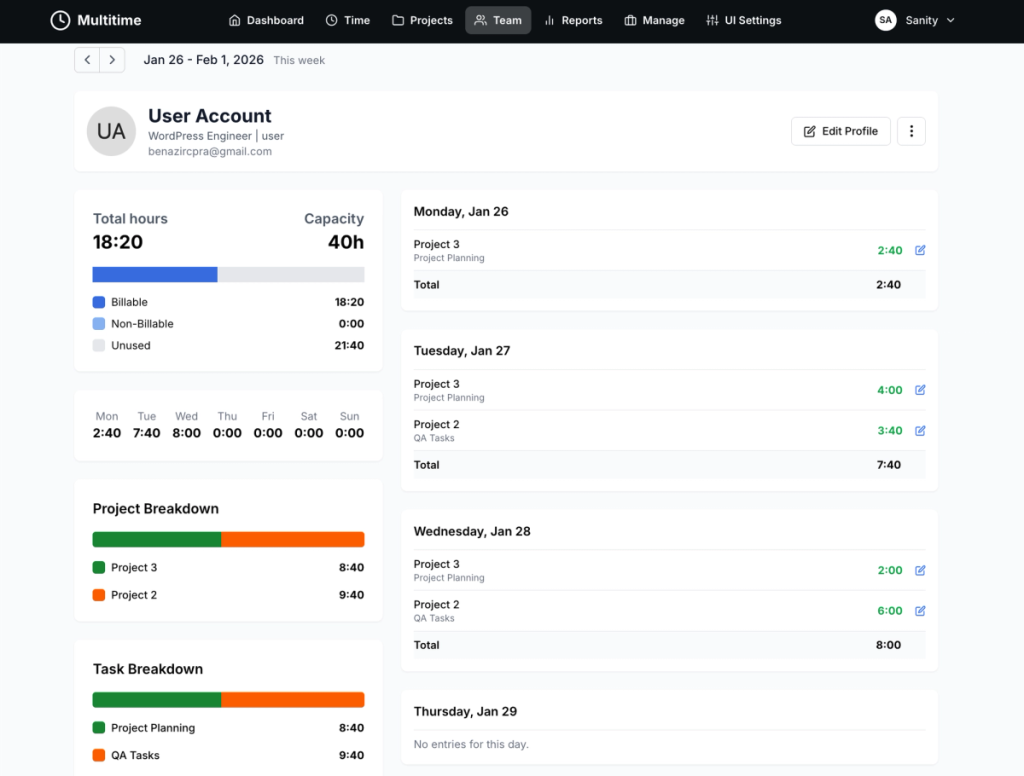
3.2 Team Management Module
Team management gives managers and admins visibility into their organization’s time tracking. The overview provides at-a-glance statistics, while the detail view enables deeper investigation when something looks off.

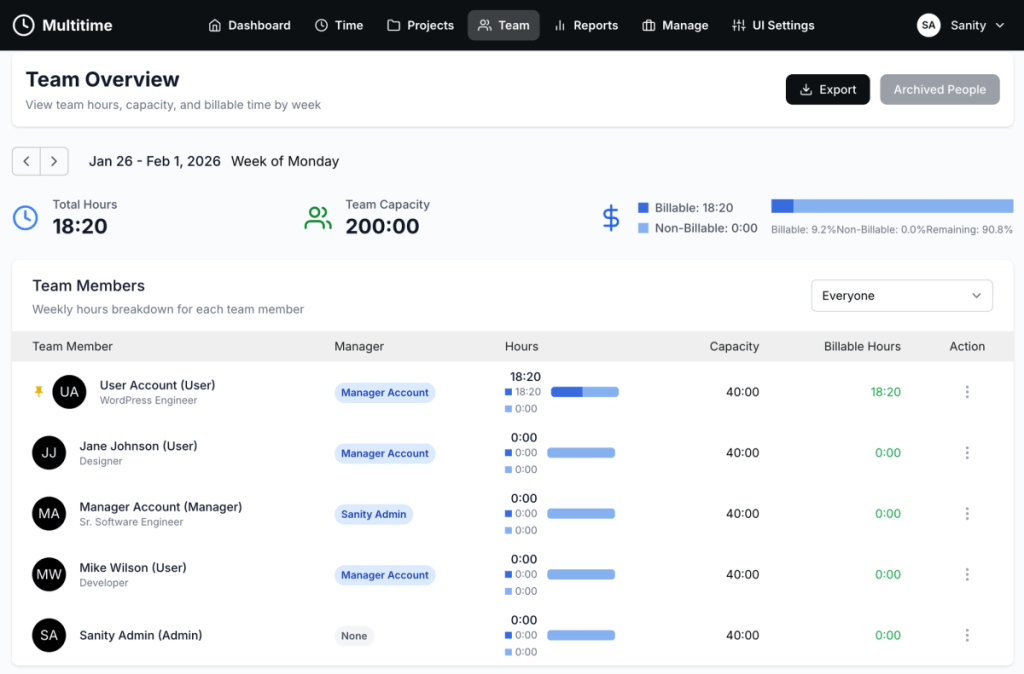
Team Overview:
The team overview displays all team members with their weekly statistics. Managers can quickly identify who’s tracking time, who’s falling behind, and who might need support. Historical navigation allows us to review past weeks for trend analysis.
- Member listing with key info
- Week navigation for historical data
- Search and filter functionality
- Pin/Archive actions
Member Details:
Drilling into a specific team member reveals their full time entry history, capacity utilization, and profile information. Admins can edit entries directly when corrections are needed, maintaining data accuracy.
- Profile information
- Hourly rate and capacity
- Time entries by week
- Edit capabilities for admins

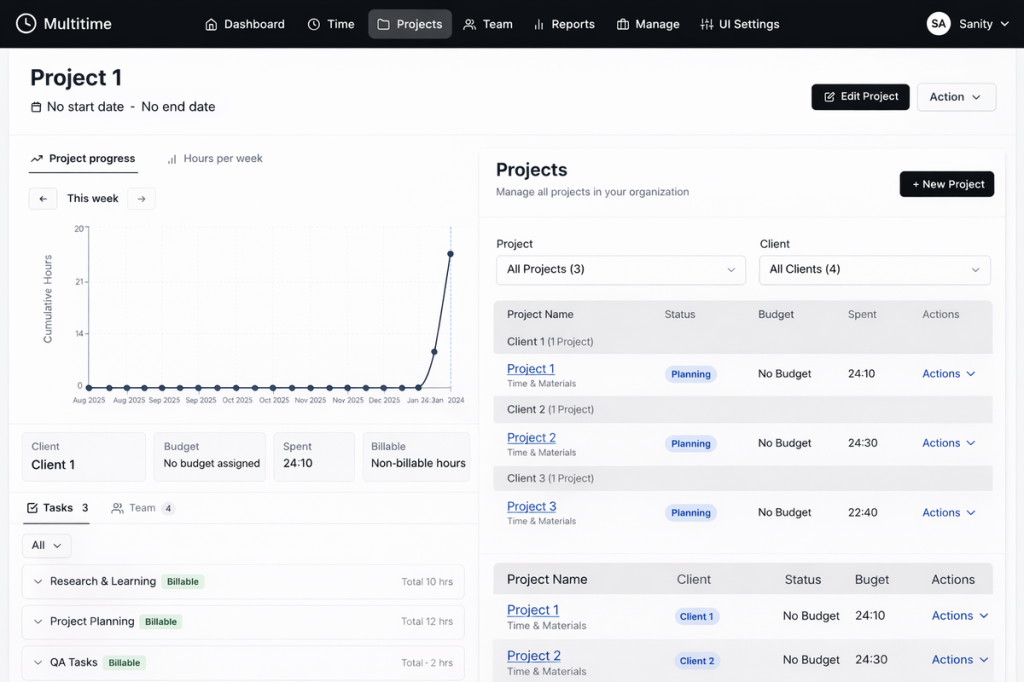
3.3 Project Management Module
Projects are the organizing principle for all billable work. This module handles the full project lifecycle from creation through completion, with budget tracking to prevent overruns before they happen.
Project List:
The project list shows all projects with their current status, associated client, and key metrics. At a glance, admins can see which projects are active, how much time has been logged, and whether budgets are on track.
- All projects with status badges
- Client association
- Team member count
- Total hours tracked
Project Details:
The detail view provides complete project configuration. Admins can manage team assignments, configure budgets, and review all time logged to the project. This single view contains everything needed for project oversight.
- Full project configuration
- Task and team assignment
- Time entry summary
- Budget tracking
3.4 Management Module
The Management Module provides a centralized interface for managing clients, tasks, and roles. This unified module ensures that all organizational data — clients, task modules, and user roles — can be managed efficiently from a single location with tabbed navigation.
Client Tab:
Clients sit at the top of our billing hierarchy. Managing client information accurately ensures that all downstream data — projects, time entries, invoices — flows correctly through the system.
- Active clients with project counts
- Primary contact display
- Quick actions (edit, archive)
- Contact management
- Address and preferences
- Linked projects
- Export functionality (CSV, Excel)
- Archive/restore capabilities
Task Tab:
Tasks provide the granular detail needed for accurate time tracking and reporting. The task management interface allows admins to create reusable tasks, organize them by categories, and manage their assignment across projects.
- Create and manage reusable tasks
- Organize tasks by categories
- Billable vs. non-billable designation
- Bulk operations (archive, delete)
- Category-based grouping
- Add tasks to all projects
- Export functionality (CSV, Excel)
- Archive/restore capabilities
Role Tab:
Roles (job categories) define team member designations and help organize the organization structure. The role management interface enables admins to create roles, assign team members to roles, and manage role assignments across the organization.
- Create and manage roles
- Assign team members to roles
- View role membership
- Bulk delete operations
- Role-based team organization
- Visual member display with avatars


3.5 Reporting Module
Reports transform raw time data into actionable business insights. Whether tracking project profitability, team utilization, or billing accuracy, our reporting module provides the answers.
Time Reports:
The time reports interface offers flexible filtering and grouping options. Users can slice data by any dimension — date, client, project, or team member — to answer specific business questions.
- Date range selection with presets
- Filter by client, project, user
- Group by date, project, member, task
- Billable vs. non-billable breakdown
Visualizations:
Charts and metrics make patterns visible at a glance. Rather than scanning rows of numbers, managers can quickly identify trends and anomalies.
- Bar charts for hours by day/project
- Summary metrics
- Utilization percentages
Export Options:
Data export ensures our system integrates with existing accounting and invoicing workflows. Both CSV and formatted Excel outputs accommodate different downstream systems.
- CSV download
- Excel (.xlsx) with formatting
- Safe date handling


3.6 Account Profiles & Settings Module
The Account Profiles & Settings Module provides users with comprehensive control over their personal account information, preferences, and notification settings.
Basic Info Tab:
Users can manage their core profile information, including personal details, avatar upload, timezone settings, and billing rates (for admins).
- Personal information (first name, last name, email)
- Avatar upload and management
- Timezone selection (supports 40+ timezones worldwide)
- Hourly rate configuration (admin-only)
- Role display (read-only)
Assigned Projects Tab:
Users can view all projects they’re assigned to, providing visibility into their current workload and project responsibilities. This helps team members understand their project assignments at a glance.
- List of assigned projects
- Project status and details
- Task assignments per project
Assigned People Tab:
Managers and admins can view and manage the people assigned to them, providing oversight of their team structure and relationships.
- Team member listings
- Manager-to-team relationships
- Team structure visualization
Permissions Tab:
Users can view their account permissions, which control what actions they can perform within the system. Permissions are role-based and determine access to various features and modules.
- Permission overview
- Role-based access display
- Feature access indicators
- Permission explanations
Notifications Tab:
The notifications system allows users to customize their email and reminder preferences, ensuring they receive relevant updates without being overwhelmed.
- Timesheet Reminders:
- Weekly team-wide reminders
- Manager-configured reminder settings
- Weekly Reports:
- Weekly time report emails
- Personal time summaries
- Approval Notifications (Managers & Admins):
- Email alerts when timesheets are submitted
- Approval workflow notifications
- Other Notifications:
- Project deleted notifications (Managers & Admins)
- Occasional updates and tips (coming soon)

Step 4: Authentication & Authorization
Security was a primary concern from day one. Our authentication system balances ease of use with strict access control, ensuring only authorized users can access appropriate functionality.
Google OAuth Implementation:
We chose Google OAuth for its simplicity and security. By requiring pre-invitation, we ensure that only intended users can access the system — no one can sign up simply by having a Google account. Account linking connects new OAuth logins with existing user records.
- Pre-invited users only
- Account linking for existing users
- Session management with JWT
- Role stored in session for quick access
Role-Based Access:
Three distinct roles provide the right capabilities to the right people. Each role is designed for specific organizational needs, from individual contributors to team leaders to administrators. Every API route and UI element respects these permissions.
Admin Role:
Administrators have complete control over the system. This role is designed for those who need full access to manage the entire organization’s time tracking infrastructure.
Admin Capabilities:
- Create, edit, and delete all projects, clients, and tasks
- Manage all users (create, edit, archive, assign roles)
- View and edit all time entries across the organization
- Approve time entries for any team member
- Access all reports and analytics (unfiltered)
- Manage system settings and preferences
- Access Management Module (Client, Task, Role tabs)
- Full access to Account Profiles & Settings
Manager Role:
Managers have elevated permissions focused on team oversight and project management. They can manage their assigned teams, approve time entries, and access comprehensive reporting for their projects and people.

Manager Capabilities:
- Track and manage their own time entries
- View and approve time entries for their team members
- Access team timesheets and weekly statistics
- View reports filtered to their team and managed projects
- Pin/archive team members for quick access
- Receive approval notifications for submitted timesheets
- View assigned people and team structure

User Role:
Users are the core contributors who track their time. This role is designed for team members who primarily log hours and view their own data. It provides a focused, streamlined experience without administrative complexity.
User Capabilities:
- Track and manage their own time entries
- View their own timesheet (week and day views)
- Submit weeks for approval
- View their own reports and time summaries
- Manage their profile information (name, avatar, timezone)
- Configure personal notification preferences

Permission Matrix:
| Capability | Admin | Manager | User |
|---|---|---|---|
| Track own time | ✅ | ✅ | ✅ |
| View own reports | ✅ | ✅ | ✅ |
| View team timesheets | ✅ | ✅ (own team) | ❌ |
| Approve entries | ✅ | ✅ (own team) | ❌ |
| Manage projects | ✅ | ✅ (filtered) | ❌ |
| Manage clients | ✅ | ✅ | ❌ |
| Manage tasks | ✅ | ✅ | ❌ |
| Manage roles | ✅ | ❌ | ❌ |
| View all reports | ✅ | ✅ (filtered) | ❌ |
| Access UI Settings | ✅ | ❌ | ❌ |
Step 5: API Implementation
Our API layer handles all data operations between the frontend and Sanity. We built RESTful endpoints for each major entity, with proper authentication checks and error handling on every route.
Core API Routes:
Each endpoint follows consistent patterns for request/response handling, making the API predictable and easy to work with. Authentication is verified on every request, and role-based permissions determine what data is accessible.
| Endpoint | Methods | Purpose |
|---|---|---|
| /api/timesheets | GET, POST, PUT | Time entry CRUD |
| /api/timesheets/[id] | PATCH, DELETE | Single entry operations |
| /api/team/weekly | GET | Team weekly stats |
| /api/team/members/[id] | GET, PUT, DELETE | Member operations |
| /api/team/pending-approvals | GET, POST | Approval workflow |
| /api/projects | GET, POST | Project management |
| /api/clients | GET, POST | Client management |
| /api/reports | GET | Report data |
Key Decisions, Tradeoffs, and Learnings
Every project involves difficult choices. Here are the key decisions we made, the tradeoffs we accepted, and what we learned from each.
1. Build vs Buy: Choosing Sanity Over SaaS
- Decision: We chose to build our own Harvest-like system inside Sanity instead of using Harvest or another time tracking SaaS.
- Tradeoff: This increased upfront engineering effort but eliminated long-term subscription costs and platform constraints.
- Learning: Owning the platform is significantly more valuable when time tracking is core to your business operations.
2. Week-Level Approval vs Individual Entry Approval
- Decision: We approve entire weeks rather than individual entries.
- Tradeoff: Less granular control, but matches how teams actually review time.
- Learning: This dramatically simplified the approval workflow and matched user expectations.
3. Pre-Invited Users Only
- Decision: Unlike open signup, admins must create users first.
- Tradeoff: Extra step for onboarding, but better security for internal tools.
- Learning: This provides enterprise-grade access control without complex invite systems.
4. Sanity as Database vs Traditional Database
- Decision: Used Sanity Content Lake instead of PostgreSQL or MongoDB.
- Tradeoff: Not optimized for time-series at massive scale, but perfect for teams up to 50+ users.
- Learning: Sanity’s flexibility and built-in Studio made development faster than a traditional stack.
5. Optimistic UI for Time Entry
- Decision: Updates appear immediately before server confirmation.
- Tradeoff: More complex error handling required.
- Learning: This transforms the UX for data-entry applications — the app feels instant.
Final Thoughts
Building a Harvest-like time tracking tool doesn’t require years of work. It requires clear data structure, strong fundamentals, and disciplined execution.
We built this platform in less than 3 months to prove a simple point: when your content model is right, everything else moves faster.
Instead of obsessing over features, focus on fundamentals. These principles guided our development and will serve any similar project well:
- Clear, intentional data modeling
- Portable schemas that scale
- User-first workflows
- Performance-ready architecture
- Clean separation between data and presentation
Get the Code
Ready to explore the implementation details? The complete source code is available for review and reference.
- see it live with a personal 1:1 walkthrough
- get the code from our GitHub repo
The repo includes:
- All 11 Sanity schemas
- Next.js application
- GROQ queries library
- Email templates for reminders