Key Takeaways
- Clean up WordPress before migrating – old drafts, unused media, and dead shortcodes only create headaches once you start transforming content.
- Start with a simple 1:1 schema that mirrors WordPress; you can refine Sanity’s structure later once the migration is safely complete.
- Use the WordPress REST API instead of XML for most migrations. This preserves things like alt text, taxonomies, and custom fields that XML often loses.
- Make migration scripts idempotent so you can rerun them safely without creating duplicates when something inevitably breaks.
- Protect your SEO equity by exporting every URL, mapping clean 301 redirects, and carrying over metadata from plugins like Yoast or Rank Math.
Migrating from WordPress to Sanity means pulling your content through the REST API, converting HTML into Portable Text, and importing documents while keeping relationships and media references intact. Simple enough in theory. In practice, migrations tend to hide a few surprises. Most issues don’t come from the migration itself, but from edge cases in content and integrations.
In this guide, we’ll go deeper into the real-world version of that process – handling page builder content, protecting SEO equity, and validating migrations at enterprise scale.
This approach follows five clear steps:
- Prepare your content model.
- Extract WordPress data.
- Transform HTML and shortcodes into Portable Text.
- Import everything while preserving relationships.
- Validate the results before cutover.
If your site has a clean structure and straightforward content, this workflow usually works just fine. Complications, however, tend to change the calculation. Large media libraries, heavy page builder usage (Elementor, Divi, WPBakery), thousands of indexed URLs with meaningful SEO value, or intricate custom post type setups all increase the risk. The more custom your WordPress setup, the less predictable the migration becomes.
With complex projects, getting experienced support is vital. But whether you’re running the migration yourself or evaluating where outside help makes sense, understanding how the process works end-to-end is the starting point.
Step 1: Prepare Your Environment and Design Your Content Model
Successful migrations start long before you run a single script. The real safety net is preparation – cleaning your WordPress content and designing your Sanity schemas first. Sanity provides comprehensive migration documentation and a migration course that explain the technical mechanics. The approach below adds the production discipline that keeps real-world migrations from going sideways.
Clean WordPress Content First
Start by clearing the clutter. Delete obsolete drafts, revisions, and unused media before extraction. Then document any plugin-dependent fields that won’t transfer automatically – Yoast or Rank Math meta descriptions, canonical URLs, Open Graph images, and JSON-LD schema all need explicit mapping.
Next, hunt down dead shortcodes left behind by deactivated plugins. Those will break during HTML conversion. Audit custom post types and taxonomies too. Old plugin leftovers often linger for years, quietly adding complexity without delivering any real value.
Finally, plan a content freeze. Give yourself a 48–72 hour window rather than trying to maintain fragile sync jobs during migration. Trying to sync live content during migration usually creates more problems than it solves. Multidots’ enterprise methodology follows this approach: freeze content, migrate cleanly, then resume publishing.
Design Sanity Schema with 1:1 Mapping
Keep the schema simple at first. Mirror the WordPress structure so the migration stays predictable. Over-modeling early on tends to create unnecessary transformation problems.
A core post schema typically includes:
- Title.
- Slug.
- PublishedAt.
- Body (Portable Text).
- Excerpt.
- FeaturedImage (reference).
- Categories (array of references).
- Author (reference).
Authors become separate documents, enabling multi-author workflows and clearer ownership tracking. Taxonomies also become referenced documents, with categories and tags each receiving their own slugs, descriptions, and metadata.
Preserve WordPress-specific fields during migration. Meta descriptions, canonical URLs, and Open Graph images carry your SEO equity and should move across intact. The schema can evolve after launch once real editorial patterns become clear.
Technical Setup
With the content model in place, set up the environment. Install Node.js 20+ and configure memory flags for large datasets – --max-old-space-size=4096 prevents out-of-memory errors during transformation.
Create your Sanity project with separate production and development datasets, generate API tokens with write permissions, and configure the Sanity CLI locally.
Multidots’ migration methodology emphasizes thorough pre-migration cleanup and schema planning. Get this stage right and a migration can take a few days. Skip it, and the same job can stretch into months.
Step 2: Extract WordPress Data via REST API or XML
This is where many migrations start wobbling. The key decision is choosing between REST API and XML. The answer as to which is best for your migration comes down to how complex your content is. For most enterprise migrations, REST API is the safer default.
Choose REST API when you need:
- Drafts and private content.
- Custom fields with accurate data.
- Complete taxonomy relationships.
- Reliable media metadata including alt text.
- Complex content architectures.
Choose XML when you have: a simple published-only blog, can live with metadata gaps, or have limited technical resources for API authentication.
REST API Implementation
You can find the endpoint for your WordPress REST API at yoursite.com/wp-json/wp/v2/. To authenticate, generate an Application Password: In your WordPress admin, go to Users → Application Passwords, create a new one, and copy it for your migration script.
REST API gives you access to drafts, custom fields (when exposed to REST), full taxonomy data, and detailed media metadata including alt text and captions. That’s why most enterprise migrations use it, allowing metadata to come across intact. Trying to guess missing alt text after migration wastes time and undermines accessibility.
XML Limitations
XML exports are simpler but more limited. By default they include only published posts and pages. Authors, categories, and tags must be exported separately through WordPress’s built-in export tool, and their relationships then rebuilt manually.
Media is where things get tricky. XML doesn’t bundle image files, so you’ll download them separately and rebuild metadata (alt text, captions, attachment relationships) from scratch. That manual step is exactly where errors creep in, which the REST API neatly avoids.
Sanity Configuration
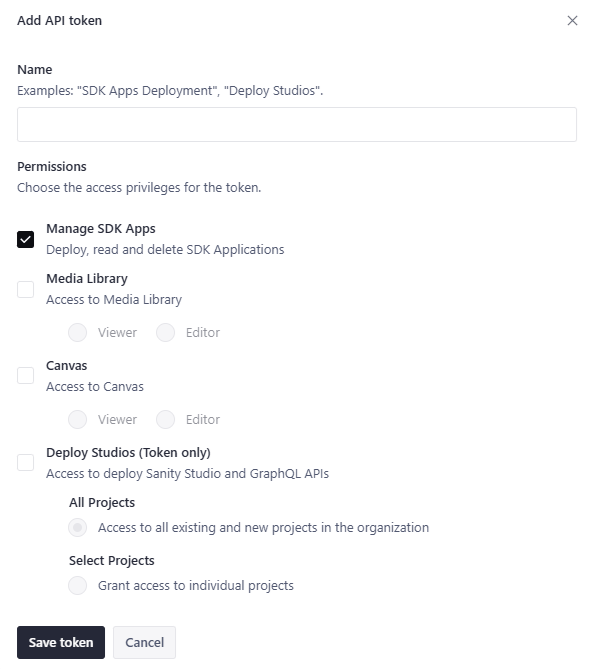
Next, generate Sanity API tokens with read and write permissions in your Sanity project dashboard. Write tokens allow migration scripts to create documents; read tokens let you verify imports.
- Go to your project in Sanity Manage.
- In the left-hand menu, open Settings → API → Tokens.
- Click Add new token.
- Give it a clear name.
- Select the appropriate role.
Once done, configure the Sanity CLI locally using sanity init and authenticate with your project ID. Your migration scripts will use these credentials to write content into your Sanity dataset.
Step 3: Transform Content to Portable Text and Handle Page Builders
Converting HTML to Portable Text sounds straightforward until you consider WordPress’s many content formats and page builders. At that point, generic migration scripts often fall apart.
Core HTML Transformation
The core conversion process follows a clear pattern. Use @portabletext/block-tools for HTML parsing and jsdom for DOM manipulation. Parse the HTML into a structure you can work with, convert it into Portable Text blocks while preserving semantic meaning, and transform inline images into Sanity asset references so relationships stay intact.
Shortcodes need special handling. Identify them with regex patterns, then map each one to Portable Text custom blocks that preserve the original functionality. Gutenberg blocks are usually easier, as most core blocks translate cleanly to Portable Text equivalents. Custom Gutenberg blocks, however, still require explicit schema mapping based on your content model.
Page Builders Need Custom Handling
Page builders complicate things. Tools like Elementor, Divi, and WPBakery store content as proprietary JSON structures rather than semantic HTML. They’re built for visual editing rather than portability.
Before deciding how to handle them, measure the scale of the problem. Query your WordPress database to see how widely page builders are used across your content, then review the layout complexity on your most important pages.
From there, choose an approach that fits the usage pattern:
Light usage (under 10% of content):
Selective manual rewrites are often cheaper than building custom transformers. Identify your highest-traffic pages and recreate them directly in Sanity Studio.
Moderate usage (10–40% of content):
A hybrid approach works best. Parse common patterns programmatically to extract text, while accepting that complex layouts will need manual rebuilding.
Heavy usage (40%+ of content):
Custom transformer development becomes a core part of the migration budget. Parse builder data structures, map common sections to Portable Text blocks, and extract text content – even if the final layout is rebuilt on the frontend.
One final reality check: perfect layout preservation is rare and expensive. Focus on preserving what actually matters – text, images, and relationships – rather than pixel-perfect replicas that lock you into outdated designs.
For enterprise migrations with significant page builder dependencies, Multidots’ development approach involves custom transformers capable of parsing Elementor JSON and mapping Divi modules beyond the reach of generic scripts.
Step 4: Import Content and Media with Preserved Relationships
Safe migration scripts should survive repeat runs without causing carnage. Most of the technical pain teams hit – rate limits, broken asset references, validation errors – usually come from treating migration like a one-and-done job, instead of something iterative. Most successful migrations run multiple times before final cutover.
Write Idempotent Import Scripts
Use idempotent mutations such as createIfNotExists or createOrReplace, so repeated runs do not churn out duplicates or other avoidable mess. Derive document IDs from WordPress IDs with patterns like post-{wp_id} to keep re-runs clean and predictable.
Import order matters too. Start with entities that have no dependencies, such as authors and taxonomies, then bring in content that points to them, such as posts. Keep a WordPress ID to Sanity ID mapping table for relationship resolution.
Your Sanity Client should be configured with the project ID, dataset name, an API token with write access, and useCdn: false so writes go to origin servers. For larger content libraries, process documents in batches of 100–500, use Node.js memory flags (--max-old-space-size=4096), and add progress tracking so you can see what’s happening without squinting at the terminal.
Handle Media Migration Carefully
Treat media as its own pipeline, with separate error handling. Media failures are one of the most common causes of broken migrations. A common setup is to upload assets to Sanity’s Content Lake, track ID mappings, and then update content references. Keeping this separate helps failed image uploads stay in their lane instead of mangling your content structure.
Alt text preservation needs explicit extraction from WordPress’s _wp_attachment_image_alt meta field in the wp_postmeta table. Featured images should map from WordPress’s _thumbnail_id post meta to Sanity document field references.
For uploads, use concurrency with throttling at around 5–10 simultaneous uploads, apply exponential backoff for rate limits, and check whether assets already exist before uploading by using a content hash or original URL as a lookup key. Large media libraries are much easier to manage with batched processing and resumable upload patterns for files over 10MB.
Step 5: Preserve SEO and Validate Before Launch
This is where migrations either protect traffic or quietly wipe it out. Most of the technical work happened earlier, but redirects and metadata determine whether rankings hold steady or slip.
Comprehensive SEO Preservation
Start by exporting a complete WordPress URL inventory: posts, pages, categories, tags, and custom post types. Map every old URL to its new Sanity-powered equivalent using 301 redirects. Even small gaps matter, losing rankings on niche pages costs more traffic than many teams expect.
Avoid redirect chains. Send each redirect straight to its final destination. WordPress → staging → production chains slow page loads and confuse search engines.
Implementation depends on your stack. Options include Next.js middleware with edge storage for dynamic routing, Netlify _redirects files for static sites, or server-side redirect services for complex rules.
Migrate Metadata WordPress Plugins Handled Invisibly
Meta descriptions typically live in Yoast or Rank Math post meta. Extract these values, map them to Sanity fields, and regenerate them in your frontend <head> tags. Canonical URLs need the same handling: preserve custom overrides and implement them in frontend templates.
Open Graph data – title, description, and image – controls how links appear on social platforms. Extract these values from WordPress and map them to Sanity fields that your frontend can access.
Structured data is the biggest challenge. WordPress SEO plugins inject JSON-LD schema during rendering. Audit the schema types your site uses – Article, Person, Organization, BreadcrumbList – then extract the configuration, map it to Sanity fields, and regenerate it in frontend templates. Complex schema types may require rebuilding. For peace of mind, validate the output with Google Rich Results Test.
Production Validation Checklist
Before launch, confirm content integrity: all documents imported successfully, required fields are populated, and references resolve correctly. Crawl the site with tools like Screaming Frog to identify broken internal links where WordPress IDs weren’t properly mapped.
Check that featured and inline images render correctly and that alt text appears in the HTML output. Use Google Rich Results Test on sample URLs to confirm schema markup validates. Compare page load times against your WordPress baseline and verify CDN caching works correctly.
Multidots’ SEO-preservation methodology combines comprehensive redirect mapping with zero-downtime cutover architecture, enabling News Corp and Ask Media Group to migrate without search ranking drops.
What WordPress Features You Need to Rebuild in Your Frontend
Content migration handles the data side of things – posts, pages, media, taxonomies, and metadata move to Sanity without much drama. But presentation features are another story. Sanity is a content backend, not a full website platform, which means anything related to how content appears on your site needs to be rebuilt in the frontend.
Here are the WordPress features that Sanity doesn’t provide:
- Related posts: Custom GROQ queries based on categories, tags, or content similarity.
- Archives: Date-based and category archives require frontend routing and query logic.
- Search: Integration with Algolia, Elasticsearch, or a custom search implementation.
- Comments: Third-party services like Disqus or Commento, or custom solutions.
- RSS feeds: Generate from Sanity data in frontend or API routes.
- Breadcrumbs: Frontend implementation based on document relationships.
- Pagination: Custom logic to chunk query results.
Plan your frontend development time accordingly. Migrating the content usually takes days. Rebuilding the presentation layer can take weeks. This is where most project timelines expand. That split is intentional: content concerns live in the CMS, while presentation lives in frontend code.
There’s a payoff for the extra work. With presentation handled in code, you can tailor features across channels. Your website’s related posts might show three articles while your mobile app shows five. RSS feeds can expose different metadata than the site itself. The upfront rebuild creates flexibility when new channels come along.
When Enterprise Sites Benefit from Professional Migration Support
Straightforward sites can usually follow the methodology above without much drama. Enterprise environments are another story. More moving parts mean more ways things can go sideways – and when they do, professional support often saves teams from expensive do-overs.
Here are a few common signals that complexity is creeping in:
Heavy page builder content: Elementor, Divi, or WPBakery dependencies typically need custom transformer development beyond generic HTML converters.
Large media libraries: Thousands of assets require optimized concurrency, error handling, and resumable upload patterns.
Multisite installations: Cross-site relationships and shared taxonomies introduce mapping complexity generic scripts rarely handle well.
High SEO stakes: Traffic-dependent sites need meticulous redirect mapping and structured data preservation.
Zero-downtime requirements: High-traffic properties benefit from phased rollout architecture with monitoring and rollback capability.
Limited JavaScript expertise: PHP-focused WordPress teams may not have the headless experience needed for frontend rebuilding.
Having delivered 300+ enterprise migrations across the WordPress (VIP Gold Partner) and Sanity (Agency Partner) ecosystems, Multidots has the expertise and experience to manage these complexities and deliver smooth enterprise WordPress-to-Sanity migrations. Custom transformer development tackles complex page builder content that typically breaks generic migration scripts. Phased cutover architecture supports high-traffic sites with rollback capability if issues surface.
Multidots’ comprehensive SEO preservation methodology covers structured data migration, redirect mapping, and metadata transfer to protect search performance. Experience serving publishers such as News Corp and Ask Media Group means the process has been tested in environments where content velocity is high and downtime isn’t an option. Post-migration support helps editorial teams through the adjustment period as new workflows settle in.
Your Path to a Safe Sanity Migration
Safe WordPress-to-Sanity migration follows a clear path: prepare your content model, extract WordPress data, transform it to Portable Text, import with relationships intact, and validate everything before launch. Teams with straightforward sites and solid JavaScript expertise can often execute this approach successfully.
Where things get trickier, the same complexity signals tend to show up: extensive page builder content, large media libraries, multisite structures, high SEO stakes, tight timelines, or limited JavaScript experience for frontend rebuilding.
Multidots has completed 300+ enterprise migrations as both a WordPress VIP Gold Partner and Sanity Agency Partner. Custom transformer development, phased cutover architecture, and comprehensive SEO preservation address the complexity that causes generic approaches to fall short.
The difference between a smooth migration and a failed one is usually preparation, not tooling.
Schedule a migration assessment with Multidots for complexity evaluation, timeline estimation, and approach recommendations based on your specific content architecture.