The Ultimate Step-by-Step Guide to Migrate from Sitecore to WordPress
Learn how to seamlessly migrate from Sitecore to WordPress with our comprehensive step-by-step migration guide
Table of Contents
Okay, you’re thinking about migrating from Sitecore to WordPress.
First off, kudos for exploring this exciting change! You probably already know this is a very detailed guide on the topic (no stone left unturned here).
But hey, we get it. Your time is valuable, and let’s face it, reading a lengthy guide on a Friday evening isn’t everyone’s idea of fun.
So, we've made it easy for you.
Here’s a quick roadmap to help you navigate this guide and get straight to the answers you’re looking for:
- Start here if you want to discover the benefits of migrating to WordPress for your technical, editorial, and marketing teams.
- Start here for a deep dive into the ROl and cost comparison between WordPress and Sitecore.
- Start here if you want to address common objections people often have about Sitecore to WordPress migration.
- Start here for a DIY step-by-step guide on how to handle the migration yourself.
- Start here if you have specific questions about your unique migration needs.
- Start here to download this guide as a PDF-perfect for your next flight or to share with your team.
- Or skip all of that and book a free 30-minute call with us. Let's cut to the chase and tackle your questions head-on.
So, what are you waiting for?
Dive in, find the answers you need, and let’s get started on this journey together!
WHY YOU SHOULD MIGRATE FROM SITECORE TO WORDPRESS?
If you are already convinced to migrate from Sitecore to WordPress, then skip ahead to the section — How to migrate.
However, if you want to explore a few reasons and benefits for migrating to WordPress from Sitecore, read on.
The Benefits of Migrating from Sitecore to WordPress
Migrating from Sitecore to WordPress can offer significant advantages for various teams in your organization. Here's a closer look:
| Benefits | Technical Teams | Editorial Teams | Marketing Teams |
|---|---|---|---|
| Productivity | Easier platform with extensive support. | Intuitive interface for efficient content management. | SEO-friendly with extensive plugin ecosystem. |
| Customization | Highly customizable with integration options. | User-friendly CMS with customizable content blocks. | Built-in marketing tools and integration options. |
| Cost-Effectiveness | Open-source, no licensing fees & lower running cost. | No need for extensive training + easy onboarding. | Cost-effective campaigns with lower TCO. |
| Flexibility | Scalable setup with multiple hosting options. | Easy collaboration with multiple user roles. | Seamless integration with CRM and other systems. |
| Security | Regular security updates and a large support community. | Reliable backups and strong security practices. | Data protection compliance and e-commerce options. |
ROI for Sitecore to WordPress Migration
Here’s an approximate side-by-side cost comparison between Sitecore and WordPress for a large-scale enterprise website.
| Cost | WordPress | Sitecore XM (On-Premise) | Sitecore XM Cloud |
|---|---|---|---|
| License Cost (Annual) | $0 | $80,000 to $150,000+ | $100,000 to $200,000+ |
| Design and Build (One-time) | $50,000 to $100,000 | $100,000 to $300,000+ | $100,000 to $200,000+ |
| Cloud and Hosting (Annual) | $25000+ | $100,000+ | $0 |
| Average Cost of 5 Premium Add-ons (Annual) | $25000+ | $100,000+ | $60,000+ |
| Support and Maintenance (Annual) | $12,000 to $24,000 | $25,000 to $75,000 | $30,000 to $100,000 |
| Non-Production Installations (Annual) | $0 | $20,000 to $50,000 | $0 |
| Total Cost (1st Year) | $100K to $180K | $400K to $800K | $300K to $600K |
| Total Cost (3 Years) | 🏆 $200K to $350K | $1M to $2M | $700K to $1.5M |
Note: These estimates are based on a website with approximately 1 million monthly visitors. All amounts are in USD, reflecting pricing data as of October 2024.
WordPress not only provides a more affordable and easier-to-install solution but also offers more flexibility and customization options. The active community of developers and users further supports innovation and ensures timely support.
Contrary to conventional opinions, WordPress is an enterprise-competent CMS, and you can get all of Sitecore’s built-in enterprise features on WordPress at a fraction of the cost.
If You Still Have Any Concerns on Switching From Sitecore to WordPress? Let’s Address Them:
Migrating from one CMS to another is a big decision, and naturally, you have questions and concerns. If you’re considering moving from Sitecore to WordPress, you might be wondering if it’s the right fit for your organization. Let’s dive into some of the most common objections and questions—and show you how WordPress can meet your needs.
1. "Can WordPress handle the scale and complexity of our organization?"
Absolutely! WordPress powers some of the biggest websites in the world, like The New York Times and Rolling Stone. Whether you’re handling millions of visitors or managing multiple subsites, enterprise hosting solutions like WordPress VIP and WP Engine ensure scalability without breaking a sweat.
2. "Will WordPress support high-traffic volumes during peak times?"
Yes, WordPress is built to handle high traffic when paired with the right infrastructure. With managed hosting, caching tools, and CDNs like Cloudflare, your site can seamlessly manage traffic spikes without downtime.
3. "Sitecore offers extensive customization. Can WordPress provide the same level of flexibility?"
WordPress is known for its flexibility. Its massive ecosystem of plugins and themes allows for deep customization. And if something unique is needed, custom development can bridge any gaps. From design tweaks to complex functionalities, WordPress is up to the challenge.
4. "What happens to our current integrations with CRMs, ERPs, and marketing automation tools?"
WordPress integrates easily with tools like Salesforce, HubSpot, and Zapier through plugins or APIs. Even custom integrations can be built to ensure a seamless connection between your tech stack and WordPress.
5. "WordPress is open-source. Is it secure enough for our needs?"
Yes, WordPress is secure—if managed correctly. Regular updates, robust plugins like Wordfence, and enterprise-grade hosting solutions provide excellent protection. Managed hosting providers also include advanced firewalls and DDoS protection, ensuring your site stays safe.
6. "What measures will you take to ensure compliance with industry standards like GDPR, HIPAA, or FERPA?"
WordPress can meet compliance standards through specific plugins and configurations. Tools like WP GDPR Compliance or custom solutions ensure your site adheres to regulations. For sensitive data, encrypted connections and secure hosting further strengthen compliance.
7. "We rely on personalized content delivery with Sitecore. Can WordPress handle personalization at scale?"
Yes, WordPress can support dynamic, personalized content delivery using tools like WP Fusion and CRM integrations. Whether it’s showing tailored content to specific user segments or tracking user journeys, WordPress has you covered.
8. "How will this impact our multi-lingual and multi-site management?"
WordPress excels in this area with features like the Multisite functionality and plugins like WPML for multi-lingual content. You’ll have the tools to manage multiple sites or languages with ease. Multisite will work as a different site from the front-end and will have a centralized back-end system.
9. "How complex is the migration process? Will there be any downtime?"
Migration complexity depends on the size and structure of your site, but with the right team, it’s a smooth process. By using staging environments, we ensure minimal downtime and test everything before going live.
10. "What happens to our existing data, SEO, and content architecture?"
Your existing data and SEO won’t be lost. A professional migration plan ensures your content, metadata, and URLs transfer correctly, preserving your SEO rankings and content structure.
11. "Sitecore is expensive, but it works well for us. What’s the ROI of moving to WordPress?"
WordPress eliminates licensing fees, and the cost of plugins and hosting is significantly lower than Sitecore. This translates into savings that can be reinvested into growth initiatives while still delivering a top-notch website experience.
12. "Are there hidden costs, such as for plugins, hosting, or support?"
There are no hidden costs, but it’s essential to budget for hosting, premium plugins, and occasional maintenance. The overall costs are transparent and predictable, with significant savings compared to Sitecore.
13. "Our team is already trained on Sitecore. How difficult will it be to transition to WordPress?"
WordPress is known for its user-friendly interface, making the transition straightforward for most teams. A few training sessions can help your team get up to speed and fully leverage WordPress’s capabilities.
14. "Will we need to hire WordPress-specific developers or agencies?"
That depends on your requirements. Many organizations find that WordPress’s ease of use reduces the need for frequent developer support. For advanced customization, hiring a WordPress expert is a good option.
15. "Sitecore offers robust enterprise-level features. Does WordPress have equivalent tools for content workflows, user roles, and advanced analytics?"
WordPress offers similar tools through plugins and integrations. For workflows, plugins like PublishPress streamline approvals and editorial management. Advanced analytics can be achieved with tools like Google Analytics or integrations with BI platforms.
16. "Will WordPress support our ad revenue models, subscriptions, or gated content?"
Yes! Plugins like MemberPress, WooCommerce Subscriptions, and Ad Inserter make it easy to manage subscriptions, gated content, and ad revenue models.
HOW TO MIGRATE FROM SITECORE TO WORDPRESS
You've made the decision to move from Sitecore to WordPress—excellent choice! Now comes the exciting part where we transform that decision into action. In the below sections, we'll walk you through each step of the migration process, from initial planning to post-launch optimization.
Migration doesn't have to be intimidating. With the right approach and proper planning, you can ensure a smooth transition that preserves your content, maintains your SEO equity, and sets you up for success on your new WordPress platform. Whether you're a technical decision-maker, a content strategist, or a marketing lead, you'll find valuable insights to help navigate this journey.
Let's break down this process into manageable steps and get started with the most critical phase: strategy.
STEP 1: HIGH-LEVEL STRATEGY
Before diving into the technical aspects, let's map out a strategic approach to ensure your migration is successful. A well-planned migration strategy will save you time, resources, and potential headaches down the road.
1.1 When should we migrate?
Timing is everything when it comes to migrating your enterprise website. The right moment to make this transition isn't just about technical readiness—it's about business alignment too.
Here are some clear signals that it's time to consider migrating from Sitecore to WordPress:
- License renewal approaching: If your Sitecore license is up for renewal in the next 3-6 months, it's the perfect time to evaluate alternatives before committing to another year.
- Growing maintenance costs: When your Sitecore implementation requires increasingly expensive specialized developers or consultants.
- End-of-support for your version: If your Sitecore version is nearing end-of-life, rather than upgrading within Sitecore (which can be costly), this presents an excellent opportunity to switch platforms.
- Publishing bottlenecks: Content creators constantly waiting for developer assistance or facing workflow delays.
- Scalability challenges: Your business is growing, but your Sitecore implementation struggles to scale at a reasonable cost.
- Technical debt accumulation: Your Sitecore customizations have become unwieldy and difficult to maintain.
Enterprise-grade migrations can take several weeks to months depending on your website's complexity, content volume, and customization needs. The key is to start planning well before you face critical deadlines or technical emergencies.
Here's a quick way to decide when staying with Sitecore makes sense vs when switching to WordPress is the right call.
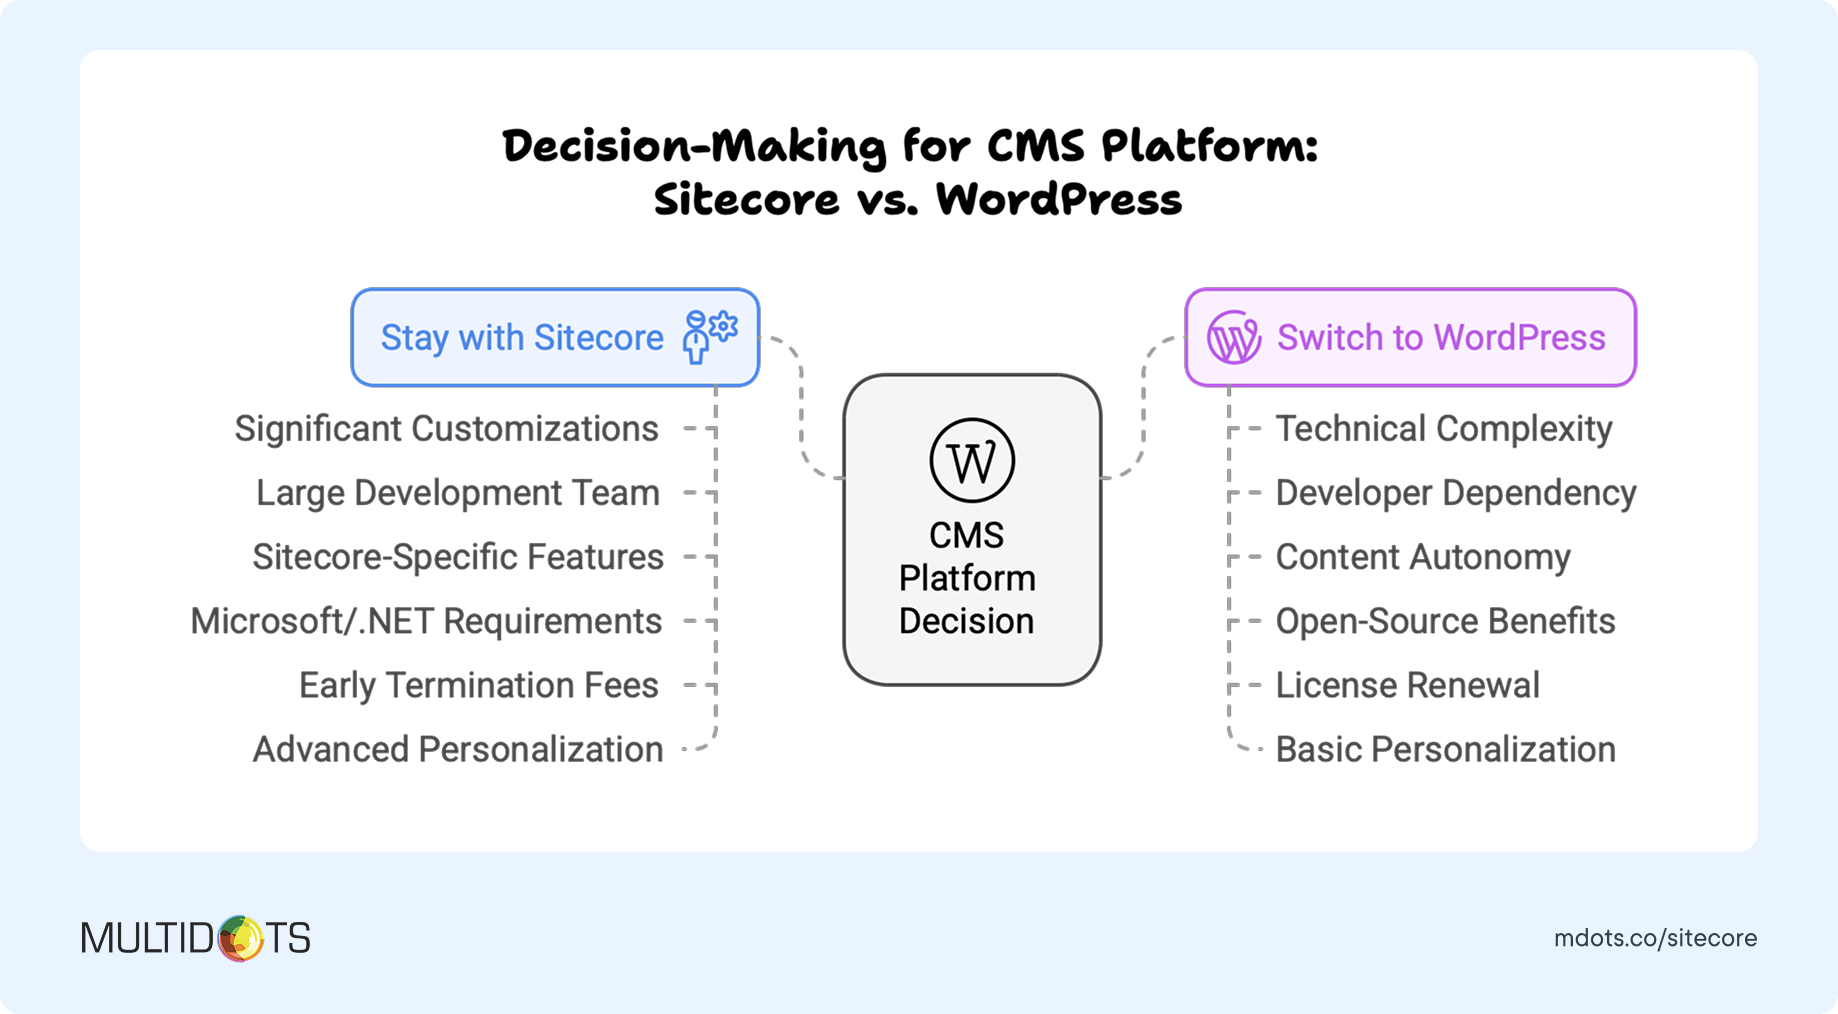
Remember, the best time to migrate is when you have sufficient runway—ideally 3-6 months before any critical deadlines—to ensure a smooth transition without rushing key decisions or implementations.
1.2 Which CMS should we migrate to?
While you're likely already considering WordPress since you're reading this guide, let's confirm why it's often the best choice for enterprises moving away from Sitecore.
WordPress powers over 43% of all websites on the internet, including enterprise sites for companies like Salesforce, Sony Music, The Walt Disney Company, and The New York Times. Its massive market share isn't accidental—it comes from offering exceptional value and capabilities.
Here's why WordPress stands out as the top alternative to Sitecore:
- Cost-effectiveness: Eliminate expensive licensing fees while maintaining enterprise-grade capabilities.
- Ease of use: Intuitive, user-friendly interface that requires minimal training for content creators.
- Flexibility: Highly adaptable to unique business needs through its extensive ecosystem.
- Vast talent pool: Access to a much larger pool of developers compared to specialized Sitecore expertise.
- Innovation pace: With thousands of contributors, WordPress evolves faster than proprietary alternatives.
- Enterprise-ready: With the right infrastructure and configuration, WordPress scales beautifully for enterprise needs.
Here's a quick features comparison of WordPress vs Sitecore (and other CMS - Sanity and AEM):
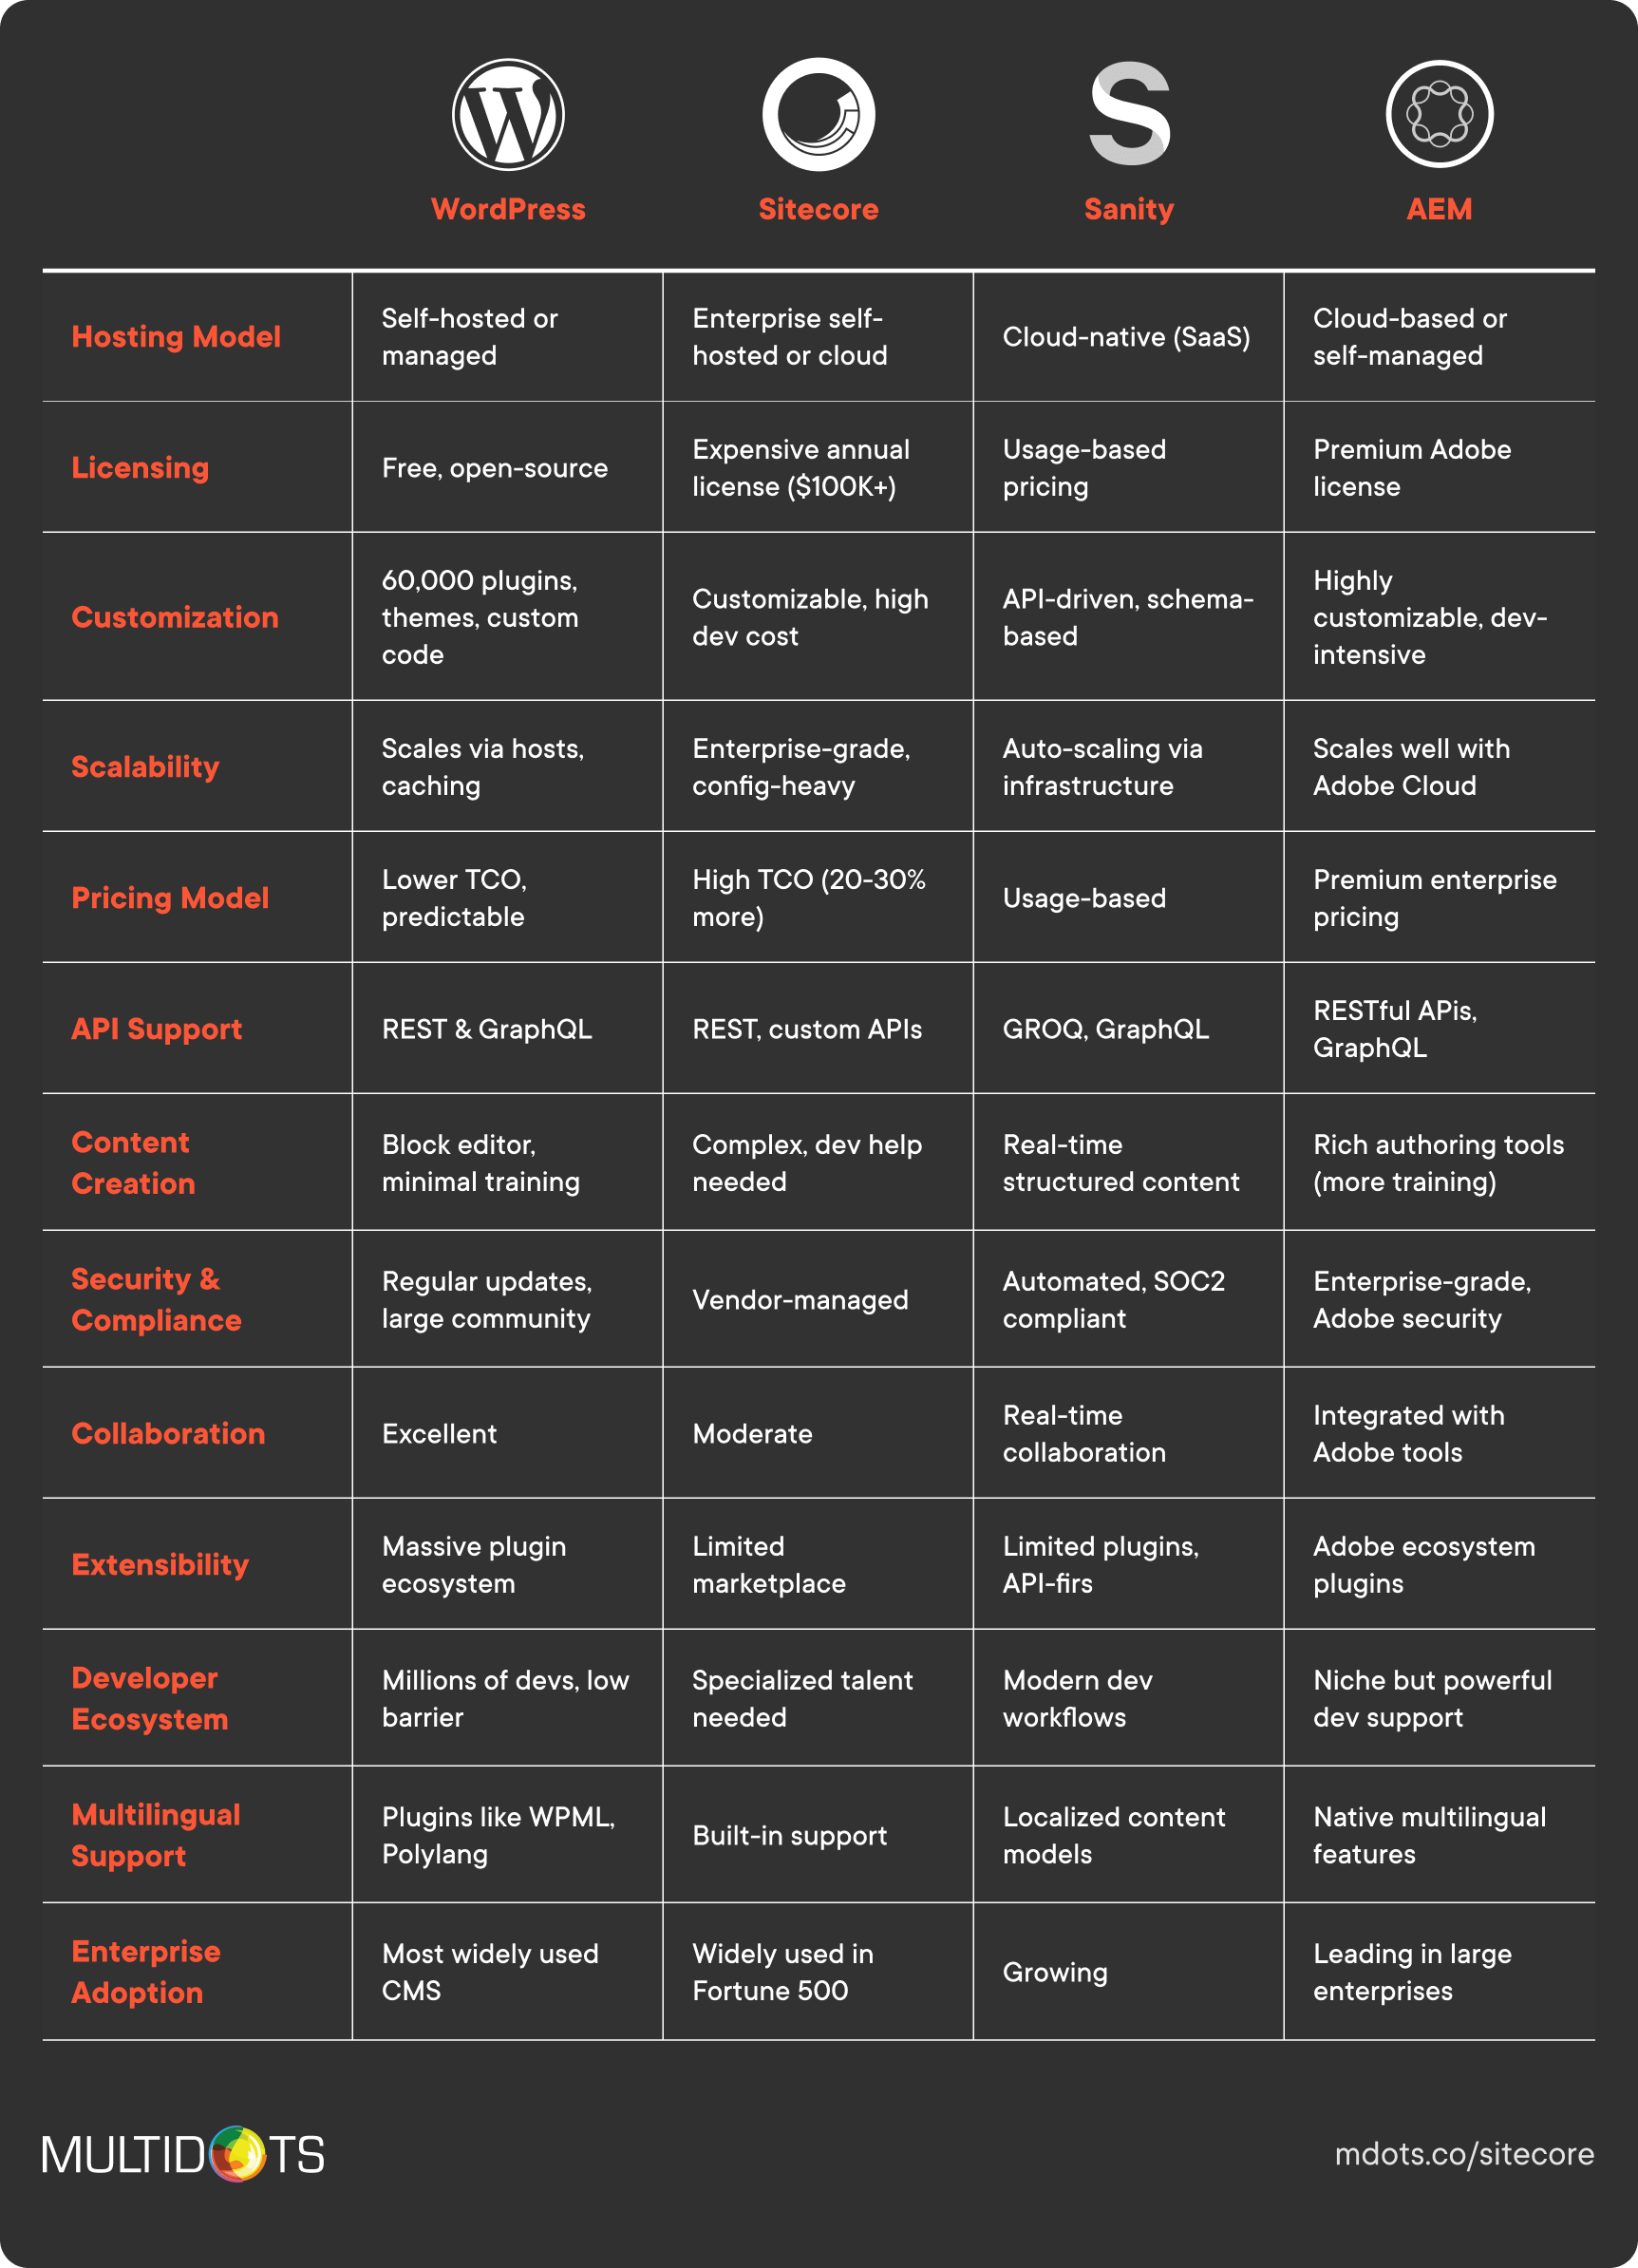
The strengths of WordPress align particularly well with organizations looking to improve content creation workflows, reduce total cost of ownership, and gain more flexibility in their digital ecosystem.
1.3 Same design or new design?
When migrating from Sitecore to WordPress, you have two options regarding your website's design: maintain your current design or take the opportunity to refresh it. Both approaches have their merits depending on your circumstances.
Choosing between these options isn't just about aesthetics—it's a strategic decision that impacts project timelines, budget, and overall success. Below we have shared a quick comparison of each approach.
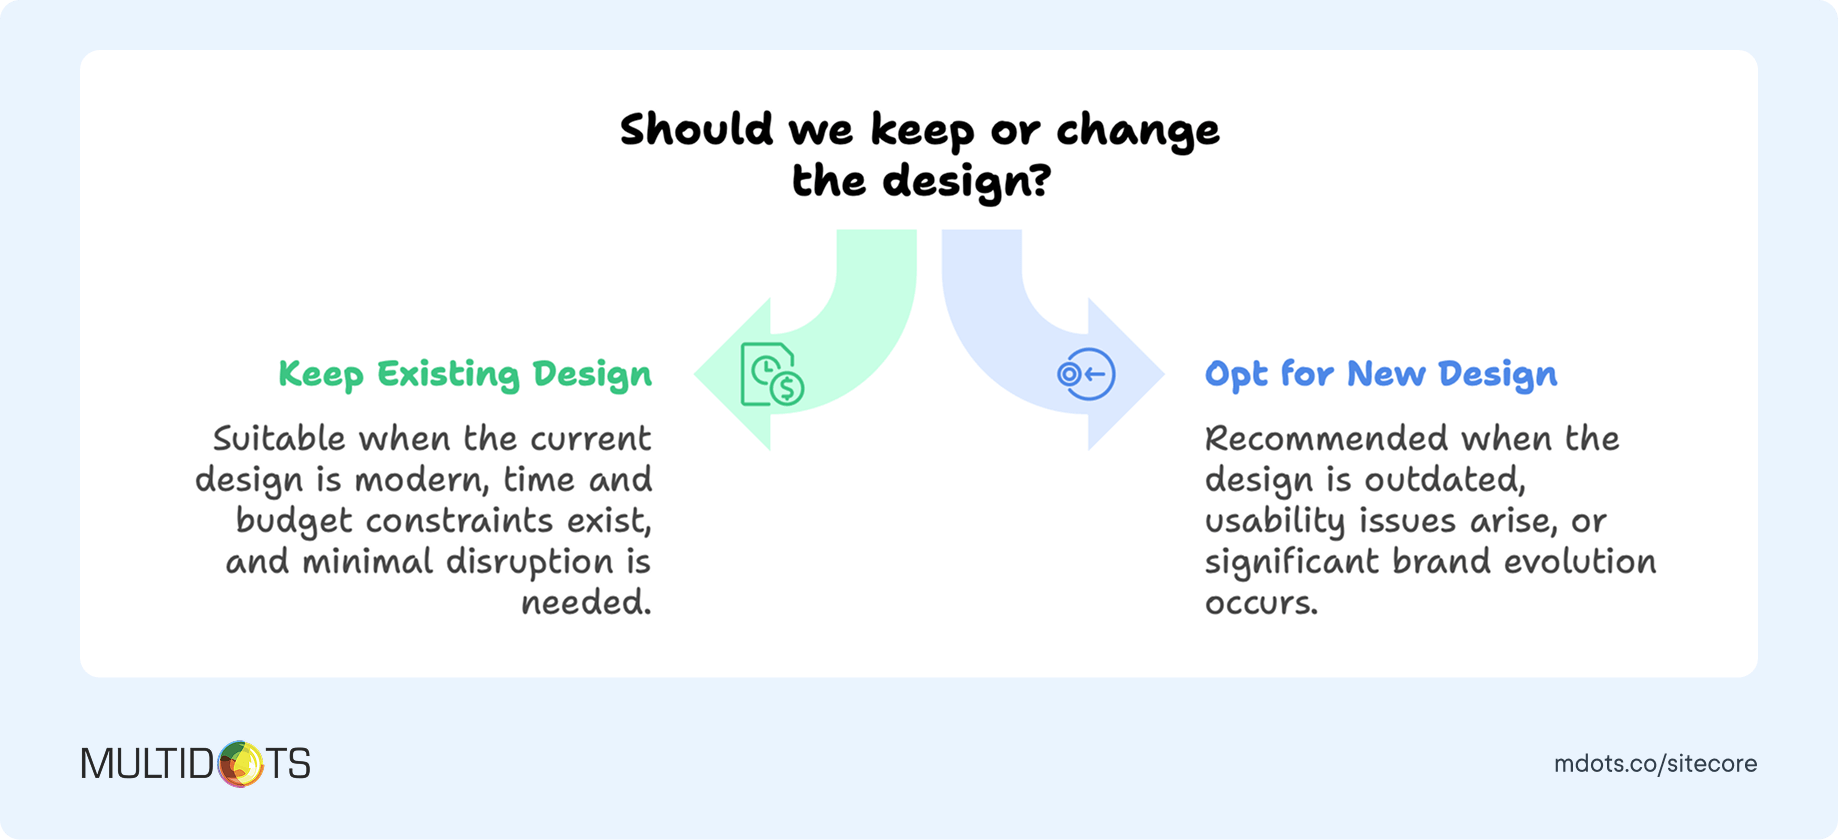
Remember that even if you choose to maintain your current design, you'll likely need some adjustments to optimize for WordPress's capabilities. A hybrid approach—keeping the overall brand look while improving specific components—can sometimes be the most practical solution.
1.4 Which Sitecore features do we want on the new website?
When migrating from Sitecore to WordPress, identifying which Sitecore functionalities are essential to your business operations is crucial. This ensures you don't lose critical capabilities in the transition while also avoiding unnecessary complexity.
WordPress offers powerful alternatives to most Sitecore features, often at a fraction of the cost and complexity. Let's map out the most common Sitecore features and their WordPress equivalents:
Common Sitecore Features and WordPress Alternatives
Before you begin the migration process, take inventory of the Sitecore features you're actually using—not just what you're paying for. Many organizations discover they're utilizing only a small percentage of Sitecore's capabilities but paying for the full suite.
Here are the common Sitecore features and WordPress alternatives.
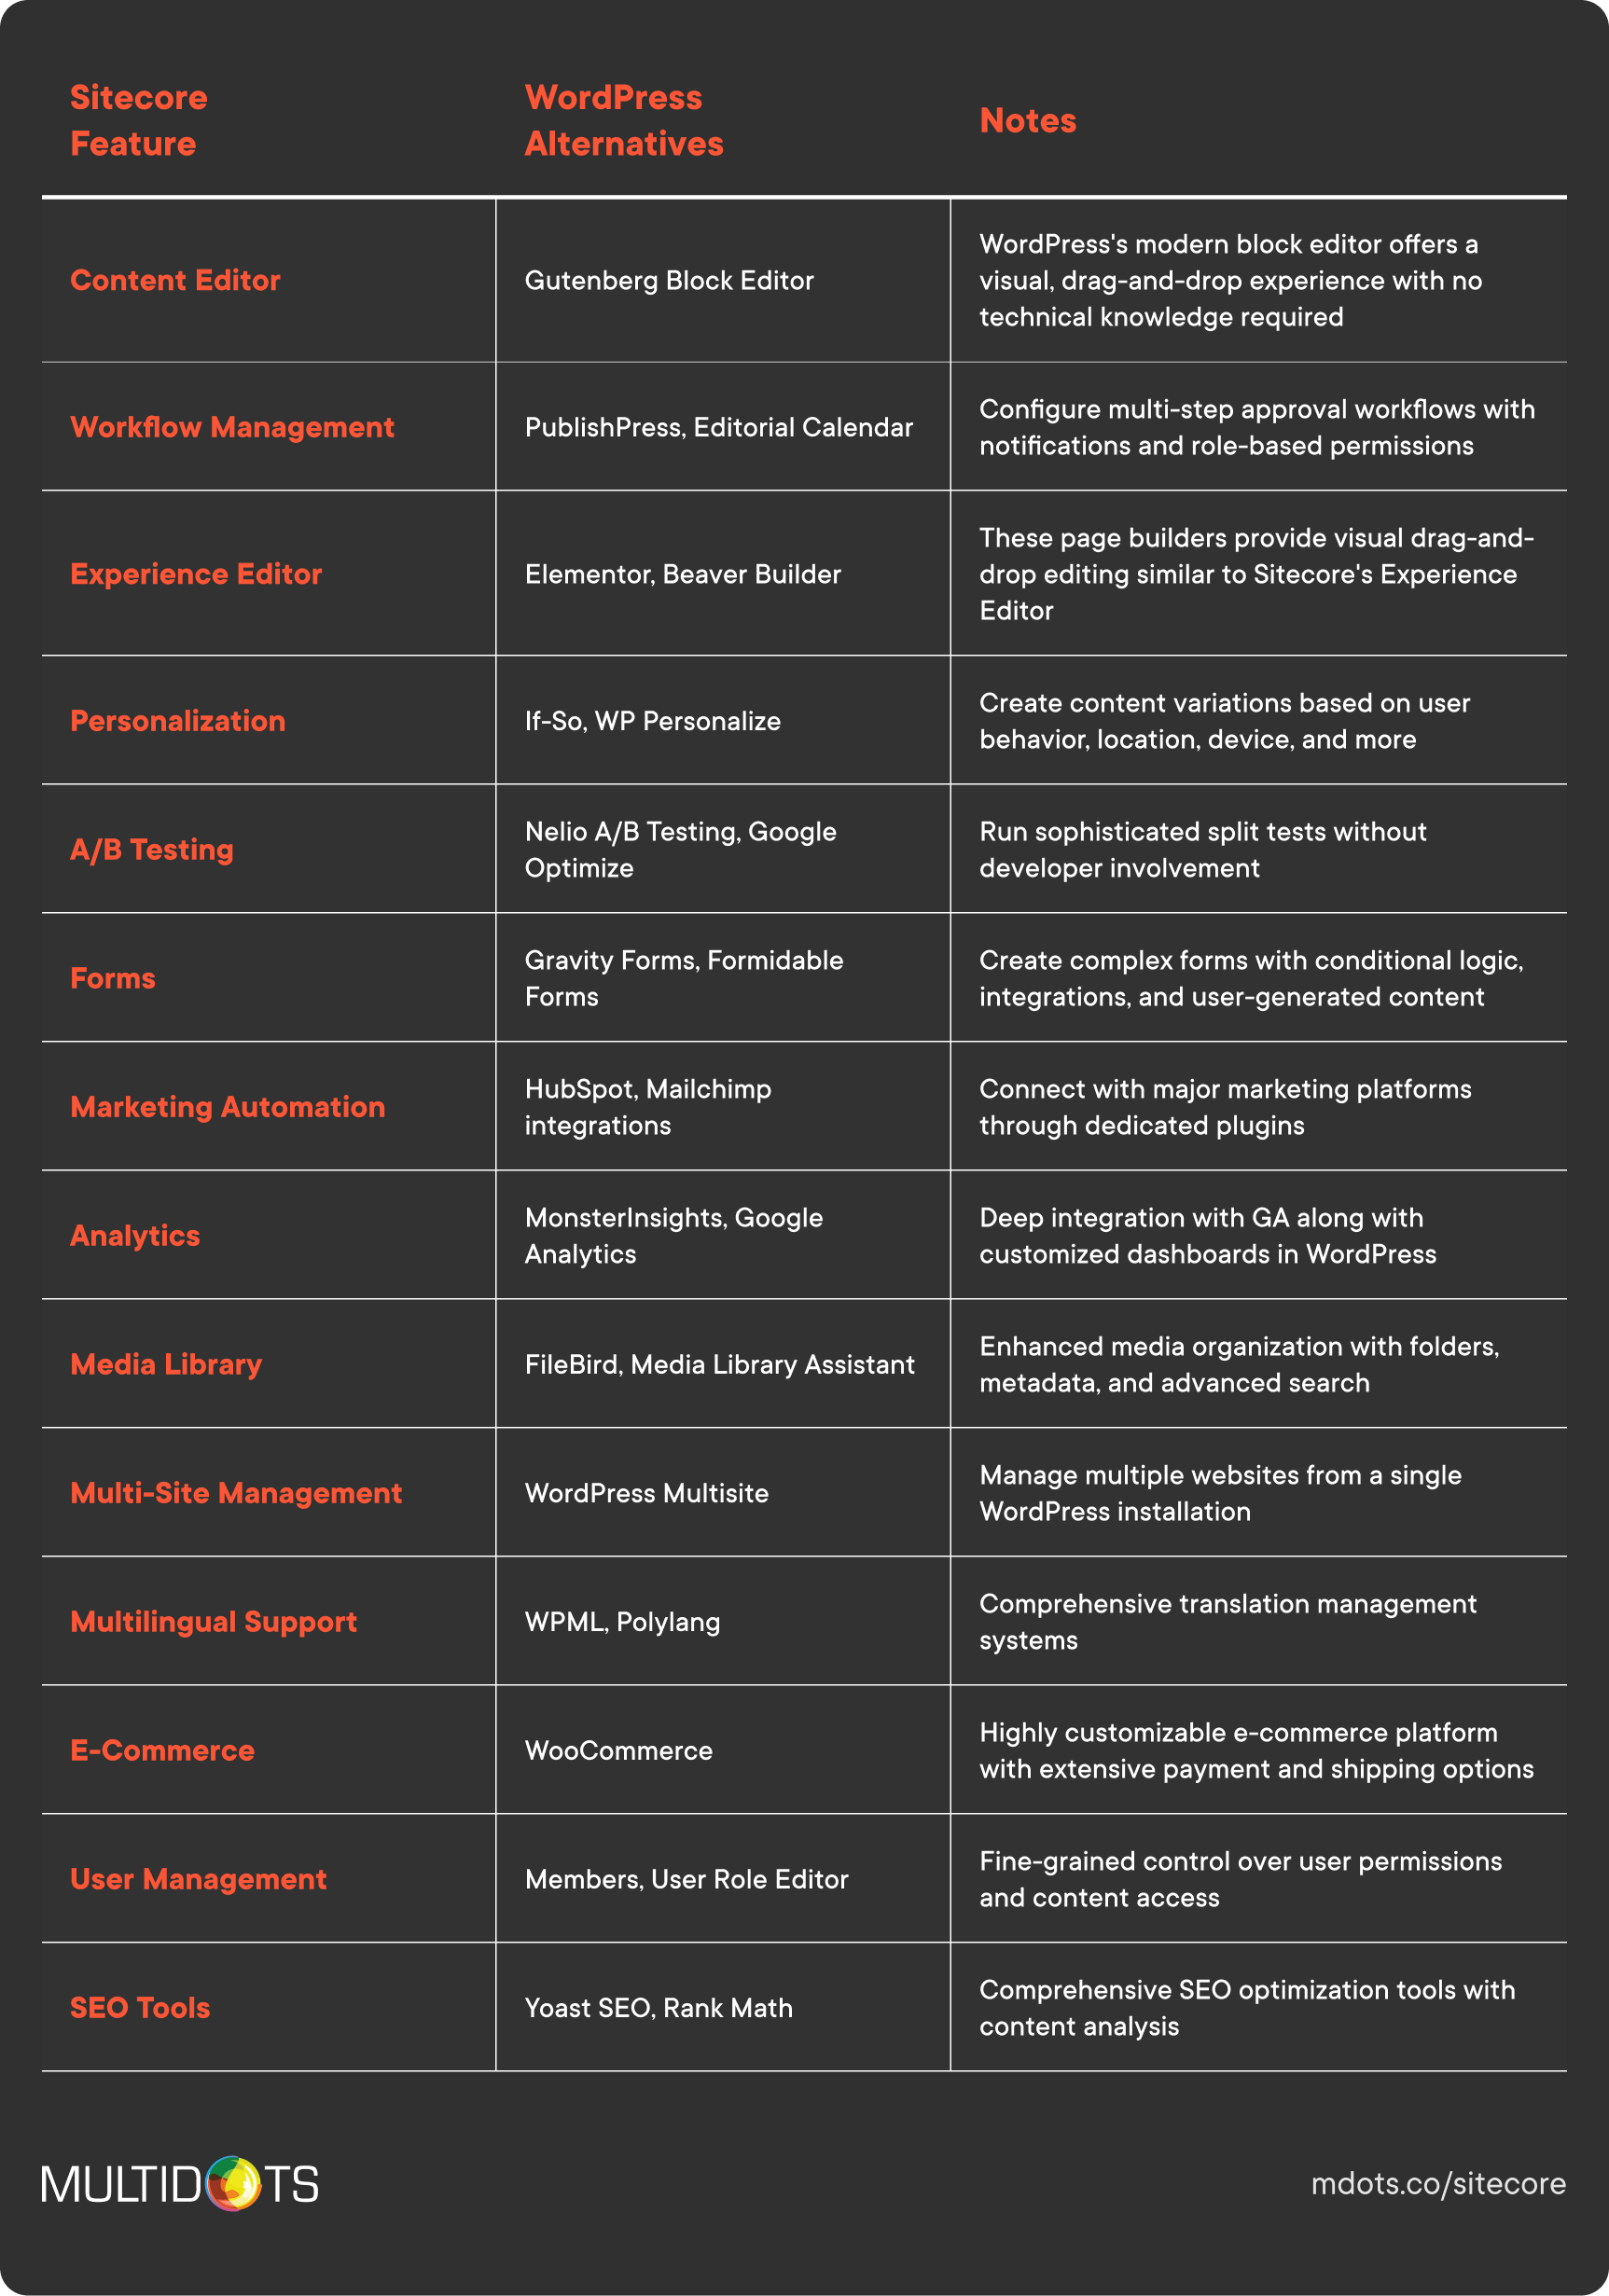
The beauty of WordPress is its flexibility—you can start with a streamlined setup and add functionality as needed, rather than paying for a full suite of features upfront.
Pro tip: Create a checklist of features you're actively using in Sitecore and prioritize them from "mission-critical" to "nice-to-have." This will help you focus your migration efforts on the most important capabilities first.
1.5 What third-party tools do we need integration with?
Your website doesn't exist in isolation—it's part of a broader technology ecosystem. When migrating from Sitecore to WordPress, mapping your existing integrations ensures business continuity and data flow between systems.
WordPress's open architecture makes it exceptionally integration-friendly, often offering more flexibility than Sitecore when connecting with third-party tools and services.

Use this table to catalog your current integrations and identify WordPress alternatives:
| Integration Category | Current Tool | Integration Method in Sitecore | WordPress Alternative | Integration Method |
|---|---|---|---|---|
| CRM | Salesforce | Sitecore Connect | WP Fusion, Gravity Forms Salesforce | API |
| Marketing Automation | Marketo | Custom | WP Marketo, Gravity Forms + Zapier | API, Webhook |
| Analytics | Google Analytics | Script injection | MonsterInsights | Plugin |
| Payment Gateway | Stripe | Custom | WooCommerce Stripe Gateway | Plugin |
| Email Marketing | Mailchimp | Custom module | MC4WP | Plugin |
| Social Media | Various | Sitecore Social Connected | Smash Balloon, Nextend Social | Plugin |
WordPress integrations generally fall into four categories:
A. Native WordPress Plugins
The WordPress repository contains over 59,000 free plugins, many specifically designed to integrate with popular services. These plugins are vetted, regularly updated, and often provide the simplest integration path.
B. Premium Integration Solutions
For enterprise needs, premium plugins often offer more robust features, dedicated support, and regular updates. Examples include WP Fusion (CRM integration) and Advanced Custom Fields PRO.
C. Custom API Integrations
For specialized needs, WordPress's REST API provides a powerful way to build custom integrations with practically any service that offers an API.
D. Integration Platforms
Services like Zapier, Integromat (now Make), or Workato connect WordPress with thousands of applications without custom coding.
WordPress's vast plugin ecosystem (59,000+ in the official directory) means you'll rarely need to build integrations from scratch. Additionally, REST API capabilities allow for custom integrations with virtually any service, while Zapier connects WordPress to 3,000+ apps without custom development.
During your planning phase, take inventory of all current integrations, their importance to your business processes, and how frequently they're used. This will help prioritize and budget for integration work during the migration.
1.6 Where should we host the new website?
Hosting is the foundation of your WordPress website's performance, security, and reliability. For enterprises migrating from Sitecore, selecting the right hosting provider is a critical decision that impacts everything from site speed to scaling capabilities.
Enterprise WordPress sites have different hosting requirements than smaller websites. You'll need a solution that can handle high traffic volumes, complex functionality, and mission-critical reliability.
Here are a few top enterprise WordPress hosting options:
| Hosting Provider | Best For | Price Range (as of April 2025) | Key Features |
|---|---|---|---|
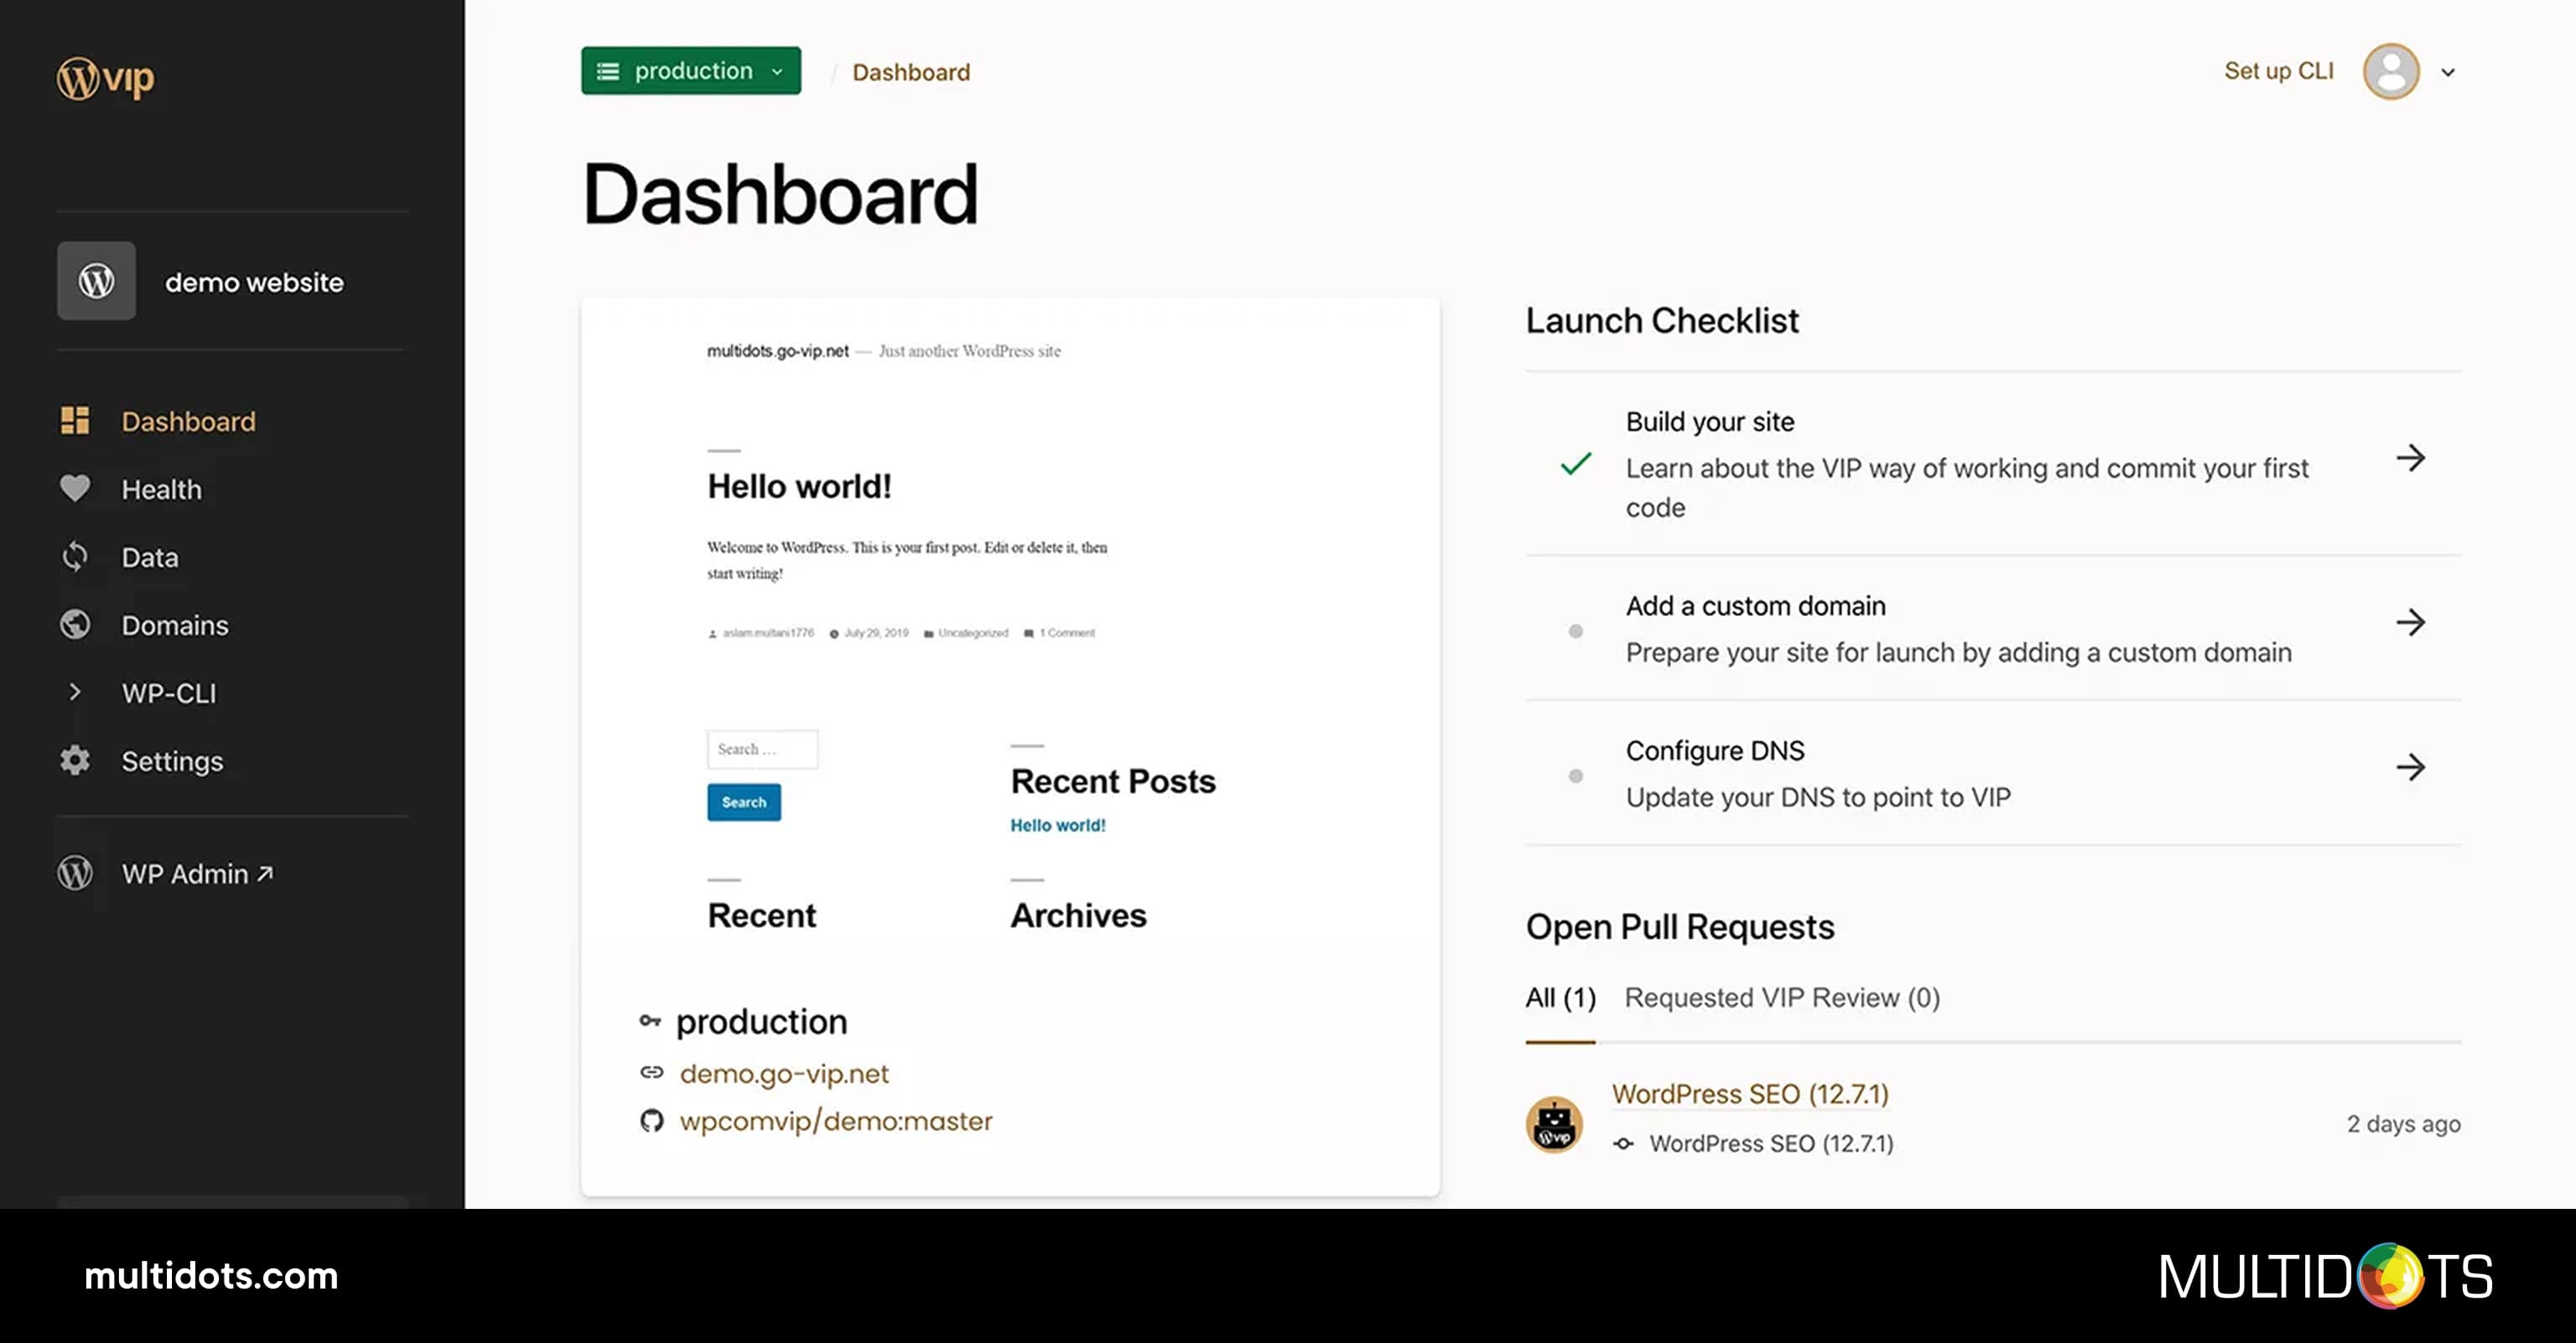
| WordPress VIP | Large enterprises with critical performance needs | Starting ~$25K/year | Highest-tier security, unlimited scaling, dedicated support team |
| WP Engine | Mid to large organizations balancing performance & cost | $600-$5K+/month | Excellent performance, dev/staging setup, automated backups |
| Pantheon | Organizations with active development needs | $500-$10K+/month | Google Cloud infrastructure, extensive global reach |
| Kinsta | Performance-focused businesses with moderate traffic | $400-$2K+/month | Excellent developer tools, git workflow, multi-environment testing |
| Pagely | Enterprise sites with custom needs | $500/month-custom pricing | VPS-based, highly customizable, excellent security |
When evaluating hosting providers, consider both your current needs and future growth. The right hosting partner should scale with your business and provide the technical foundation for your WordPress investment to flourish.
Here are a few essential hosting features that every enterprise needs:
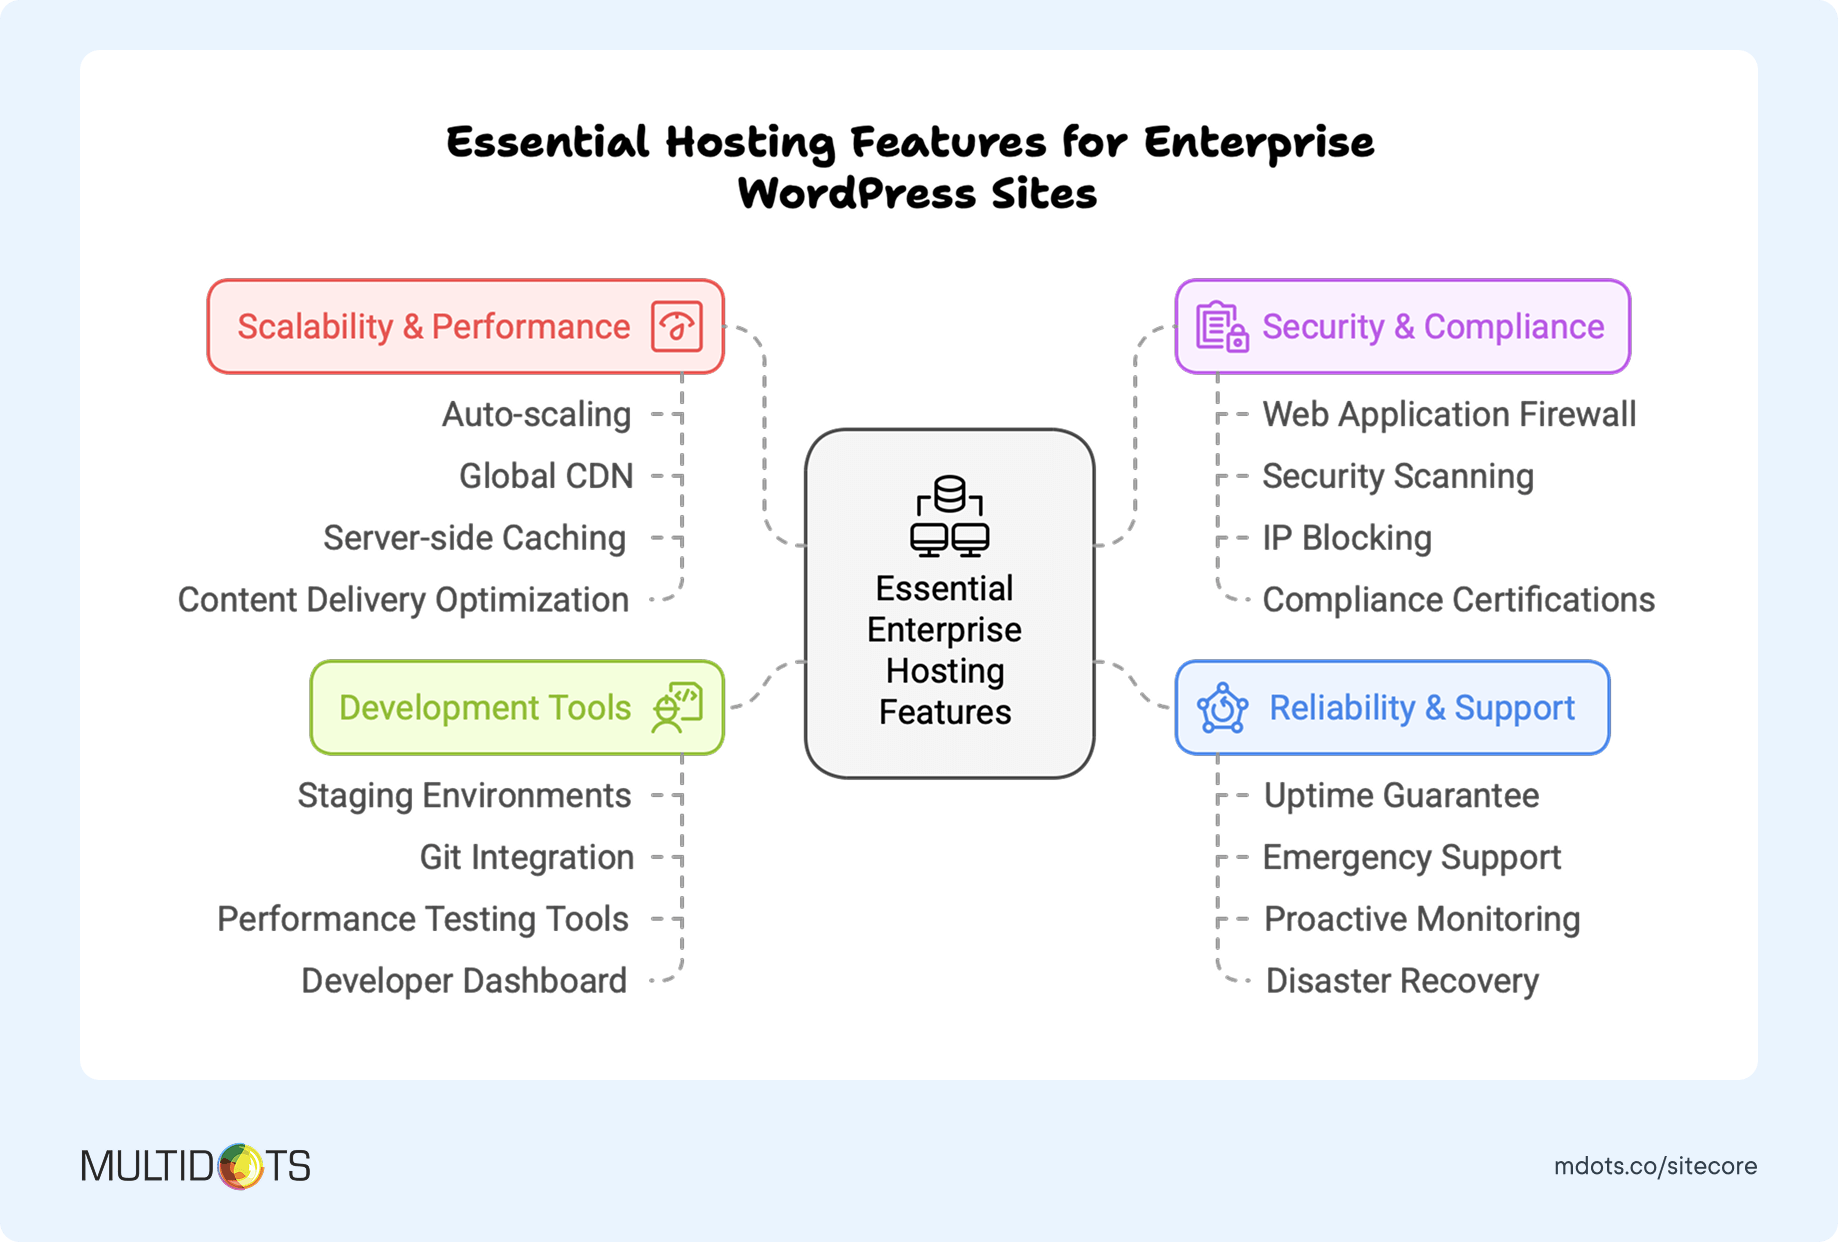
For most enterprises migrating from Sitecore, managed WordPress hosting like WordPress VIP offers the best combination of performance, security, and support. These providers handle WordPress-specific optimizations, security hardening, and updates, allowing your team to focus on content and strategy rather than server management.
Remember that hosting costs for enterprise WordPress sites are typically still a fraction of Sitecore licensing fees, even at the premium hosting tiers.
1.7 Who should be doing this migration—internal team or expert?
Deciding whether to handle your Sitecore to WordPress migration in-house or hire experts depends on several factors, including your team's expertise, available resources, project timeline, and complexity of your current Sitecore implementation.
Both approaches have their merits, but the stakes are high—a poorly executed migration can result in data loss, extended downtime, SEO penalties, and frustrated users.
Here's how you can decide between DIY vs when to hire a WordPress migration expert.
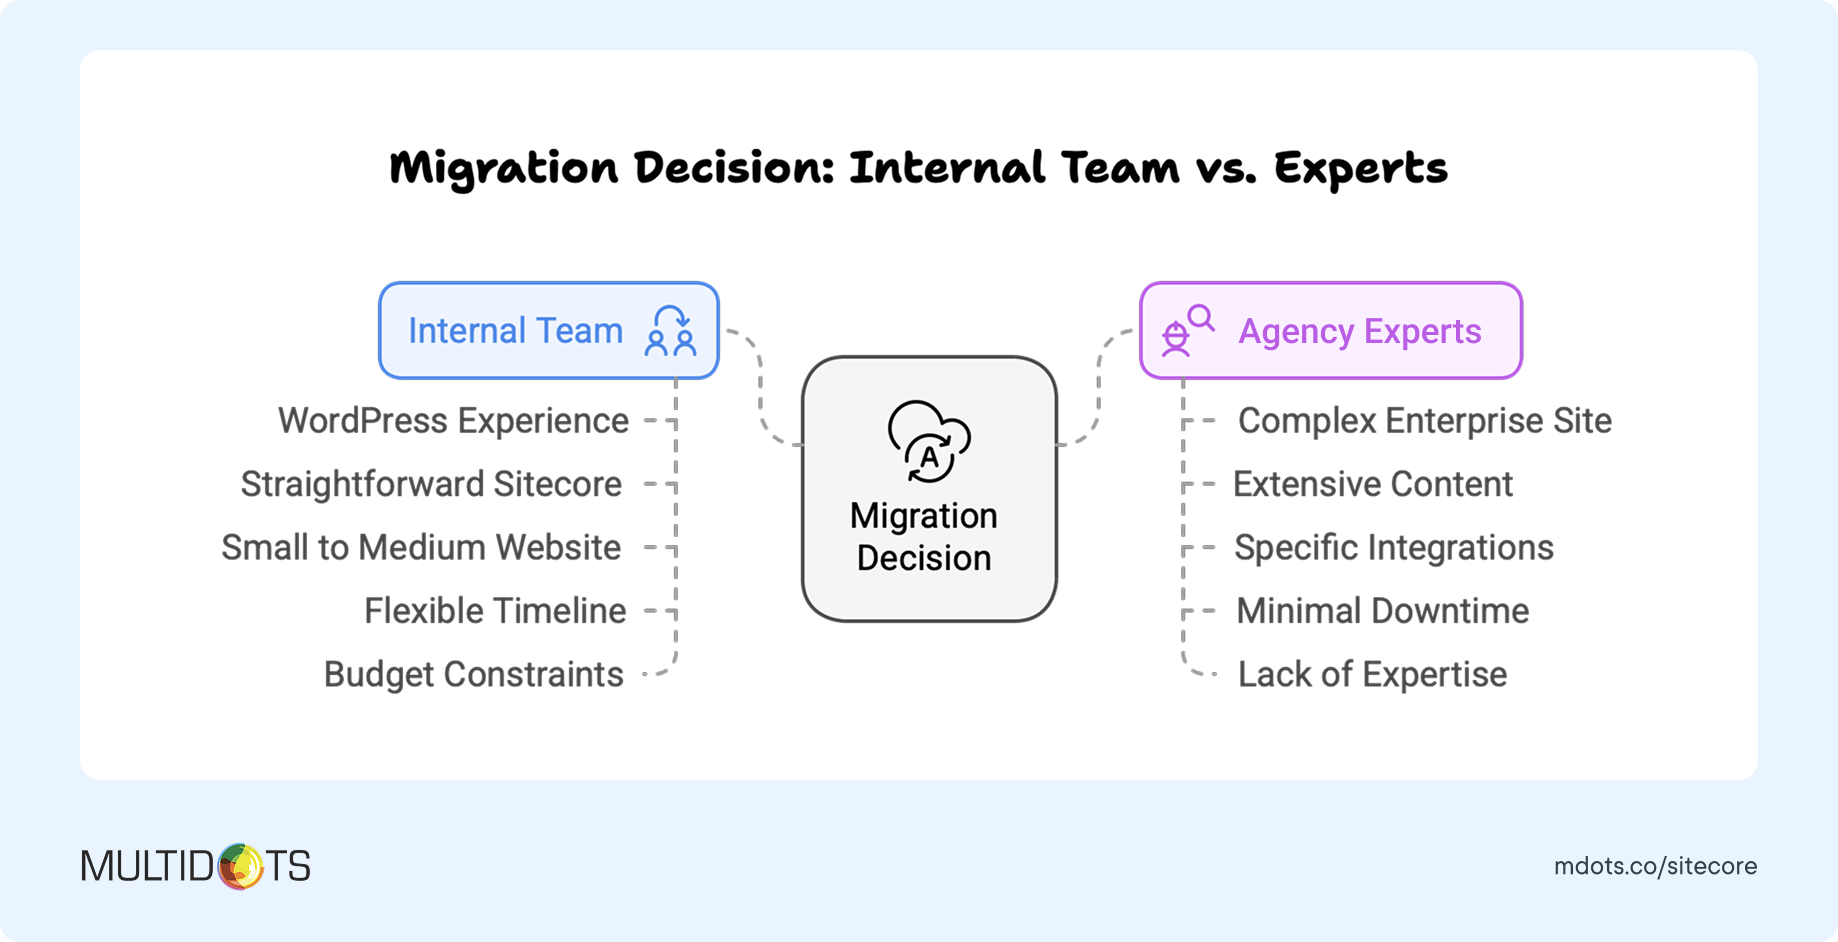
If you decide to bring in experts, look for agencies with:
- Proven track record of Sitecore to WordPress migrations
- WordPress VIP partnership status (for enterprise-level projects)
- Experience with your specific industry or website type
- Transparent methodology and migration process
- Strong reviews and case studies from similar clients
Multidots has extensive experience with complex Sitecore to WordPress migrations, specializing in enterprise publishers and large corporate sites. As a WordPress VIP Gold Partner, we adhere to the highest standards of WordPress development and security practices.
For a broader selection of qualified agencies, you can also explore the WordPress VIP partner directory, which lists vetted agencies with enterprise WordPress expertise.
Hybrid Approach: The Best of Both Worlds
Many successful migrations employ a hybrid approach:
- Migration experts handle the technical aspects and content transfer
- Your internal team contributes domain knowledge and specific requirements
- Post-migration, your team takes ownership with initial expert support
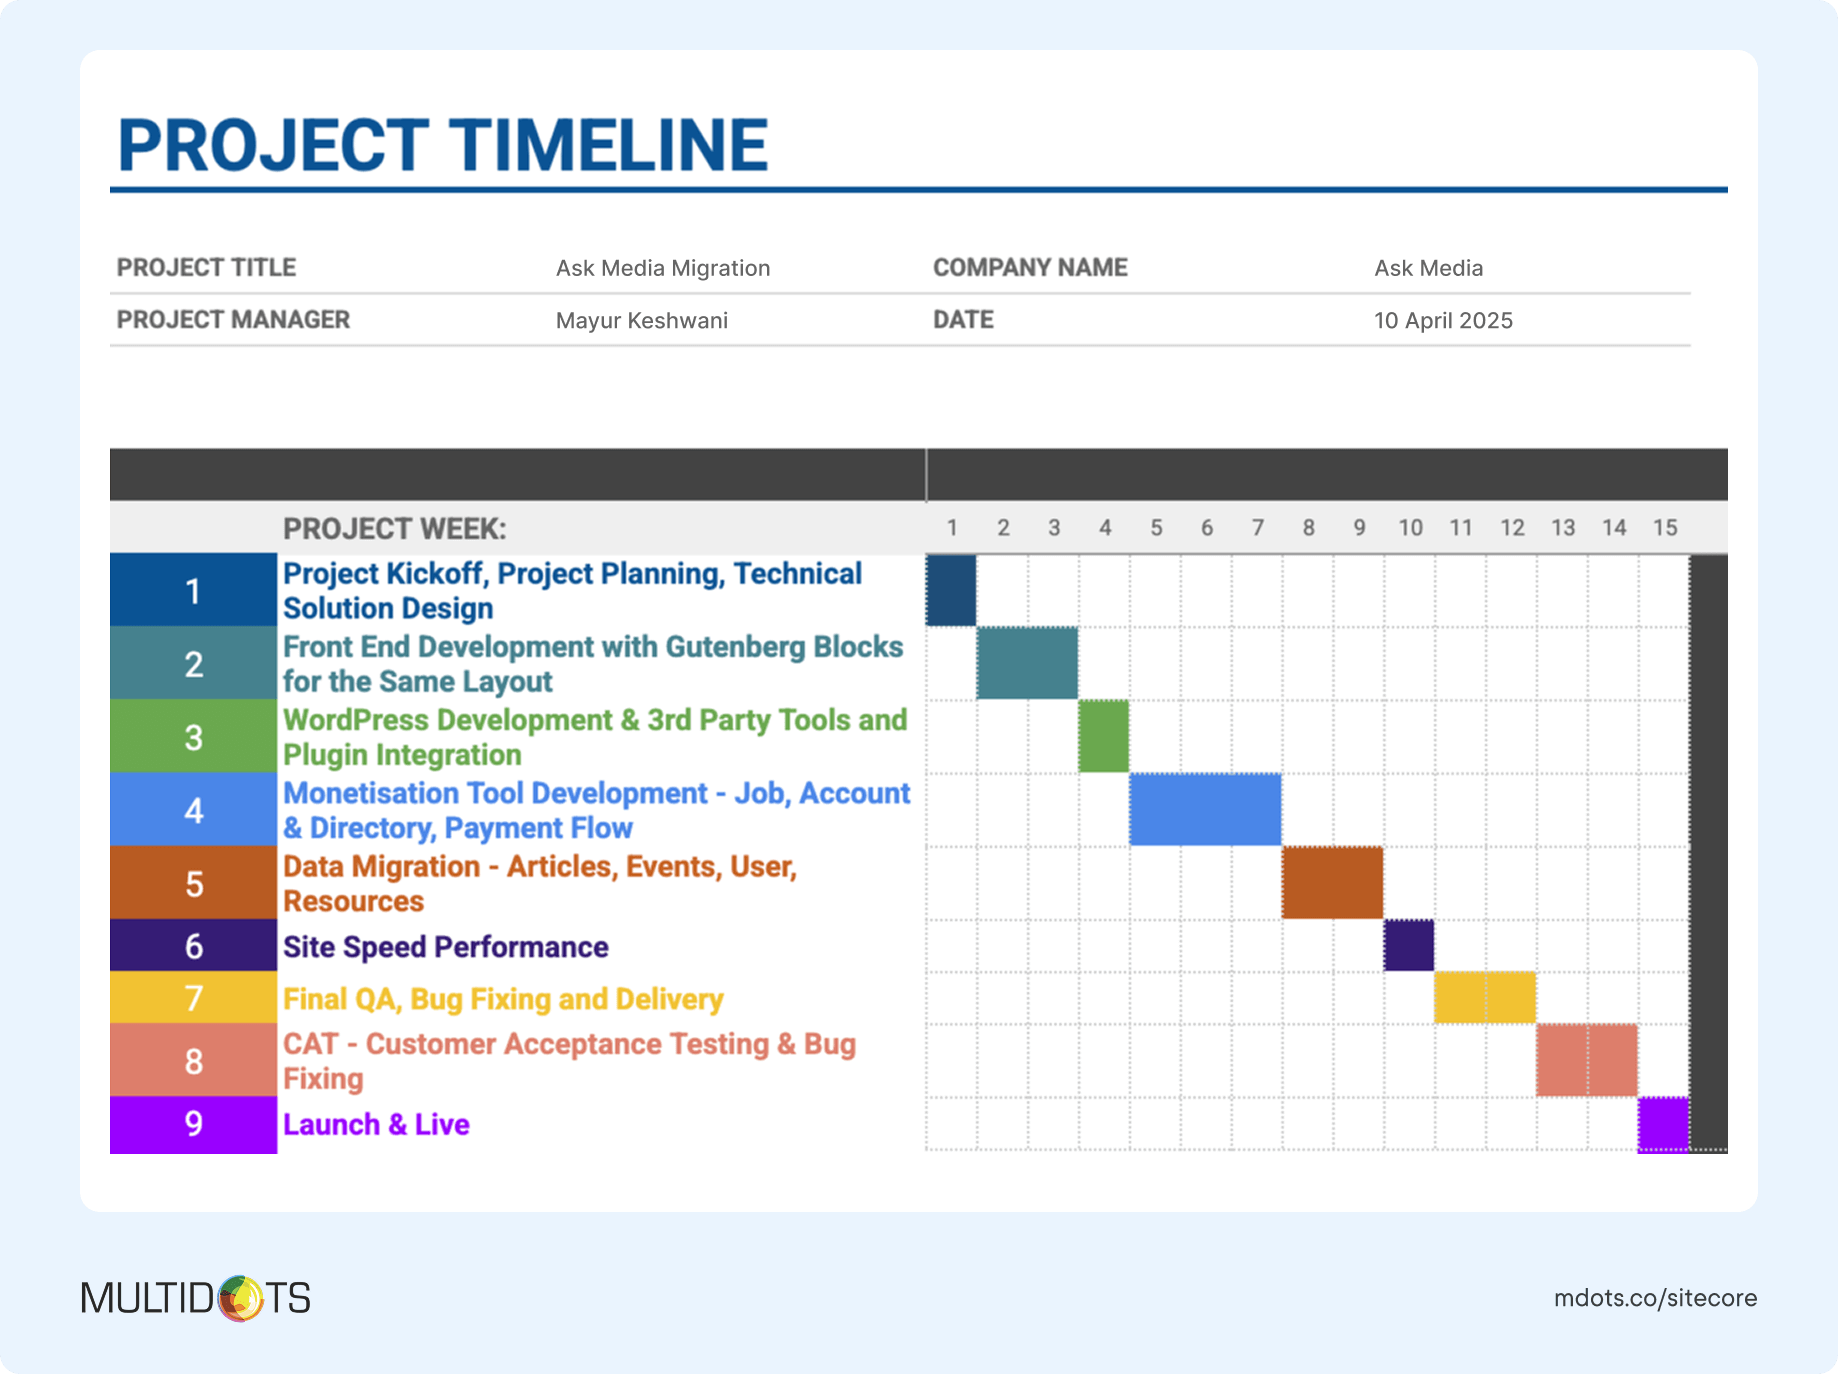
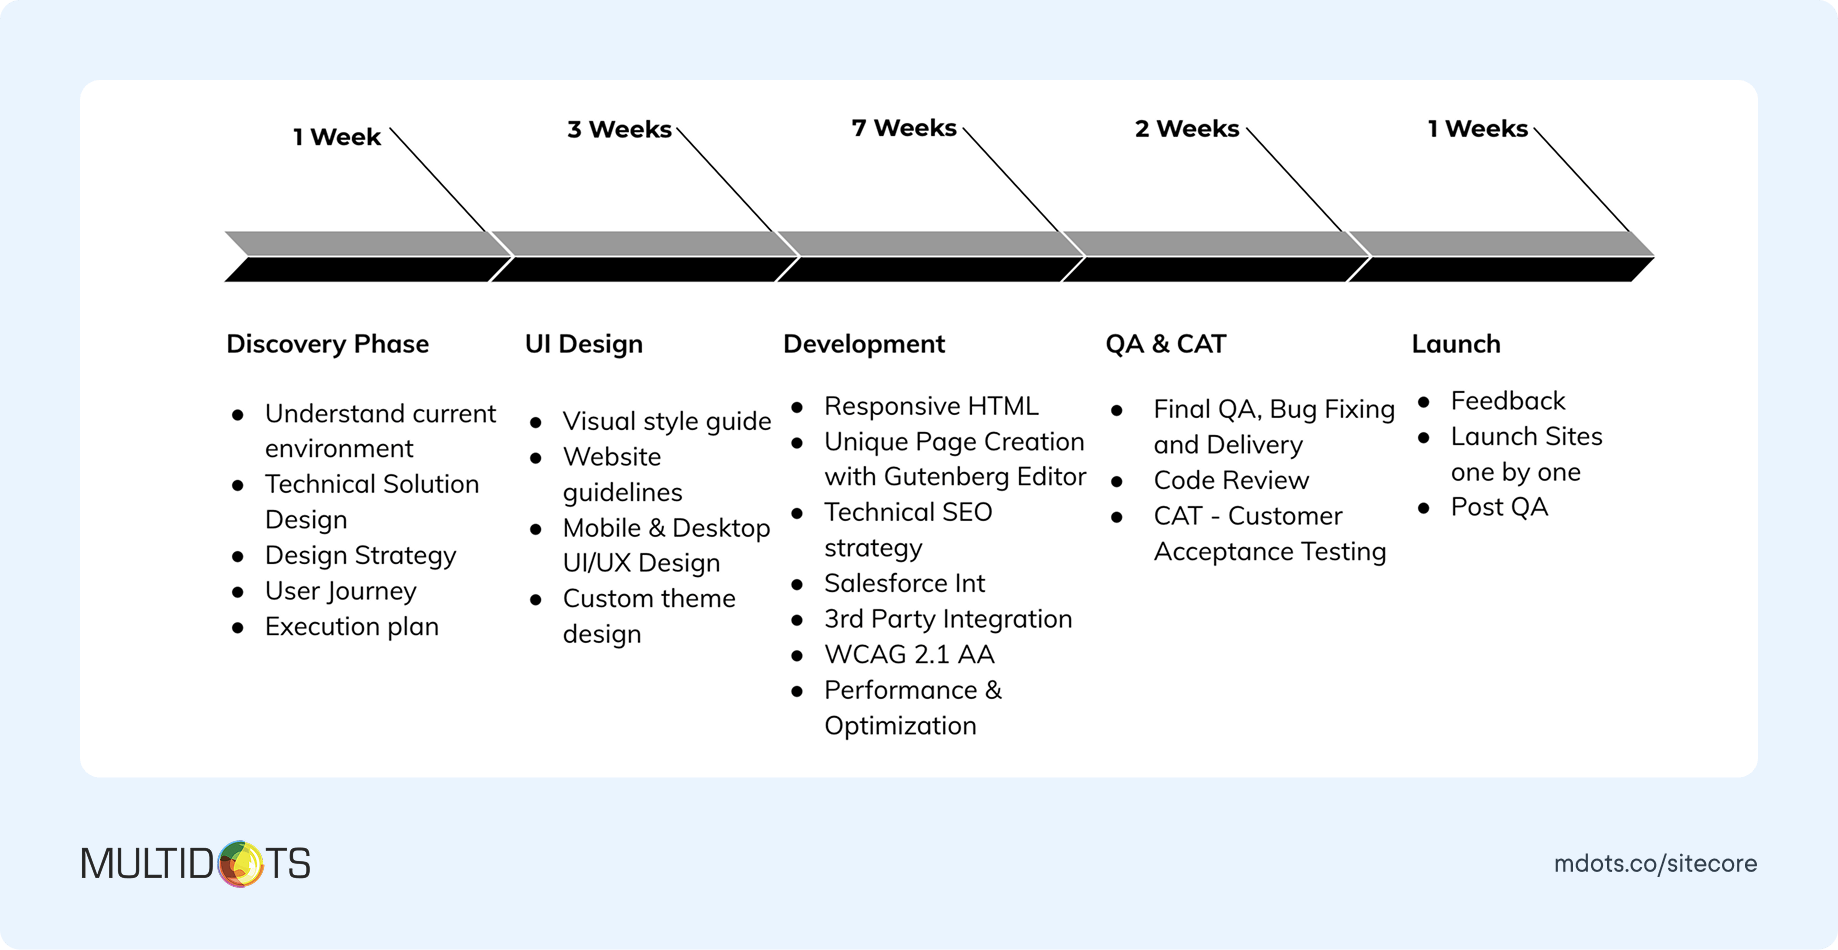
This collaboration leverages outside expertise while building internal capabilities, setting you up for long-term WordPress success. To give you a clearer picture of how a typical enterprise migration is structured, here’s a sample 14-week Sitecore to WordPress migration timeline we use for clients.
Whether you choose DIY, expert assistance, or a hybrid approach, thorough planning is essential. Document your requirements, establish clear goals, and create a detailed content inventory before beginning any migration work.
STEP 2: GETTING READY FOR THE MIGRATION
With a high-level migration strategy in place, you're ready to tackle the necessary preparations to ensure a smooth process. Below is a checklist to help you navigate the key steps before you migrate from Sitecore to WordPress:
2.1 Backup your data
First things first – always, always back up your data. This is your safety net should anything go wrong during migration.
Here's how to back up your Sitecore site's content:
- Log into Sitecore.
- Navigate to the Control Panel.
- Select the 'Database Backup' option.
- Choose the database you want to back up.
- Click 'Backup Now' to start the process.
Remember, even if you're planning to rebuild your site from scratch in WordPress, having a complete backup of your Sitecore site provides an invaluable reference point.
Pro tip: Test your backups by restoring them to a development environment before proceeding with the migration. This verifies that your safety net will actually catch you if needed.
2.2 Take inventory of content
A thorough content inventory is crucial for understanding exactly what needs to be migrated. This step helps you decide what to keep, what to update, and what to leave behind.
Your content audit should include:
- Pages (URLs, titles, content types)
- Blog posts and articles
- Media assets (images, videos, PDFs)
- Forms and interactive elements
- Custom templates and components
- Metadata (SEO titles, descriptions)
Looking to take control of your content migration?
Use our Content Audit Template to track all your content systematically. This template includes tabs for different content types and fields for organizing, prioritizing, and streamlining every step.
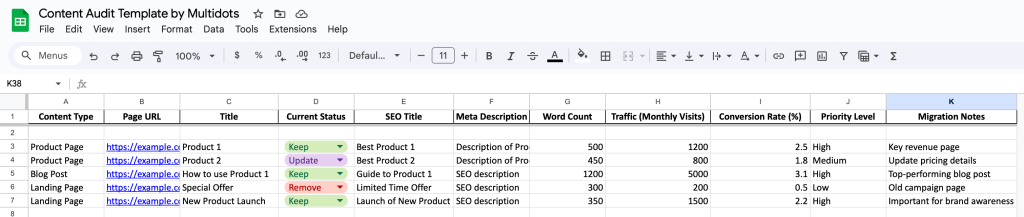
Categorizing your content by type will help organize the migration process. For example, you might want to migrate your product pages first, followed by blog posts and then marketing landing pages.
Identifying your most valuable content assets is also crucial – these are the pages that drive the most traffic and conversions. They should receive special attention during migration to maintain their SEO value and user experience.
2.3 Snapshot of page rankings & performance
Before migrating, capture your current SEO and performance metrics. This gives you a baseline to compare against after migration and helps you prioritize high-value pages.
Tools to capture your pre-migration SEO data:
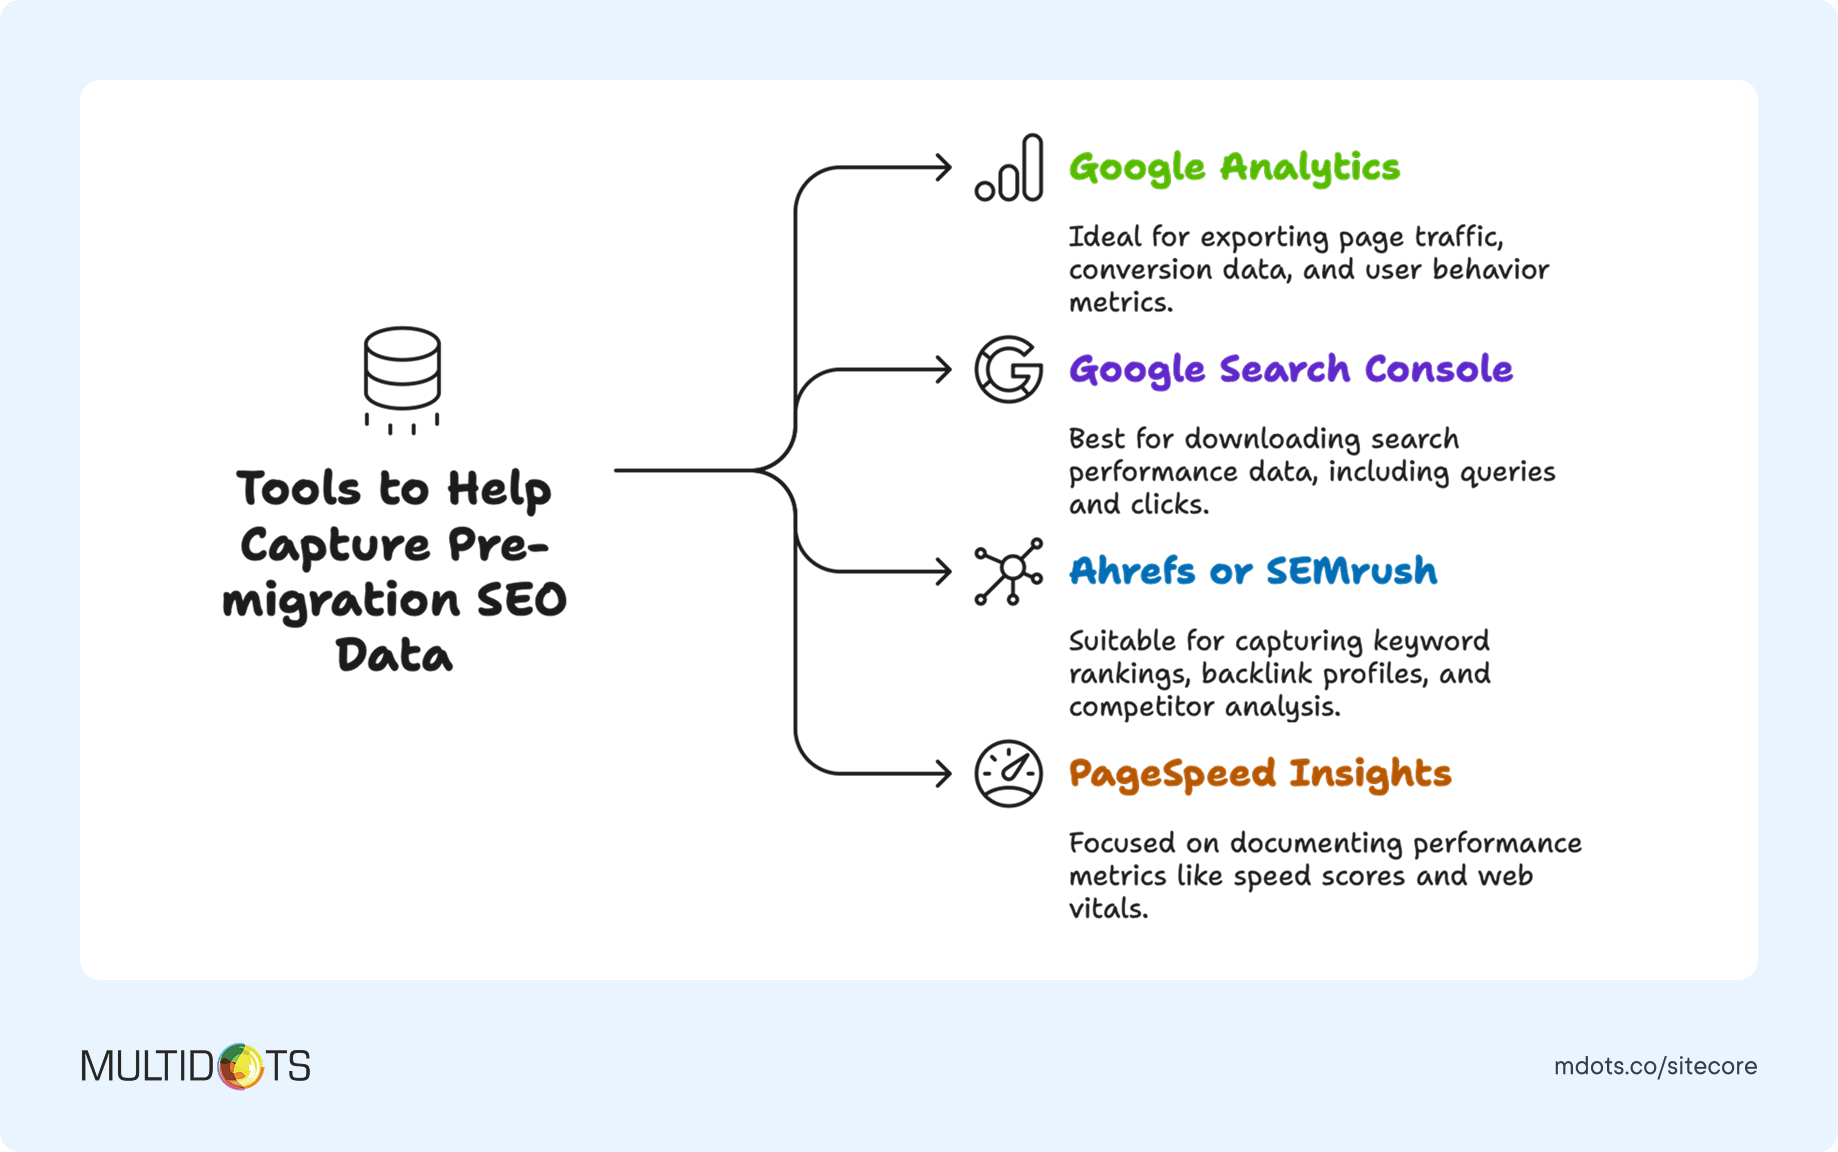
Most importantly, export a complete list of your top-performing pages by organic traffic. These pages will need special attention during migration to preserve their SEO value.
Here's how to create a comprehensive SEO snapshot:
- Export your site structure from Screaming Frog or a similar crawler
- Pull organic traffic data from Google Analytics
- Export keyword rankings from Search Console or an SEO tool
- Document page speed metrics using Lighthouse or PageSpeed Insights
- Capture backlink data for your most important pages
2.4 Taxonomies
Taxonomies—your categories, tags, and custom content classifications—are vital for maintaining content organization and user navigation.
In Sitecore, taxonomies are often implemented as hierarchical structures in the content tree. WordPress uses a different approach with its built-in taxonomy system. Mapping these correctly ensures your content remains properly organized after migration.
Why taxonomies matter during migration:
- They maintain logical content groupings
- They support proper URL structures
- They enable intuitive navigation
- They help preserve SEO value
To properly migrate your taxonomies:
- Document your current Sitecore taxonomy structure
- Map Sitecore taxonomies to WordPress categories and tags
- Plan for any custom taxonomies you'll need to create in WordPress
- Ensure taxonomy slugs align with your URL structure plan
Pro tip: Consider this migration as an opportunity to clean up and optimize your taxonomy structure. Are there unused categories that can be removed? Could your tag system be more consistent? Now is the time to make these improvements.
Here's a video walkthrough on how you can migrate taxonomies from Sitecore to WordPress:
By thoroughly preparing in these four key areas, you'll lay a solid foundation for a successful migration from Sitecore to WordPress. The time invested in preparation will pay dividends by preventing data loss, maintaining SEO value, and ensuring a smoother transition process.
Ready to take the next step? Let's move on to setting up your WordPress destination environment.
STEP 3: SETUP WORDPRESS
After mapping out your migration strategy, it's time to establish your WordPress environment. This step is crucial as it lays the foundation for how your content will be structured, who can access it, and how users will interact with it once migrated from Sitecore.
A properly configured WordPress setup ensures that you're not just replicating your Sitecore website, but actually enhancing it by leveraging WordPress's flexibility and user-friendly features.
3.1 Traditional or Headless CMS
When setting up WordPress after migrating from Sitecore, one of the first decisions you'll need to make is whether to go with a traditional or headless architecture.
Traditional WordPress follows a monolithic approach where the content management backend and the frontend presentation layer are tightly coupled. This is the classic WordPress setup most people are familiar with – you manage content in the WordPress admin panel, and it's displayed using your chosen theme.
Headless WordPress, on the other hand, decouples the content management system from the frontend. Your content is stored in WordPress but accessed via the REST API or GraphQL, allowing it to be displayed on any frontend technology (React, Vue, Angular, native mobile apps, etc.).
Headless WordPress is particularly beneficial for enterprises that:
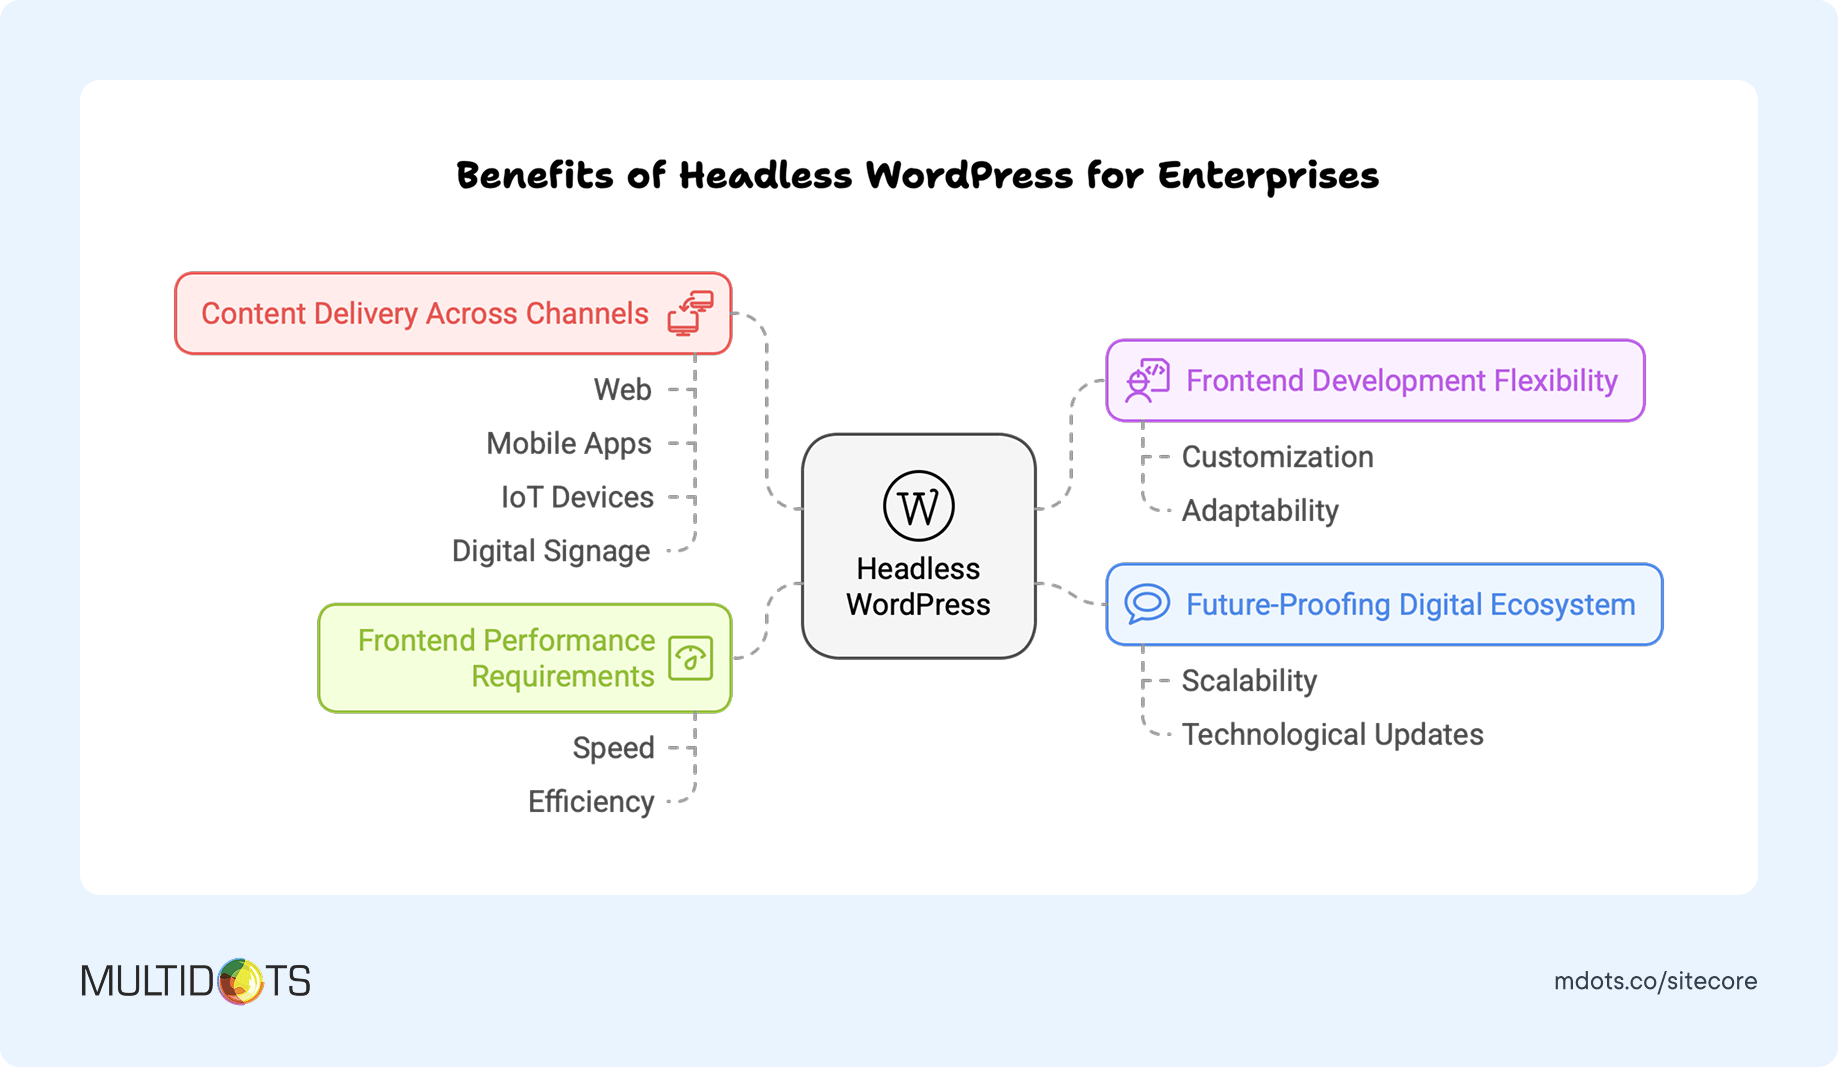
For example, The New York Times uses a headless WordPress setup to manage their content, which is then delivered across their website, mobile apps, and even voice assistants. This allows them to maintain a single source of truth for their content while delivering optimized experiences on each platform.
However, headless isn't always the right choice. Traditional WordPress remains ideal if:
- You prefer an all-in-one solution
- Your team is more familiar with traditional CMS workflows
- You have limited developer resources
- You need to deploy quickly
Pro tip: Learn how billion-dollar enterprises leverage Headless WordPress for scalability and performance.
3.2 Single or Multisite
Another critical decision is whether to implement WordPress as a single site or multisite network. This choice depends on your organizational structure, brand architecture, and content governance needs.

Setting up a multisite network is straightforward but requires some technical understanding:
- Download WordPress: Visit the WordPress.org download page and download the WordPress package.
- Upload the WordPress Files: Upload the files to your web server using an FTP client.
- Create a Database and User: Create a MySQL database and user with full privileges.
- Configure WordPress: Visit your domain in a web browser, and you'll be prompted to fill in your database information. Follow the on-screen instructions.
- Complete the Installation: Choose your site name, admin username, password, and email. Click "Install WordPress."
Here's a complete video walkthrough on how to setup WordPress multisite with its best practices:
Remember, the choice between a single site and multisite is crucial to the success of your Sitecore to WordPress migration. Analyze your needs, consult your migration team, and make the decision that best aligns with your specific goals.
3.3 User roles and permissions
Properly configuring user roles and permissions is essential for maintaining security and workflow efficiency after migrating from Sitecore to WordPress.
Here's a video on Sitecore user roles and how you can transfer them from Sitecore to WordPress:
WordPress includes these default user roles:
- Administrator: Complete control over the site
- Editor: Can publish and manage all content
- Author: Can publish and manage their own content
- Contributor: Can write and manage their posts but not publish
- Subscriber: Can only manage their profile
However, enterprises often need more nuanced permissions. For example, you might need:
- Content Approvers: Can review but not create content
- SEO Specialists: Can edit meta descriptions but not publish
- Department Managers: Can manage content only within their section
WordPress allows you to create custom roles and adjust capabilities using plugins like PublishPress Permissions or Members.
Here's a quick user role mapping table to help you when converting your Sitecore site to WordPress:
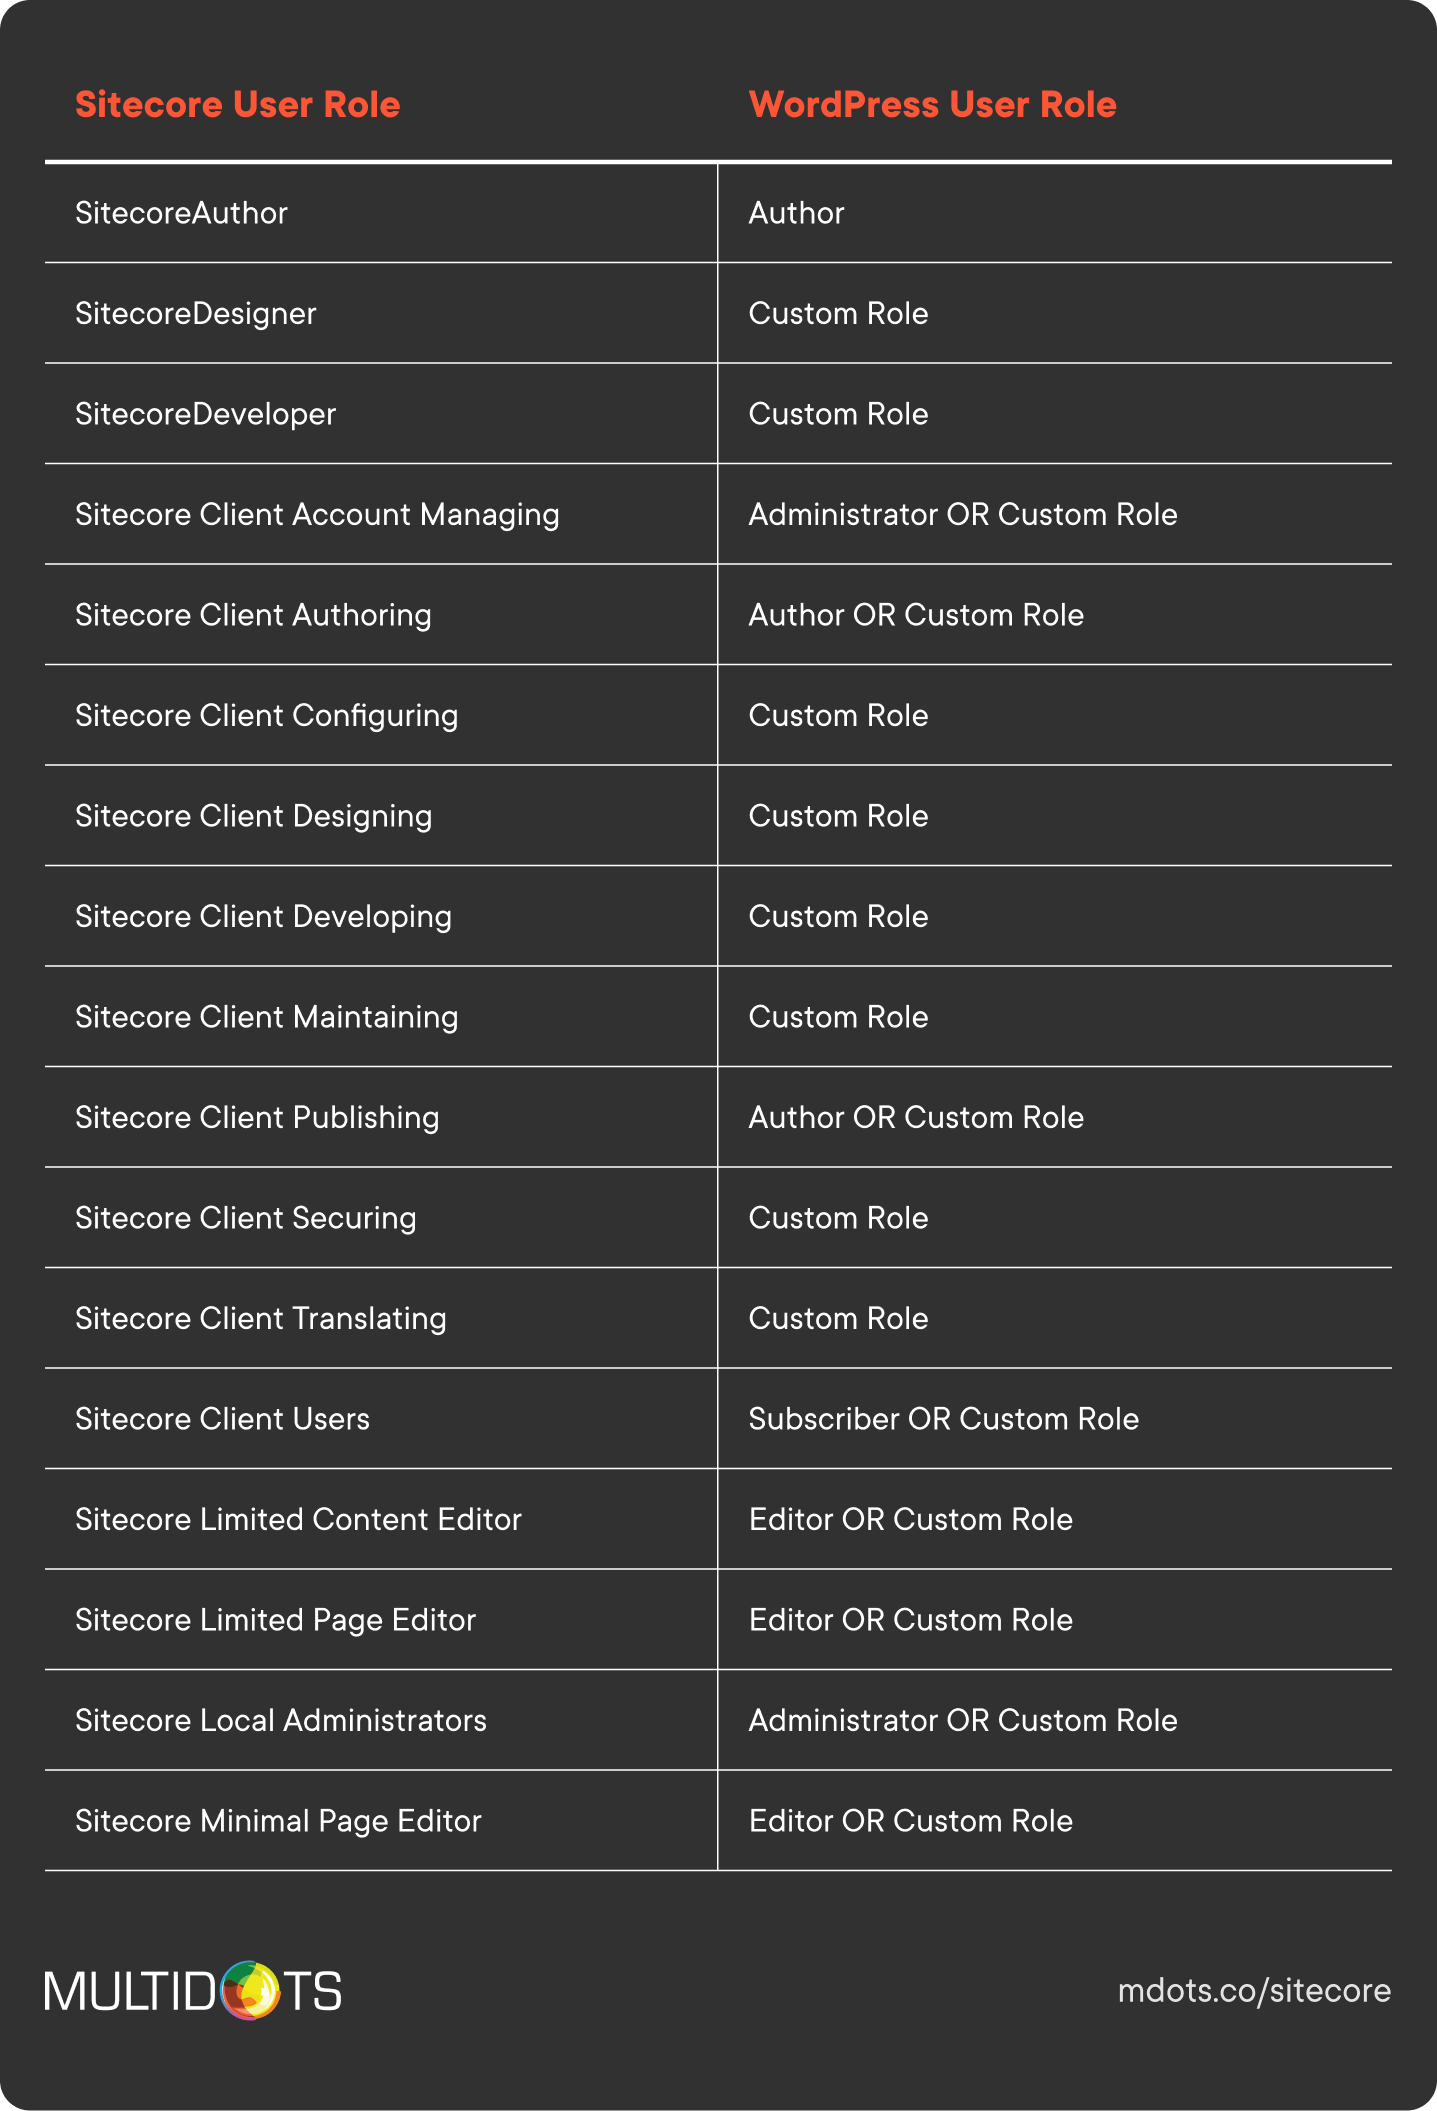
When you migrate content from Sitecore to WordPress, considering these user roles ensures a smoother transition, a more secure system, and a better alignment with your team's needs.
3.4 Custom blocks & templates
One of WordPress's most powerful features is the Gutenberg block editor, which provides a flexible, modular approach to content creation – a significant upgrade for many Sitecore users.
Gutenberg blocks are reusable content components that can be added, arranged, and styled independently. This modular approach gives content creators unprecedented flexibility while maintaining design consistency.
Enterprise teams can create custom blocks for specific needs:
- Hero sections with consistent branding
- Product comparison tables
- Location finders with integrated maps
- Compliance-approved disclaimers
- Interactive calculators or configurators
These custom blocks can include validation rules, default content, and styling that aligns with your brand guidelines – all while being intuitive for content creators to use.

For larger organizations, creating reusable templates based on these blocks ensures consistency across hundreds of pages. For example, you can create templates for:
- Product pages
- Location pages
- News articles
- Event announcements
- Resource downloads
Here's a quick video on how to create reusable blocks in Gutenberg:
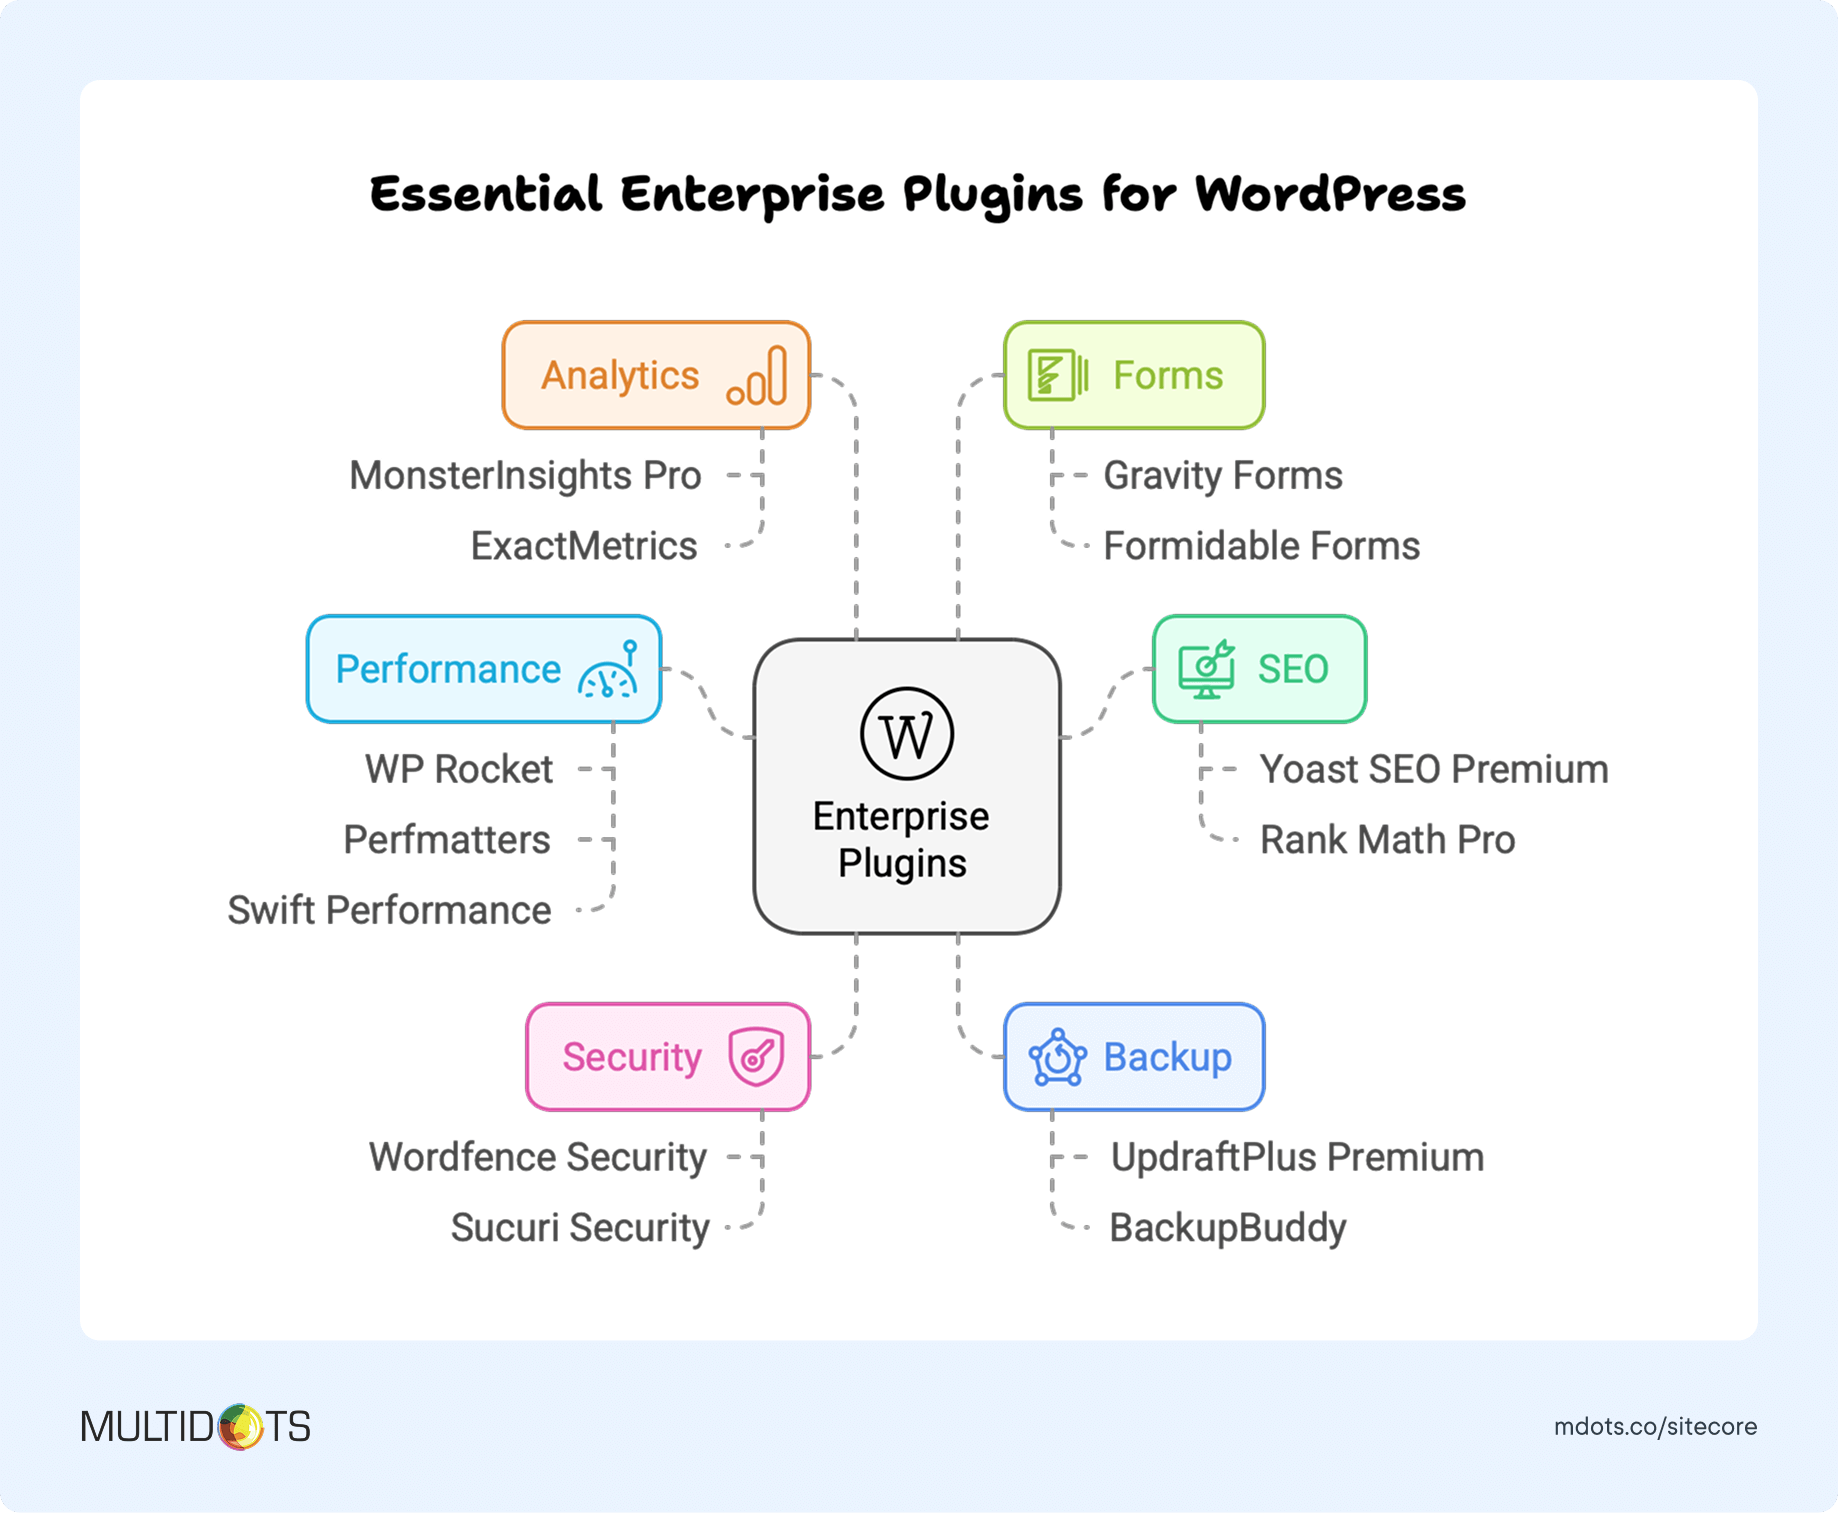
3.5 Plugins
The right plugin selection forms the backbone of a robust WordPress implementation, especially for enterprises migrating from Sitecore.
Must-have enterprise plugins include:
When vetting plugins for enterprise use, consider:
- Development Activity: Ensure regular updates (check the "Last Updated" date)
- Support Quality: Look for responsive support teams
- User Base: Plugins with many active installations indicate stability
- Code Quality: Premium plugins often have better code standards
- Performance Impact: Test the plugin's effect on page load times
- Security History: Research if the plugin has had security vulnerabilities
WordPress VIP Technology Partners offer pre-vetted, enterprise-ready plugins that meet stringent performance and security requirements, including:
- Cloudflare (security)
- Salesforce (marketing)
- Parse.ly (analytics)
- Yoast (SEO)
Multidots Plugins for Enterprise Users:
- Multicollab: Enables Google Docs-style collaboration in WordPress with comments, suggestions, and approval workflows – essential for editorial teams transitioning from Sitecore
- Better by Default: Enhances the WordPress admin experience with customizable defaults and templates
3.6 Custom plugins
While WordPress's plugin ecosystem is vast, sometimes you'll need functionality that doesn't exist in off-the-shelf solutions. That's where custom plugins come into play.
Consider developing custom plugins when:
- You need deep integration with proprietary systems: For example, connecting to your custom CRM, ERP, or other internal tools that Sitecore currently integrates with
- You have unique content workflows: If your editorial process includes specialized approval steps or unique collaborative features
- Security requirements demand it: When you need specific encryption or data handling protocols that generic plugins don't offer
- Performance optimization is critical: When you need highly optimized code for specific high-traffic or resource-intensive features
- You're migrating unique Sitecore functionality: For specialized features your team relies on that don't have WordPress equivalents
For example, a pharmaceutical company migrating from Sitecore might need a custom plugin to handle their unique regulatory compliance needs, such as automated disclaimer management or region-specific content restrictions.
The development of custom plugins should follow enterprise software best practices:
- Clear requirements documentation
- Proper version control
- Comprehensive testing
- Security auditing
- Performance optimization
- Thorough documentation
When properly developed, custom plugins can provide significant competitive advantages while maintaining the user-friendly experience that makes WordPress appealing in the first place.
If you're considering a Sitecore to WordPress migration and need guidance on custom plugin development, our team can help evaluate your specific requirements and recommend the most efficient approach.
STEP 4: LAUNCH
So you've made it to the final stage of your Sitecore to WordPress migration journey—congratulations! By now, you've planned your strategy, mapped out your content structure, and set up your WordPress environment. Now it's time to bring your vision to life by executing the actual content migration and launching your new WordPress site.
This step is where all your preparation pays off. In this section, we'll walk through the process of migrating your content, optimizing your media assets, running through a comprehensive pre-launch checklist, and thoroughly testing your new WordPress site before going live.
Let's make sure your migration crosses the finish line smoothly!
4.1 Content migration
Content migration is often the most time-consuming part of any CMS transition. Fortunately, with the right approach, you can streamline this process and ensure all your valuable content makes the journey intact.
Let's break down the process of exporting your content from Sitecore:
- Log into Sitecore CMS as an administrator.
- Navigate to the Control Panel → Localization → Export Languages.
- Select the language you want to export and choose a top-level Sitecore item to serve as the 'root' element for your export.
- Click 'Next' and wait for the export process to complete.
- Select the Sitecore item Content that you want to export.
- Choose the destination path where you want to store the XML database on your server.
- Download the XML file to your local system.
- The result will be an XML file containing your Sitecore content in a structured format that can be converted for WordPress.
Now that you've exported your Sitecore content, you need to transform it for WordPress:
- Convert the Sitecore XML file to a WordPress-compatible format. This typically requires custom scripts to map Sitecore content structures to WordPress posts, pages, and custom post types.
- Use WordPress import tools like the built-in WordPress Importer or plugins like WP All Import to bring your content into WordPress.
- Map content types from Sitecore to their corresponding WordPress structures (e.g., Sitecore templates to WordPress posts or custom post types).
- Verify content hierarchy to ensure your page structure remains intact.
- Check formatting to confirm that text styling, links, and embedded media have transferred correctly.
Remember, complex Sitecore implementations often require custom migration scripts to properly convert the content. Consider reaching out to migration specialists (like us!) if you're dealing with a large or complex site.
4.2 Prepare media assets
Media assets are crucial elements of your website that contribute to user experience and SEO. Let's look at how to properly migrate and optimize them for your new WordPress site.
Here's how to prepare your media assets for migration:
A: Follow the first three steps from the above section on exporting your content XML in Sitecore. This lays the foundation for exporting both your textual and media content as you migrate from Sitecore to WordPress.
B: Select the Sitecore Media Library which you want to export. The same process applies here as you would use to export your configuration, aligning with the process to convert Sitecore website to WordPress site.
C: Refer to steps five and six from the above section on exporting your content XML in Sitecore. These steps guide you in storing your media assets, readying them for moving from Sitecore to WordPress.
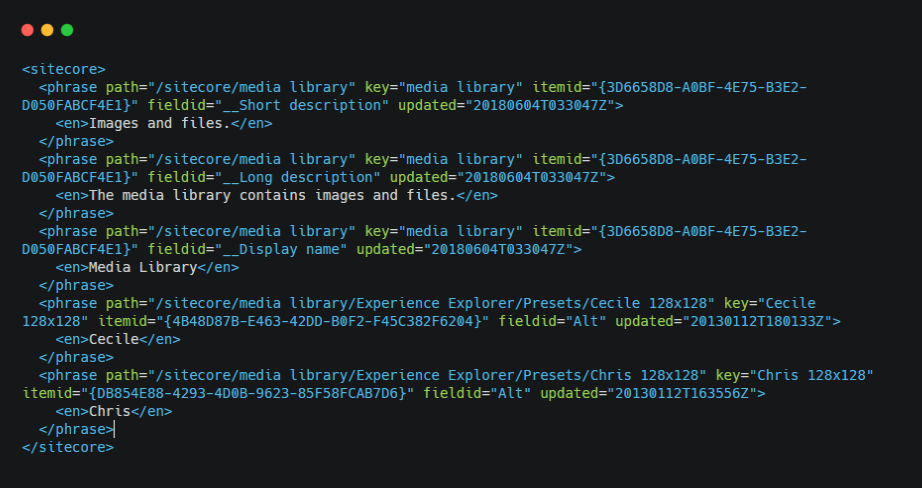
D: Here is the Sitecore XML format database. Please see the below screenshot with all details of the item in XML format of Sitecore.
E: Build custom scripts to convert Sitecore .xml file to WordPress compatibility .xml file (contact us if you need any help). If you're looking to export Sitecore posts to WordPress and wish to self-launch a site with WordPress VIP, consult this resource.
4.3 Deployment checklist
The deployment phase is critical to ensure nothing falls through the cracks. Here's a comprehensive checklist to guide you through this process.
Important Considerations Before Final Deployment
- Prepare Your Sitemap: Finalize your website structure. Is there anything you want to change in the sitemap? Now is the time to add new pages or remove old ones.
- Prepare Your Integrations List: Identify which Sitecore integrations need to be migrated to WordPress and which new WordPress-specific integrations you want to implement. WordPress offers specialized, cost-effective marketing solutions that often outperform Sitecore's built-in MarTech stack, giving you the flexibility to scale as your enterprise grows.
- Plan the Timeline: Choose a low-traffic period for your migration, perhaps a weekend when your team is out of office. This minimizes disruption and gives you breathing room to address any issues.
- Implement Content Freeze: Establish a date when your editorial team should stop updating content on your Sitecore site. This prevents losing new content during migration. Make sure all stakeholders are aware of this freeze period.
- DNS Switching: Prepare to point your domain to your new WordPress hosting provider. If you're using a managed solution like WordPress VIP, they can help manage your DNS. It's advisable to switch nameservers at least a week before launch to allow for propagation.
- Caching Strategy: Plan your WordPress caching implementation to ensure optimal site performance. Consider plugins like W3 Total Cache, WP Super Cache, or managed hosting solutions that include caching.
- Set Up 301 Redirects: Create a comprehensive redirect map from your old Sitecore URLs to the new WordPress URL structure to preserve SEO value and user experience.
- SSL Certificate Implementation: Ensure your SSL certificate is properly installed on the new WordPress site.
Prepping for launch day?
Here’s a comprehensive Deployment Checklist we’ve prepared to guide you through the final stages of your Sitecore to WordPress migration. This checklist ensures a smooth transition by covering everything from pre-deployment preparations, technical checks, SEO preservation, security measures, and post-launch monitoring.
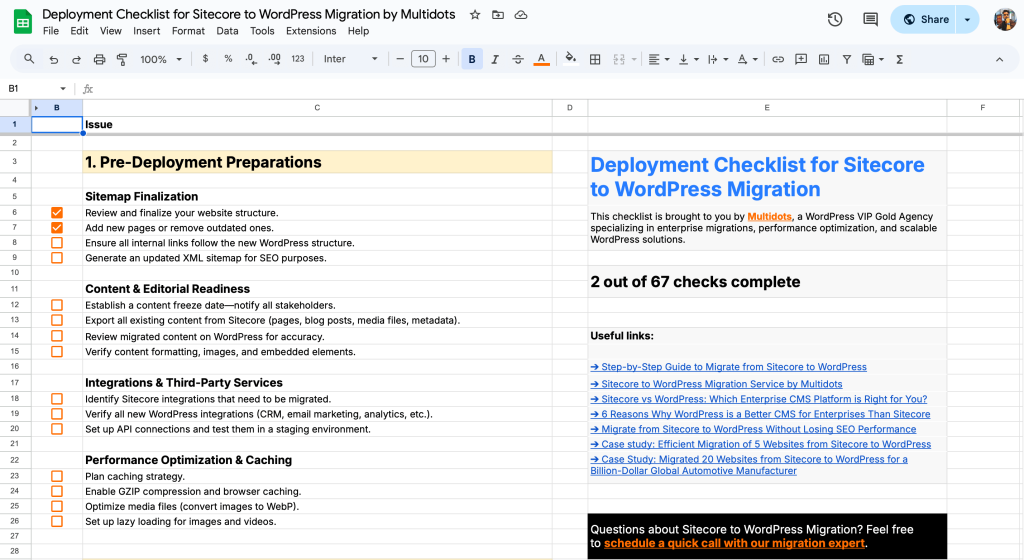
You can use this checklist as a step-by-step reference to ensure nothing is overlooked during deployment—minimizing risks, preserving site performance, and maintaining SEO integrity. Whether you’re handling the migration internally or working with a development team, this resource will help streamline the process and set your new WordPress site up for success.
4.4 Testing new website
Thorough testing is essential before taking your new WordPress site live. Here's what you should test and how to do it effectively.
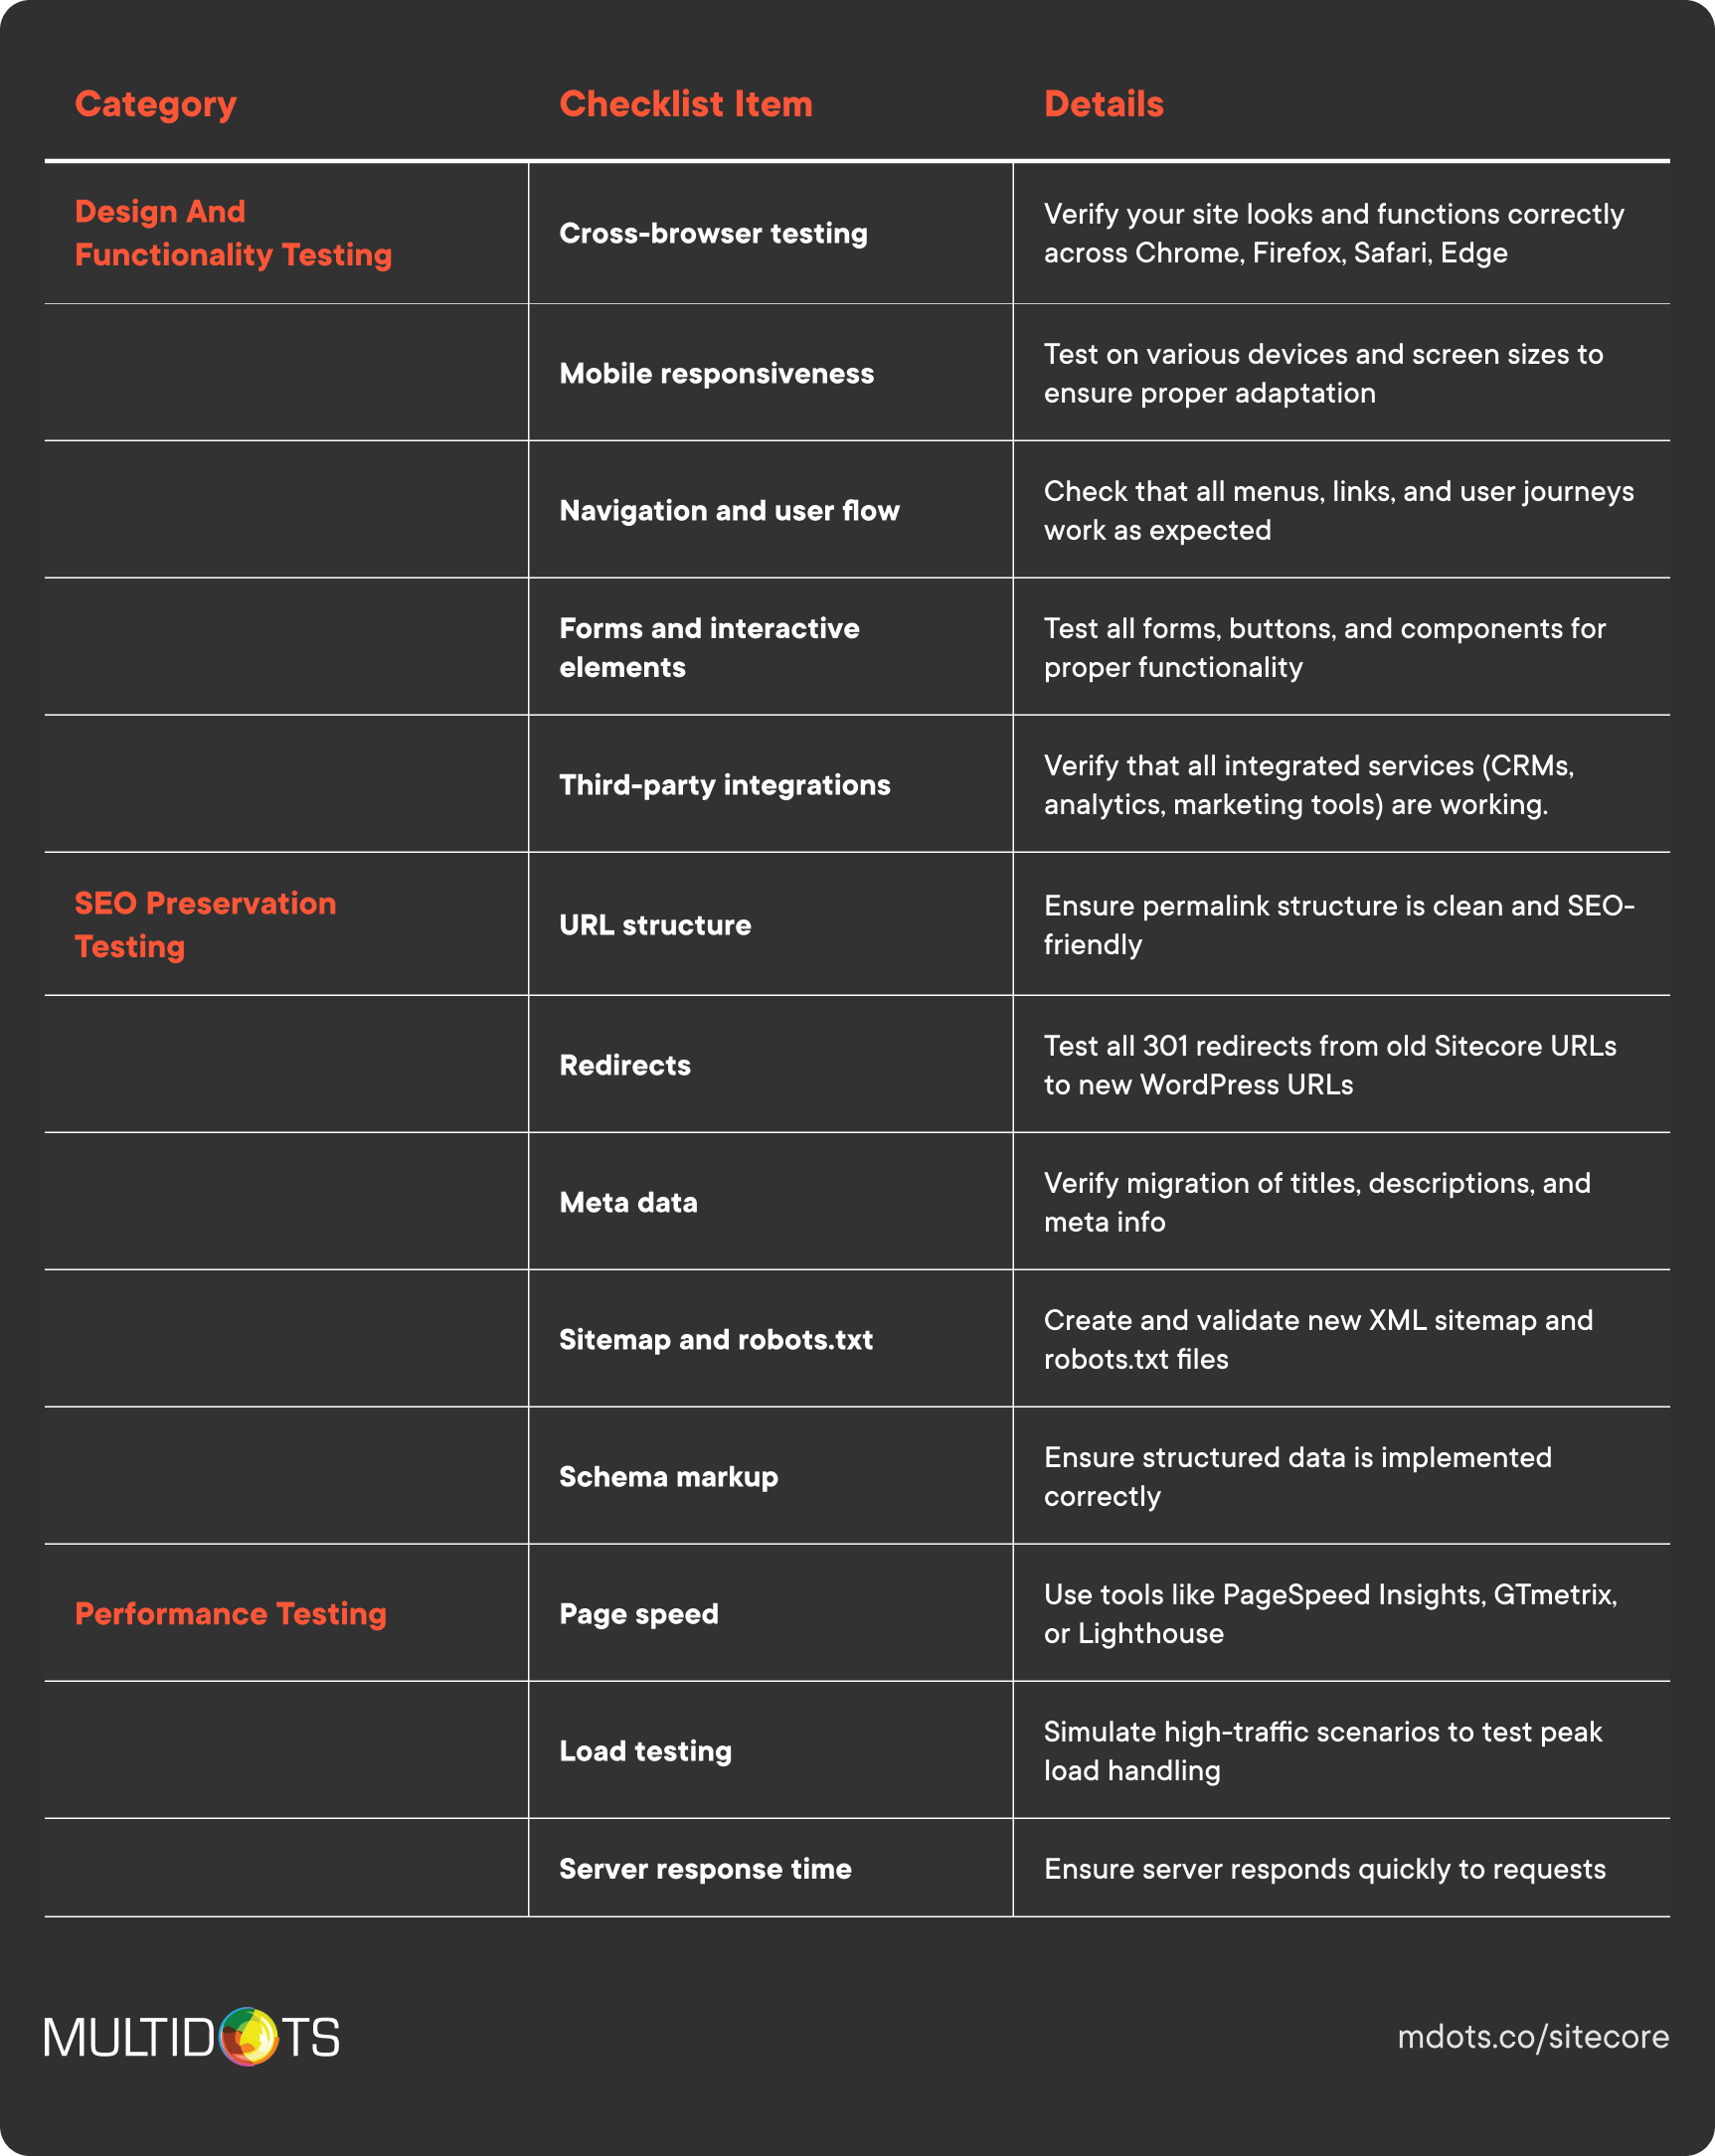
Tools like BrowserStack allow you to test your site across multiple devices and browsers from a single dashboard, while GTmetrix provides detailed performance insights and recommendations for improvement.
After launch, monitor your site's performance, traffic, and search rankings closely for at least 30 days to catch and address any issues quickly.
With these comprehensive steps completed, your migration from Sitecore to WordPress should be a success! Remember that post-launch optimization is an ongoing process, so continue to refine and improve your site based on user feedback and performance data.
Need expert assistance with your Sitecore to WordPress migration? Contact our team for personalized support throughout your journey.
STEP 5: TRAIN YOUR TEAM
Alright, you've made it through the migration process! Your shiny new WordPress site is up and running. But wait—we're not quite done yet. If your team has been working with Sitecore all this time, they're now facing a brand-new CMS. And while WordPress is famously user-friendly, there's still a learning curve.
Let's make sure your team feels confident and comfortable with their new digital workspace.
5.1 Learn WordPress basics
WordPress is known for its intuitive interface, but that doesn't mean your team will instantly master it. The good news? There are resources designed specifically for different skill levels.
WordPress offers a structured learning approach based on your team members' roles and existing knowledge:
- Beginner WordPress User courses cover the fundamentals of navigating the dashboard, creating basic content, and understanding the WordPress ecosystem. Perfect for team members who are completely new to WordPress.
- Intermediate WordPress User training builds on these basics, diving into more complex content creation, media management, and basic customization. This is ideal for users who understand the basics but need to learn how to leverage WordPress's flexibility.
- Advanced WordPress User materials explore in-depth customization, troubleshooting, and advanced content techniques. This level is great for your power users who'll be pushing WordPress to its limits.
Beyond these core skill levels, WordPress also offers specialized learning paths. For instance, the Designer Learning Path is perfect for team members who'll be customizing block designs and templates—a crucial skill for maintaining your brand's visual identity after migration.
5.2 Guides on updating and publishing content
Your content team needs specific, actionable guidance on their day-to-day tasks. Generic learning materials are helpful, but task-specific resources make the transition smoother.
Create how-to videos for everyday tasks
Short, focused video tutorials can dramatically speed up learning. Consider creating screen recordings that show exactly how to:
- Publish a new blog post using the WordPress block editor
- Update existing pages without disrupting the design
- Add and optimize images for the web
- Manage categories and tags for content organization
- Set up redirects when content moves or changes
These videos don't need Hollywood production values—simple screen recordings with clear narration are incredibly effective. Store them in a central location where team members can easily reference them whenever they need a refresher.
Add PDFs or one-pagers on workflows
While videos are excellent learning tools, sometimes your team needs quick reference materials they can glance at during their workflow. Develop concise PDF guides or one-page reference sheets for common procedures:
- Editorial workflow checklists (from draft to publication)
- Content optimization quick guide
- Image size and format standards
- Decision trees for content categorization
- Common troubleshooting solutions
These resources can be printed and kept at workstations or saved on desktops for immediate access when needed.
5.3 Get professional training from an agency
While self-service learning resources are valuable, there's enormous benefit in bringing in professional trainers who understand both Sitecore and WordPress deeply. They can bridge the knowledge gap more effectively than generic materials.
Typical training offerings
Professional WordPress training typically includes:
- Customized workshops tailored to your specific WordPress implementation
- Role-based training sessions for different team members (editors, administrators, marketers)
- Hands-on exercises using your actual content and website structure
- Advanced feature training focused on your specific business needs
- Q&A sessions to address your team's specific concerns and questions
- Follow-up support to handle questions that arise as teams start using the system
Benefits of professional training
Professional training delivers several advantages over self-guided learning:
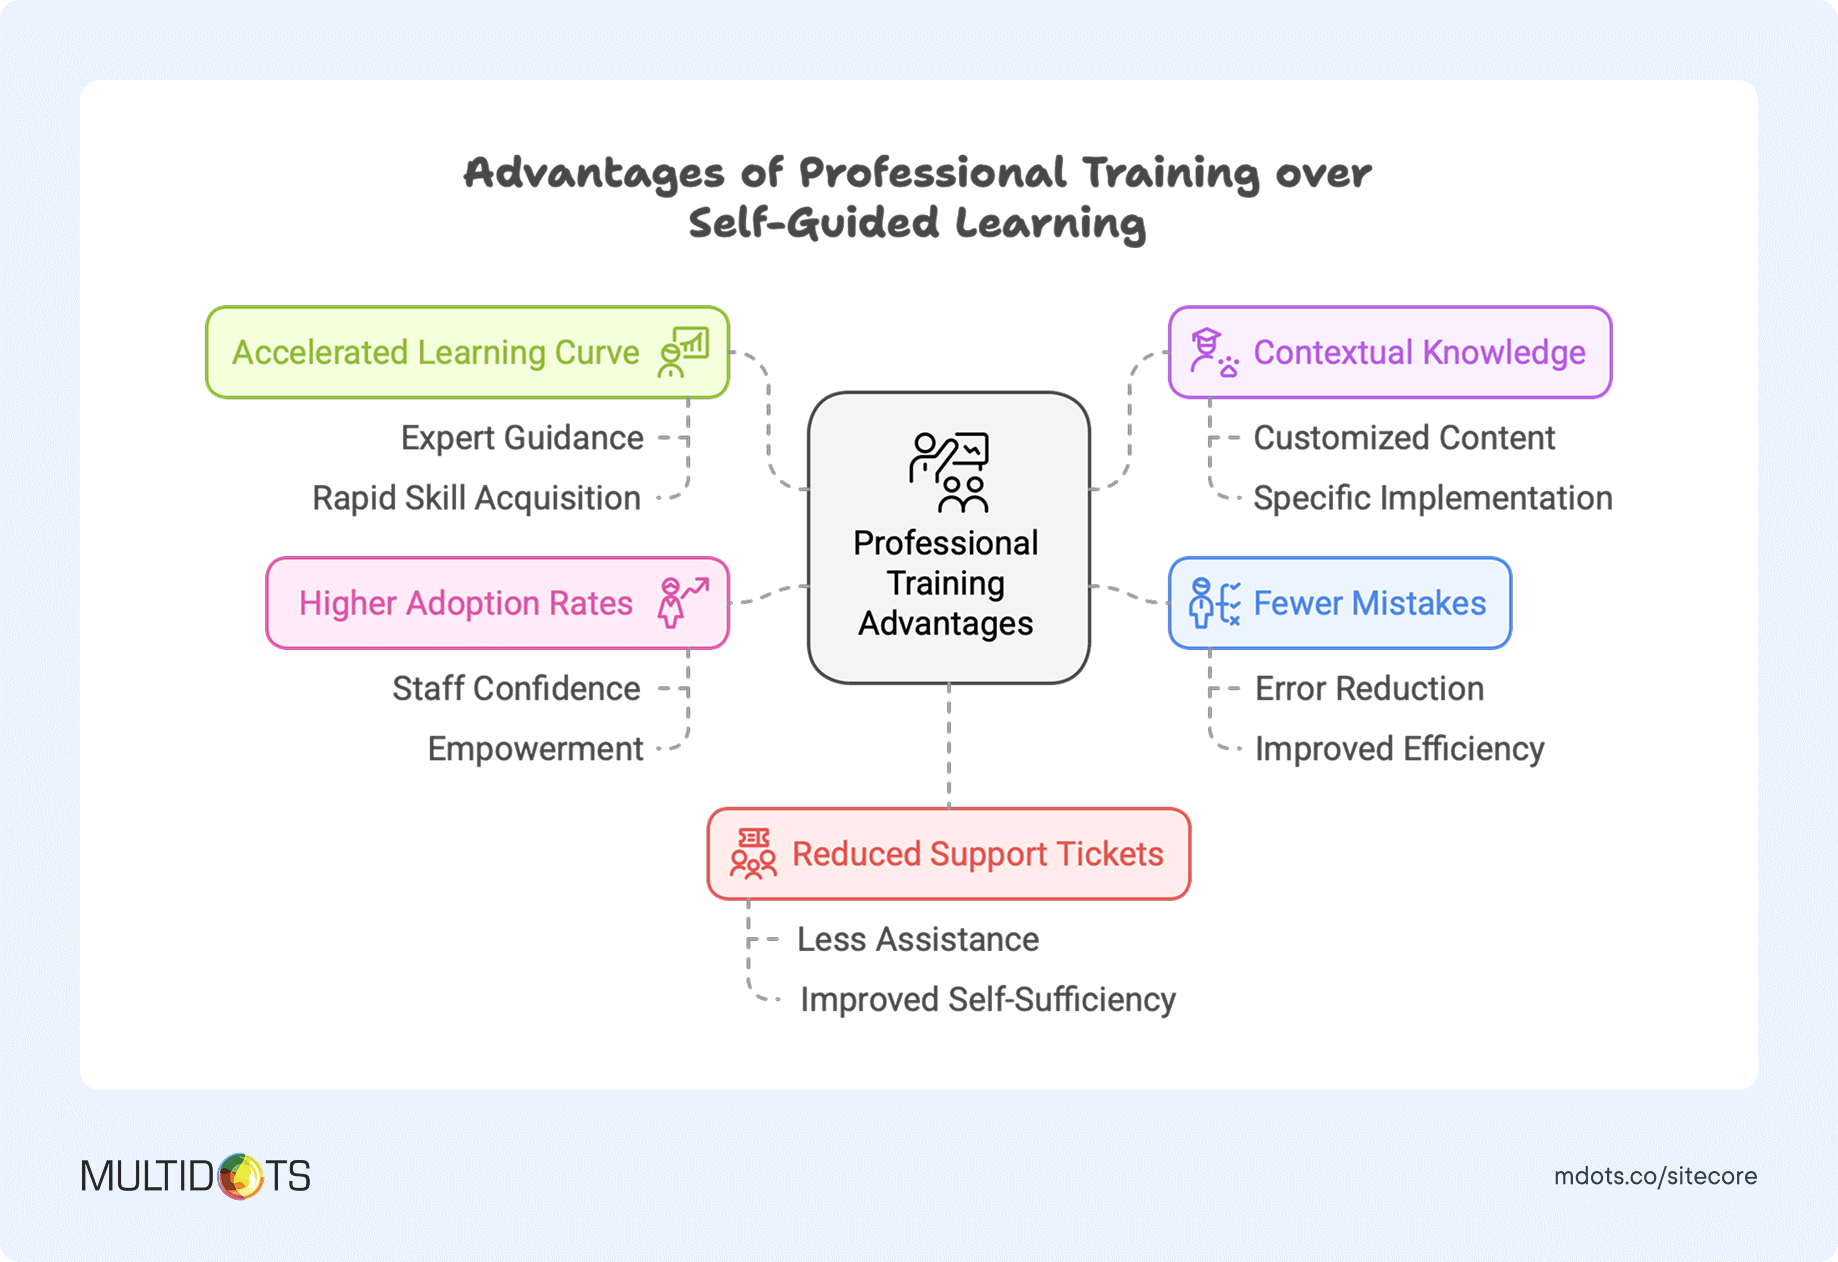
Multidots training services
At Multidots, we've developed a comprehensive WordPress training program specifically designed for teams transitioning from Sitecore. Our training isn't just about WordPress basics—it's about helping your team understand the differences between platforms and leveraging WordPress's strengths.
Our training packages include:
- Interactive live sessions with WordPress specialists
- Custom training materials based on your specific WordPress implementation
- Hands-on workshops using your actual website
- Personalized learning paths for different team roles
- 30-day post-training support to address questions as they arise
- Advanced sessions on WordPress SEO, performance optimization, and security
Whether you choose to migrate Sitecore to WordPress manually or with professional assistance, training is key to harnessing the full potential of your new WordPress site.
STEP 6: MAINTENANCE AND MONITORING
Congratulations! Your migration is complete, and your team is trained on the new WordPress platform. Now comes an equally important phase: ensuring your website stays secure, up-to-date, and performs optimally over time.
6.1 Regular plugin and WP updates
Follow these guidelines to keep your WordPress site secure and functioning smoothly:
- Create a staging environment for testing updates before applying them to your live site
- Schedule regular update checks at least once a month (weekly is even better)
- Document your plugin list and know what each one does to avoid redundancy
- Back up your site before performing any updates
- Update in this order: plugins first, themes second, WordPress core last
- Monitor your site after updates to catch any issues quickly
- Read changelog notes to understand what each update contains and whether it might impact your site's functionality
6.2 Continuous monitoring
Monitoring your WordPress site isn't just about knowing when it's down—it's about proactively identifying issues before they impact users.
Implement these monitoring approaches to maintain peak performance:
- Uptime monitoring: Services like Pingdom, UptimeRobot, or ManageWP constantly check if your site is accessible. They'll alert you immediately if your site goes down, often before your customers notice.
- Performance monitoring: Tools like New Relic, Google PageSpeed Insights, or GTmetrix help track your site's speed and performance over time, allowing you to identify when things start to slow down.
- Security monitoring: Solutions like Sucuri, Wordfence, or iThemes Security provide real-time security monitoring, alerting you to potential threats or suspicious activities.
- Error logging: Configure WordPress debug logging to catch PHP errors and warnings that might indicate underlying problems.
- Analytics monitoring: Regular review of your Google Analytics or similar platform helps identify unusual patterns in traffic that might indicate problems.
- Database monitoring: Tools like Query Monitor help identify database issues or inefficient queries that could be slowing down your site.
For enterprise WordPress sites, we recommend implementing a comprehensive monitoring strategy that combines automated tools with regular manual checks. Set up a monitoring dashboard that gives you a unified view of all your critical metrics in one place.
6.3 Support and maintenance contracts
Even with the best in-house team, having professional WordPress support provides peace of mind and access to specialized expertise when you need it most.
What to look for in maintenance contracts
When evaluating WordPress maintenance services, consider these key factors:
- Update frequency: How often will they check and apply updates?
- Response time guarantees: What's their SLA for emergency issues vs. standard requests?
- Security audits: Do they perform regular security scans and audits?
- Backup frequency and storage: How often are backups created, and where are they stored?
- Performance optimization: Do they proactively monitor and improve site performance?
- Development hours: Are development hours for small tweaks and fixes included?
- Reporting: Will you receive regular reports on work performed and site health?
- Support channels: How can you reach them (phone, email, ticket system), and what are their hours?
- Proactive vs. reactive support: Do they just fix problems, or do they actively look for ways to improve your site?
Multidots maintenance and support offerings
At Multidots, we offer three flexible approaches to website maintenance that cater to different needs:
- Support Packages: Our super flexible support packages range from 50 to 500 hours and cover a wide range of services, including bug fixes, new features, performance optimization, and expert consulting. You have six months to use your allocated hours, giving you maximum flexibility to address your maintenance needs as they arise.
- Hire Dedicated Developers: For more complex ongoing maintenance needs, our monthly developer plans allow you to hire a dedicated team (or just one developer) with the flexibility to scale up or down as needed. We offer four different skill levels to match your project's requirements and budget, ensuring you get exactly the expertise you need.
- Managed Website Maintenance: Our Managed Maintenance Services provide comprehensive care for your WordPress site, ensuring it stays secure, optimized, and performing at its peak. We handle everything from updates to uptime monitoring, allowing you to focus on your core business. This service includes proactive support, quality-assured updates, and expert consultancy to keep your digital presence running smoothly.
Clients who subscribe to our maintenance services experience 99.9% uptime, fewer security incidents, and significantly improved site performance compared to self-maintained WordPress sites.
Whether you need ad-hoc support, dedicated developers, or comprehensive managed maintenance, Multidots has a solution designed to keep your WordPress site running at its best.
Looking for more personalized guidance on your website maintenance needs? Schedule a free website maintenance consultation with our experts today.
ADDITIONAL RESOURCES
Looking for quick answers or want to take this guide with you? We've got you covered with these helpful resources.
FAQs: Common questions related to Sitecore to WordPress Migration
-
Yes, WordPress supports integrations with platforms like Salesforce, HubSpot, and Azure via plugins, APIs, or custom development, making it a flexible choice.
-
WordPress’s REST API and support for GraphQL enable robust, API-first setups similar to Sitecore for dynamic and decoupled applications.
-
Managed hosting solutions like WordPress VIP, WP Engine, or Kinsta are recommended for enterprise-grade performance, security, and support.
-
Your current designs and UX flow can be replicated or improved in WordPress using custom themes, Gutenberg editor and advanced page builders.
-
The migration typically takes 4-8 weeks depending on complexity, with downtime minimized through staging environments and careful execution.
-
WordPress ensures security with regular updates, managed hosting firewalls, and plugins like Wordfence for DDoS protection and vulnerability scans.
-
Caching plugins, image optimization tools, and enterprise hosting ensure fast loading times. Regular performance audits further enhance speed.
-
WordPress integrates seamlessly with CDNs like Cloudflare or Akamai to handle global traffic efficiently.
-
WordPress eliminates licensing fees, with expenses focused on hosting, premium plugins, and development. Costs are typically 40-60% lower than Sitecore. Find out exact ROI on migrating to WordPress.
-
Hosting and plugins scale with your business needs, and managed hosting can handle surges without significant cost increases.
-
WordPress scales effortlessly with global traffic, supports AI integrations through APIs and plugins [check out guide] and adapts to new features or technologies as your business grows.
Download our in-depth guide as a PDF and move from Sitecore to WordPress with confidence
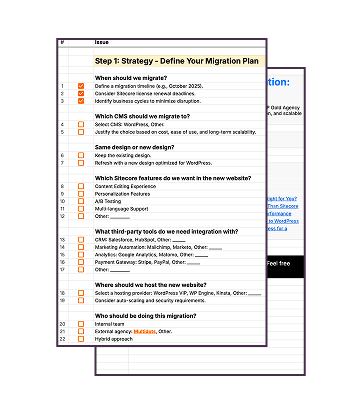
Grab our downloadable checklist to map out your Sitecore to WordPress transition
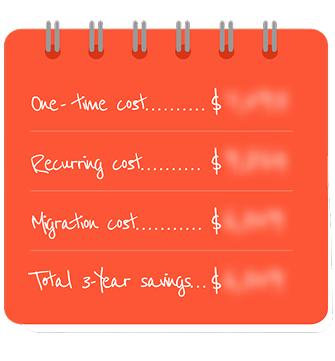
Find Out How Much You Can Save (Yearly) by Switching Your Website to WordPress?
Feel free to schedule a quick call with our migration expert.
Contact Us