The Essential Guide to Measuring and Improving Core Web Vitals for Your WordPress Site
Master the essential techniques to measure and improve Core Web Vitals on your WordPress site for optimal performance
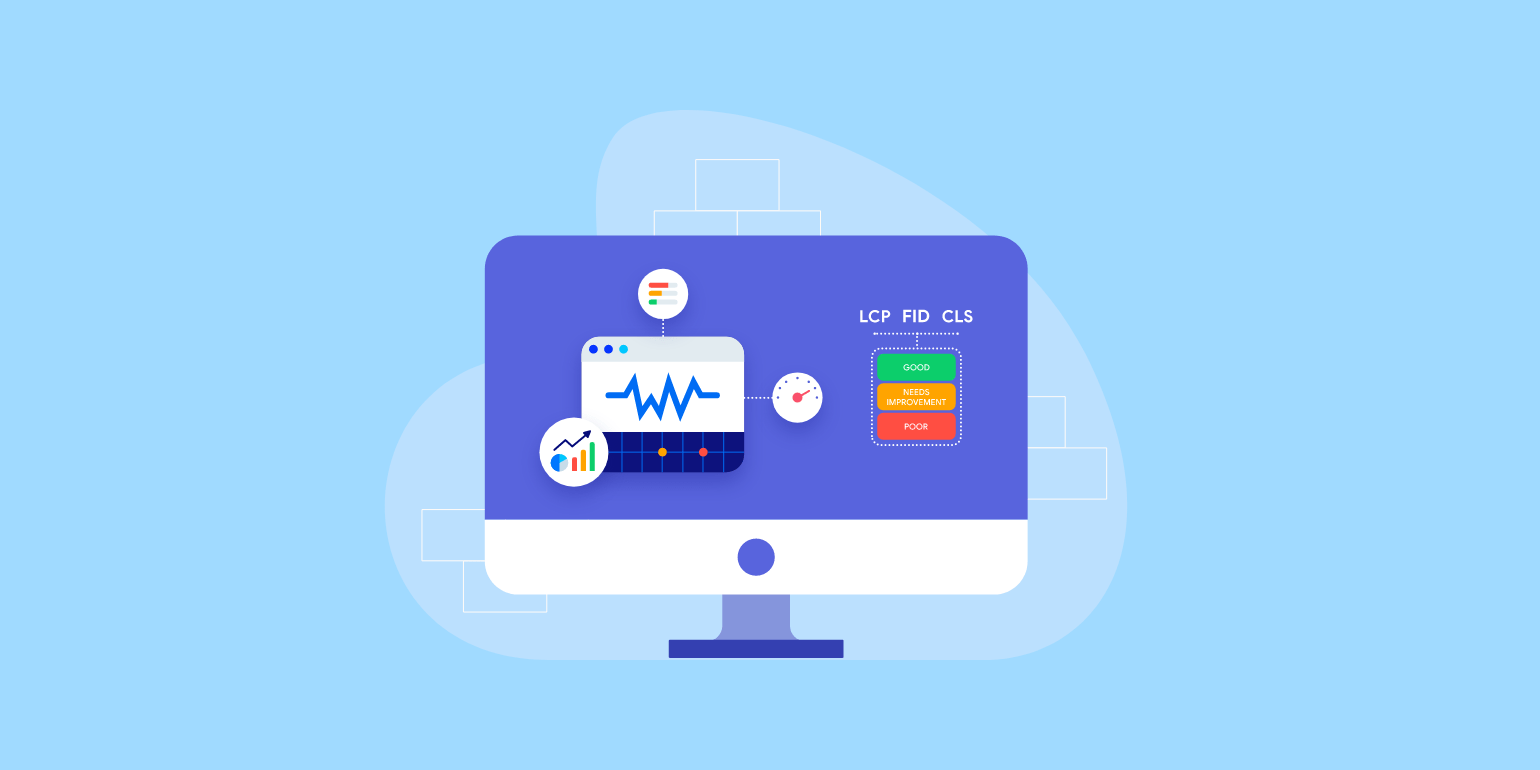
Table of Contents
Google raised the bar for SEOs when it introduced its Core Web Vitals project. The page experience update sent a clear message to site owners that offering a great page experience was critical for dealing with bounce rates and boosting engagement and conversions.
So, rather than focusing on the generic metrics that measure a site’s performance, Google will use the core web vitals that directly connect a WordPress site’s performance to deliver a great user experience.
And why not?
User experience offers businesses a serious competitive advantage. When it comes to pricing, 8 in 10 customers are willing to pay a premium for better experiences.
Also, poor experiences are driving customers away and a majority of them tell their friends about bad online experiences.
Hence, no business, small or big can afford to ignore the power of delivering an awesome user experience.
In this post, we will share interesting insights on Google’s Core Web Vitals project and offer guidance on how to measure your present score.
So, let’s begin with the basic question - what are core web vitals?
What Are Google Core Web Vitals?
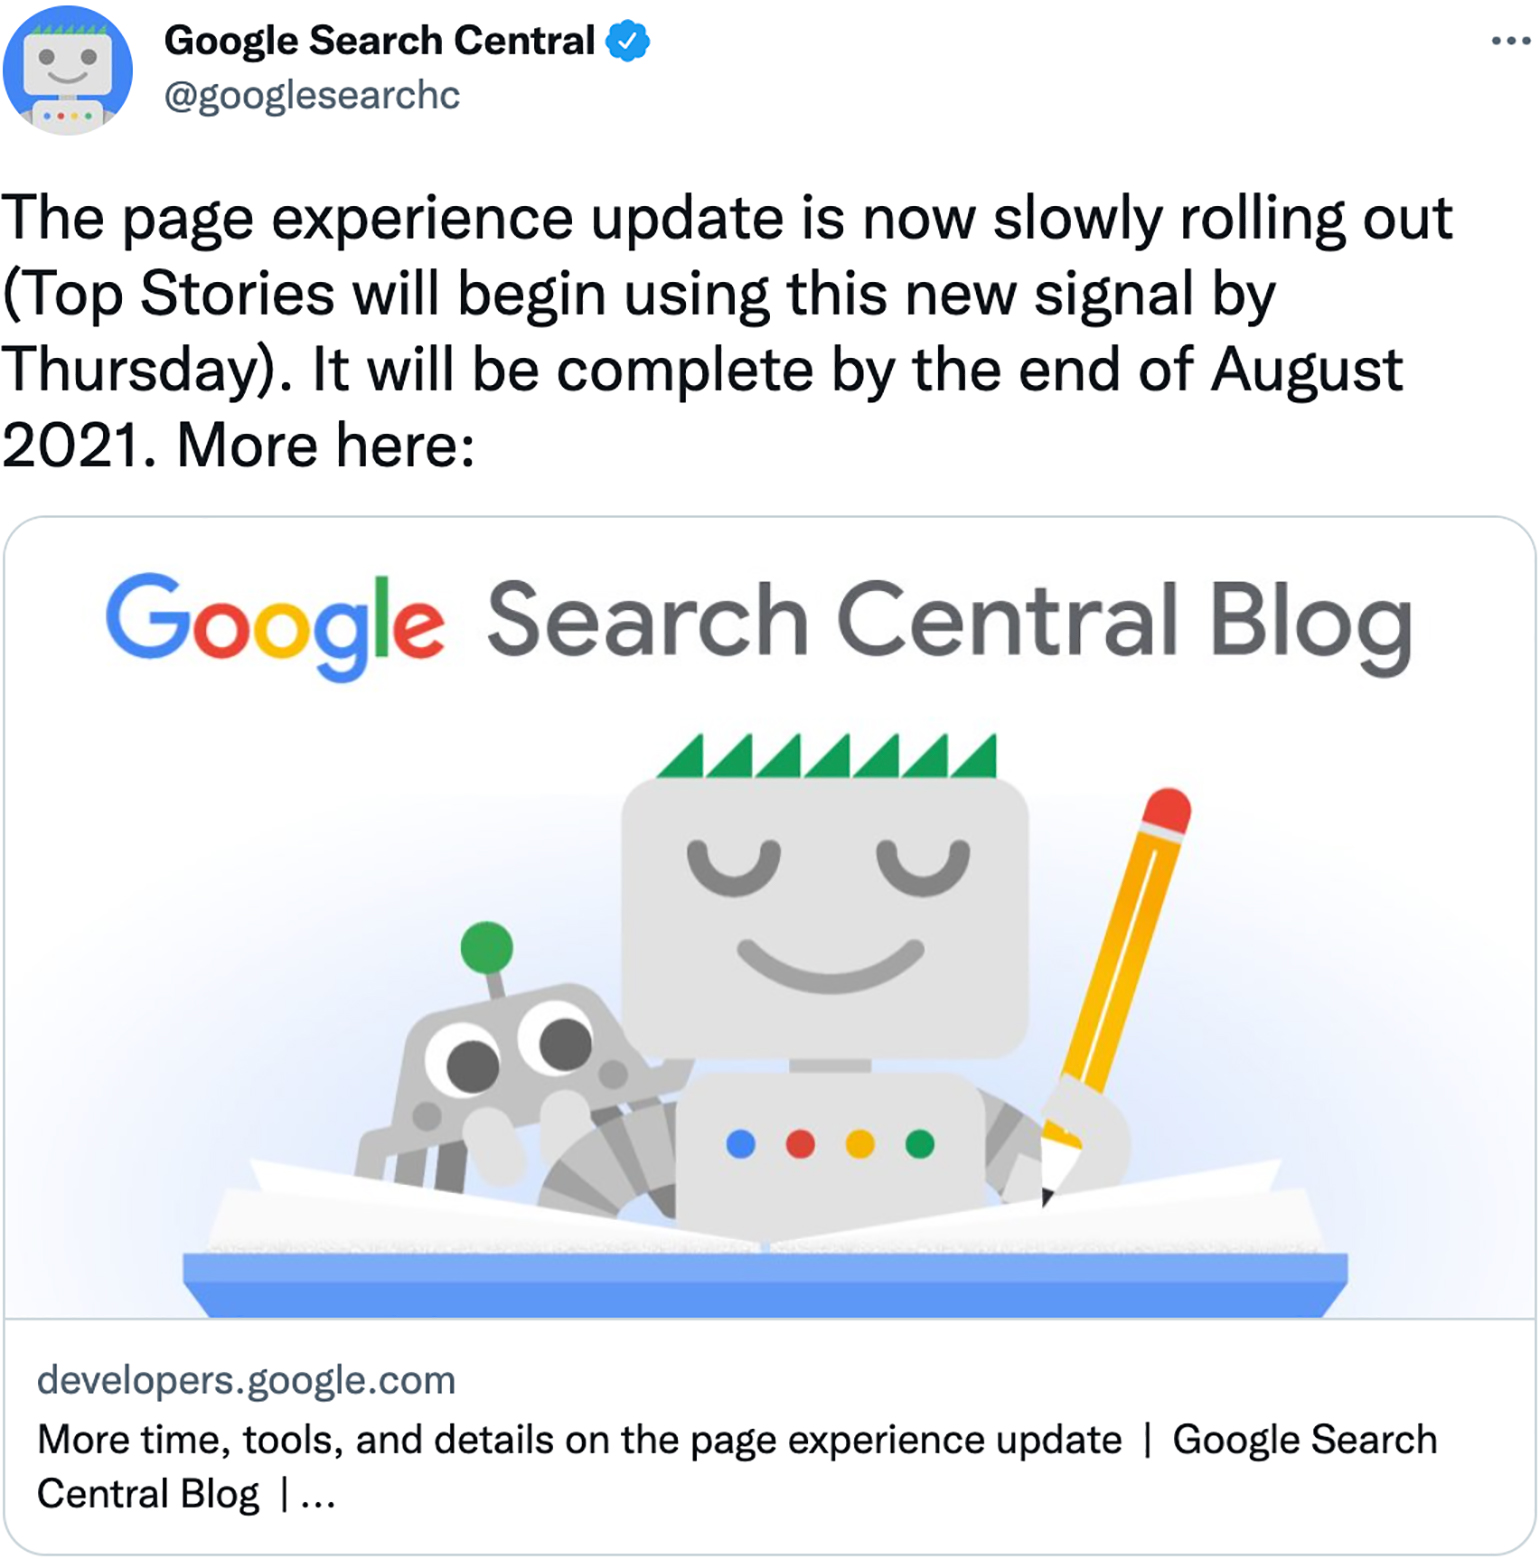
To improve page experience, last year (June 2021) Google announced the page experience update. The search engine giant considered five page experience signals, one of which are the Core Web Vitals.
These new web vitals will be prioritized as a part of Google’s new page experience update besides other categories like mobile usability, security issues, HTTPS, and ad experience.
Google has always considered the below-mentioned factors as the pillars of page experience. Hence, it chose to align its core web vitals with them,
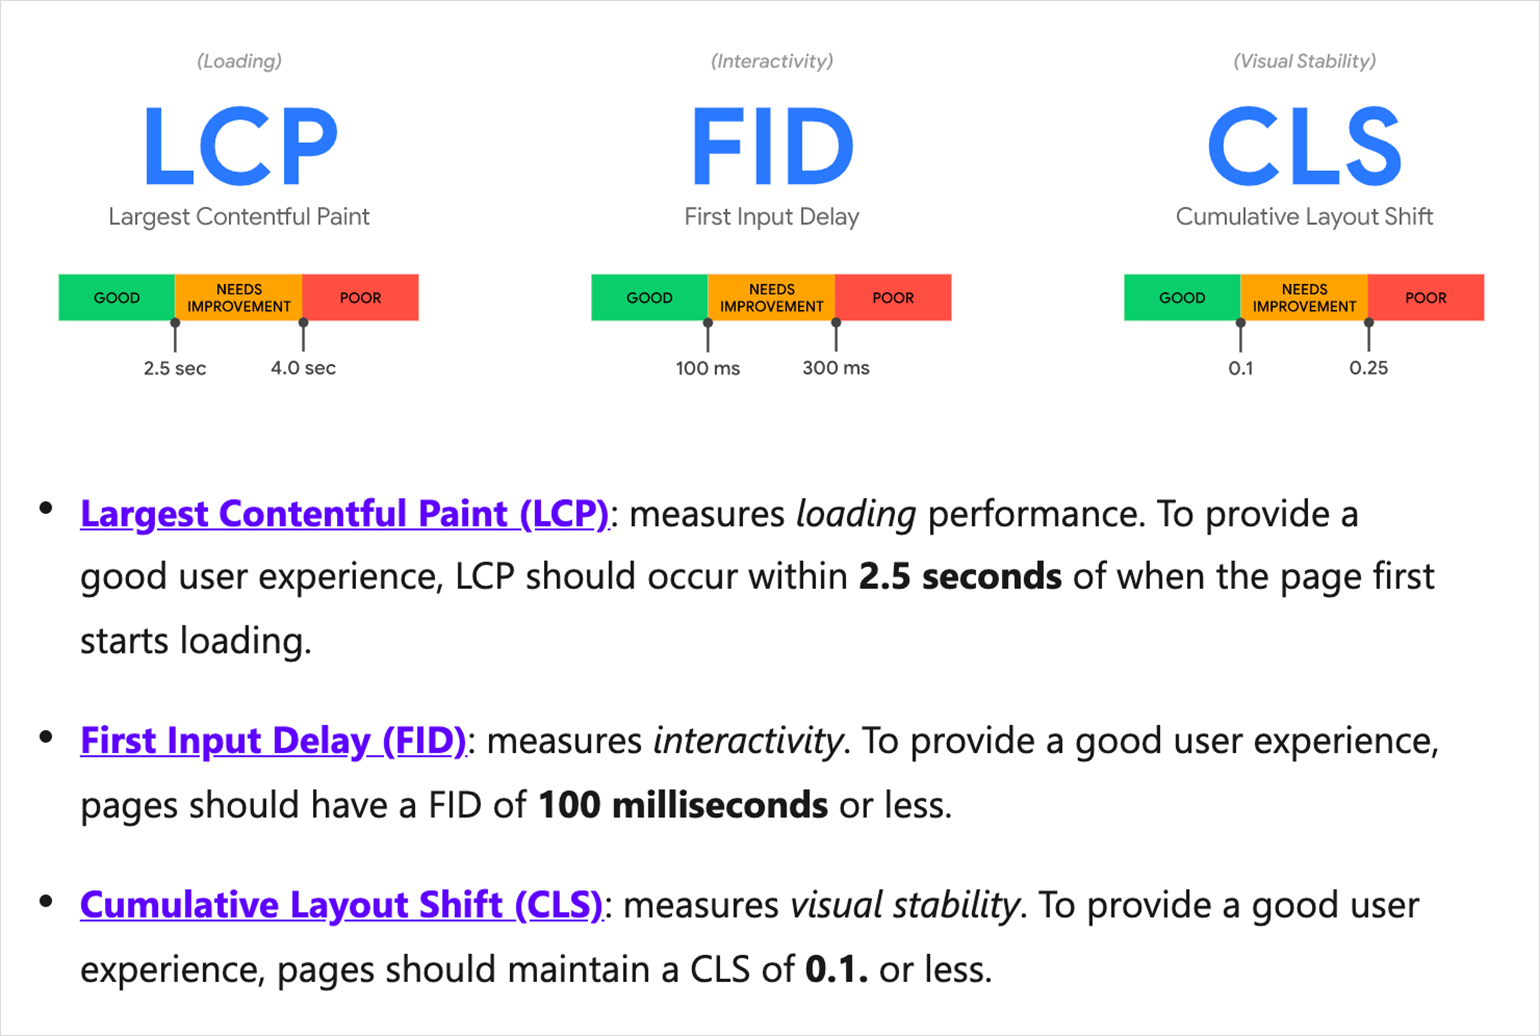
- Loading performance - How fast content appears on the screen - LCP
- Responsiveness - How fast a page responds to user input - FID
- Visual stability - Whether the content on a page moves around on the screen while loading - CLS
Largest Contentful Paint (LCP)
It focuses on the page load time. It is assessed by the time taken for a single page to load from the user’s perspective.
First Input Delay (FID)
FID focuses on the interactivity and user’s ability to interact with a page.
Cumulative Layout Shift (CLS)
CLS emphasizes the visual stability of a page.
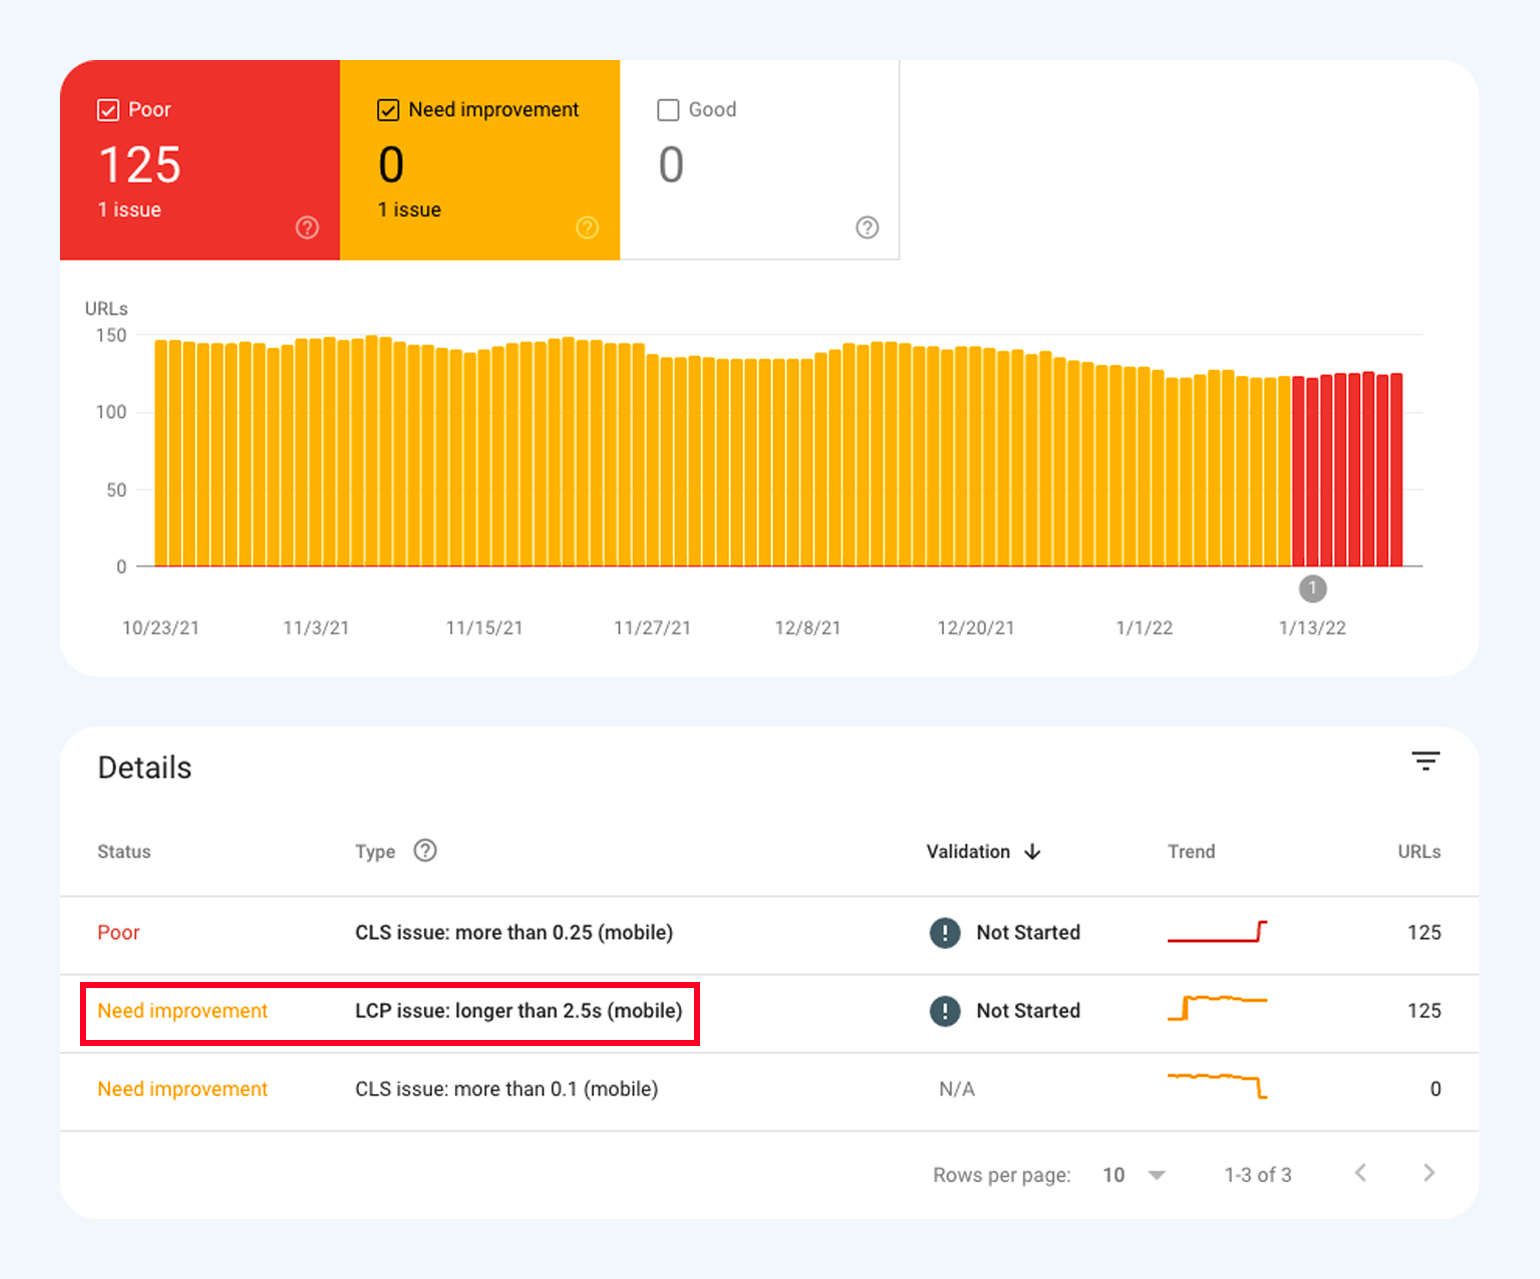
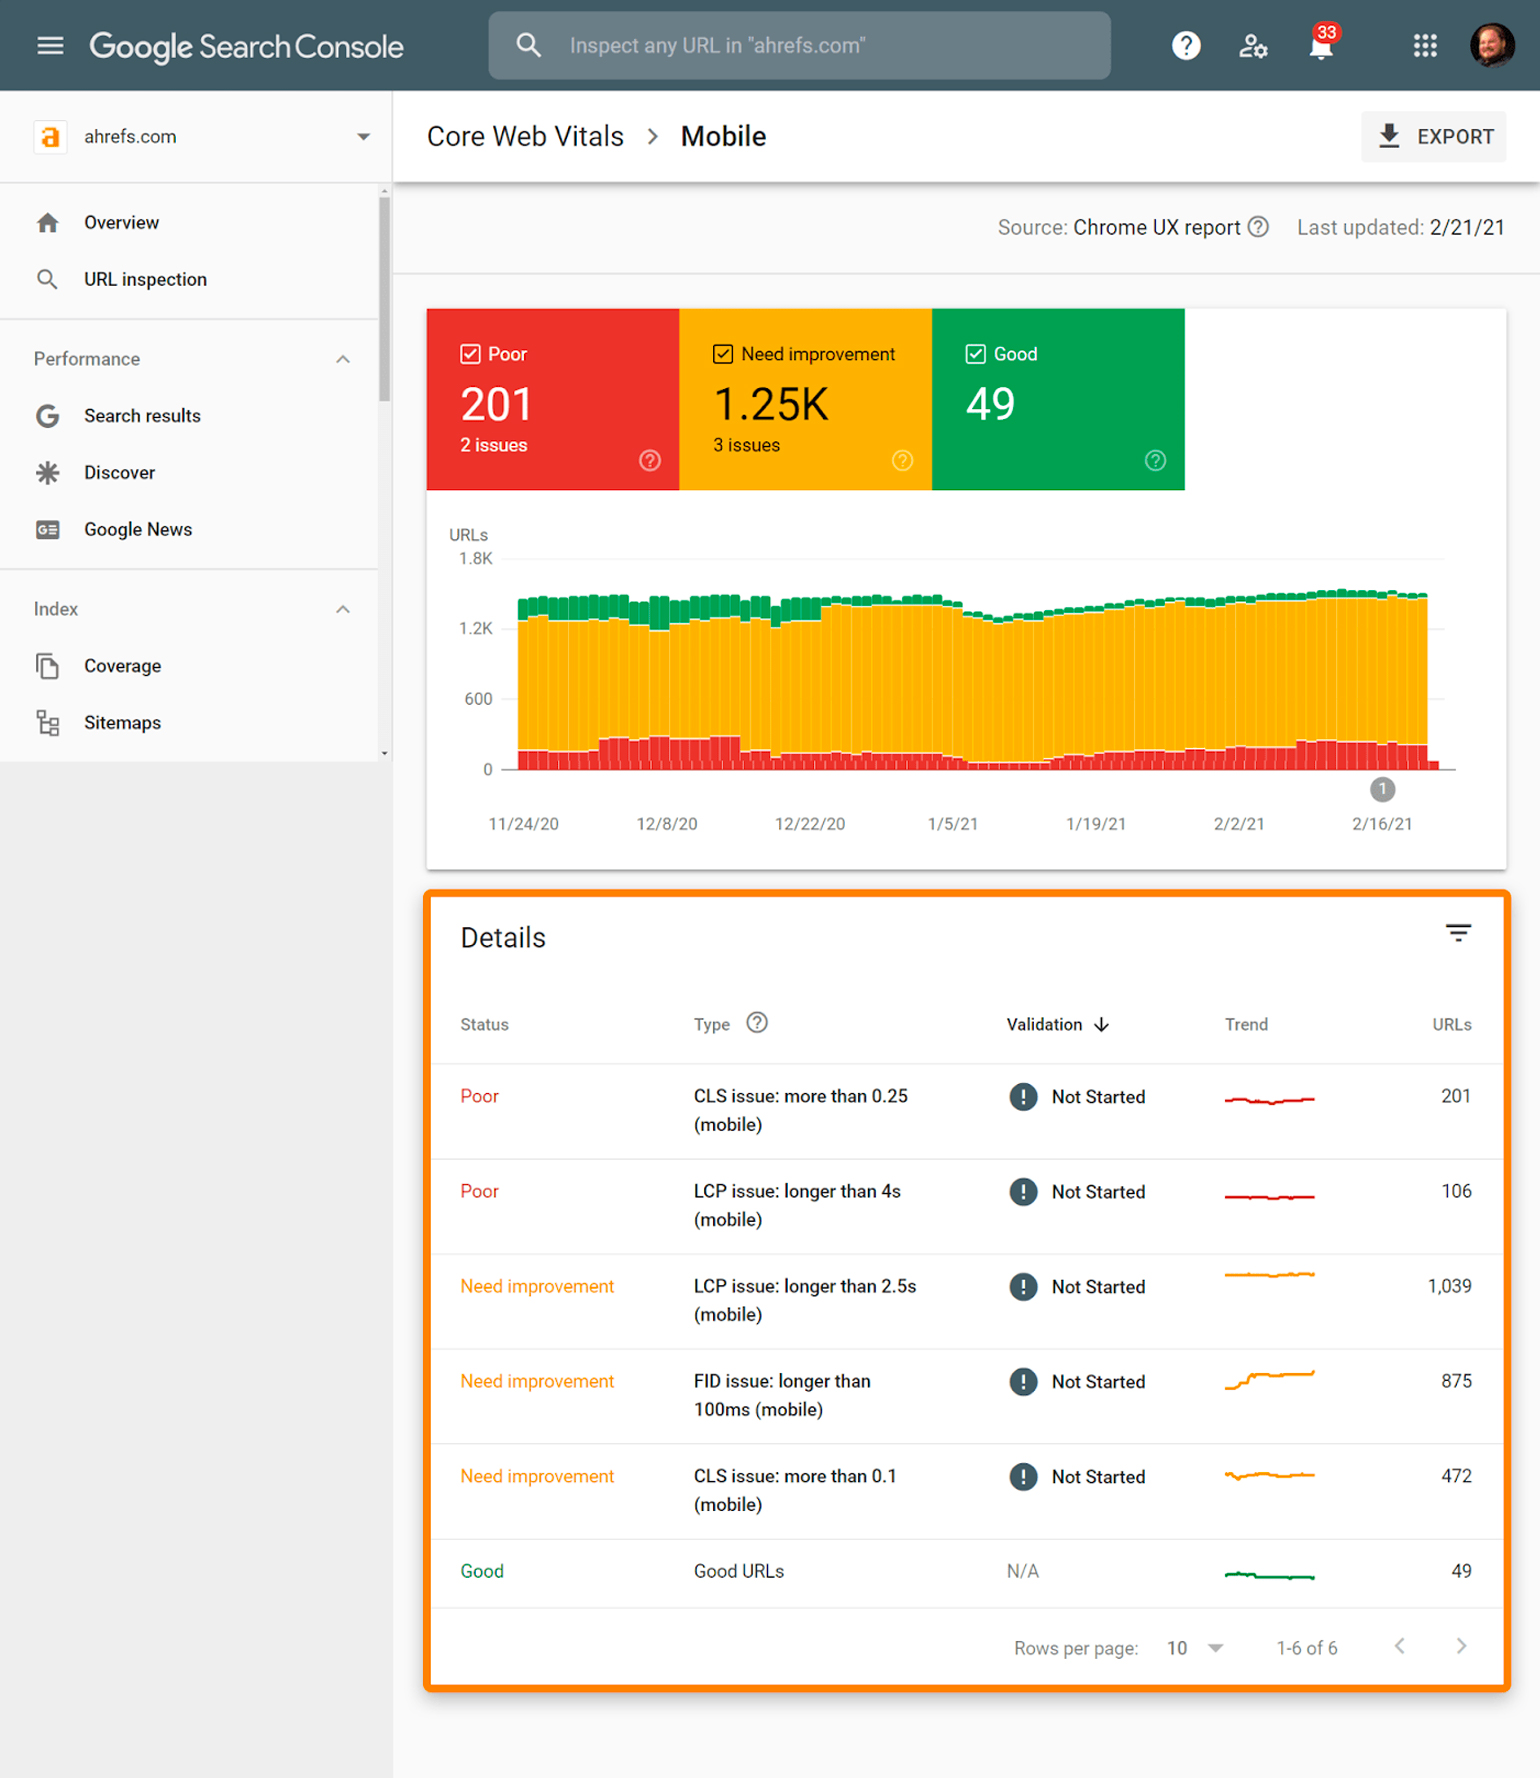
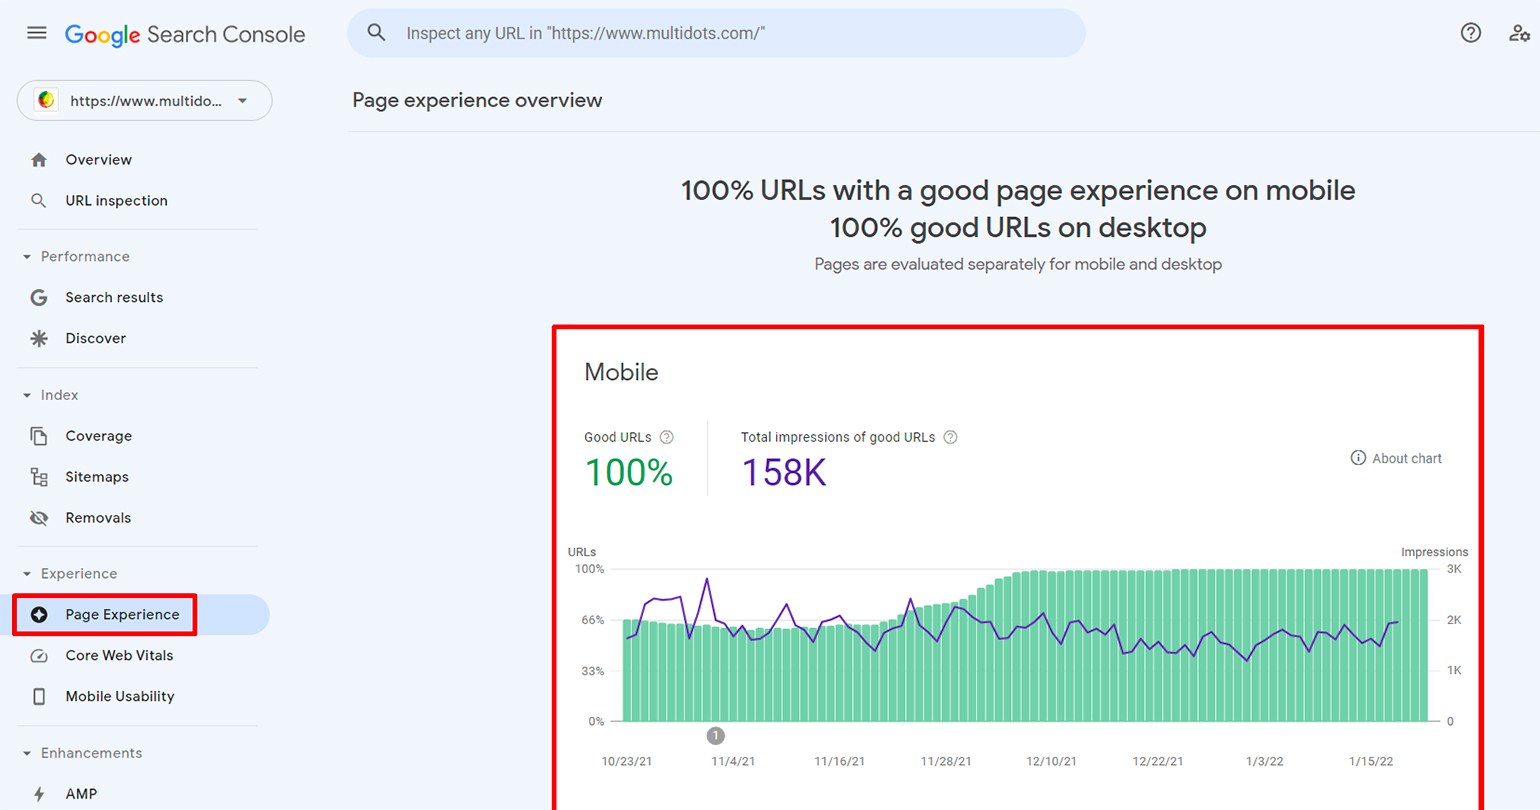
If the pages on a website pass all these three areas, it counts for a good page experience rating. You can monitor your WordPress site performance in the Core Web Vitals report in Search Console. It clearly shows you the URLs marked good or bad with issues you need to address.
Do Core Web Vitals Affect SEO as a Ranking Factor?
In May 2020, Google Search Central made a pre-announcement that the Core Web Vitals would be a key ranking factor.
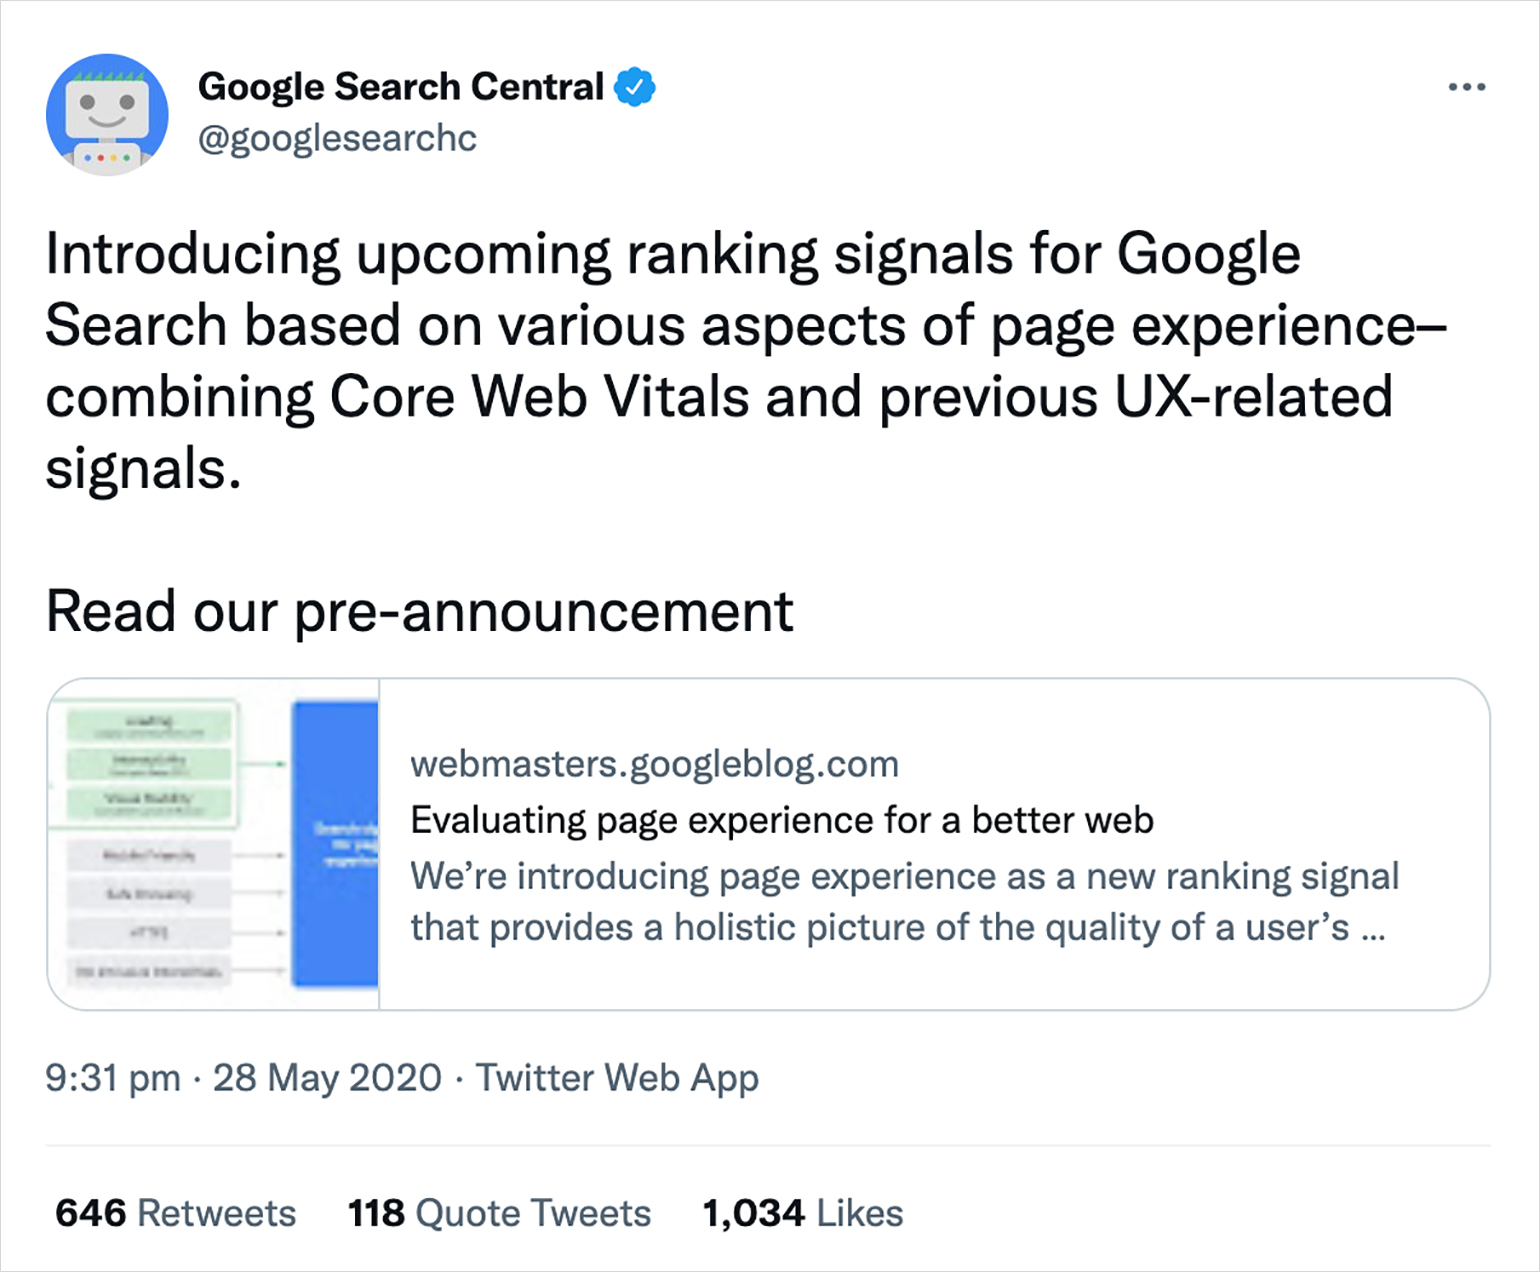
These set of metrics related to speed, responsiveness, and visual stability were being introduced to help site owners measure UX and ensure great page experience.
Google has confirmed that Core Web Vitals are a ranking factor. Hence, the search giant offers a sea of advice for improving your LCP, FID, and CLS for boosting your site’s experience and ranking.
So, it’s time to visit each of the core web vitals in detail. However, before that it’s important to know the difference between field data and lab data because this data is used to assess the Core Web Vitals.
Field data versus Lab data
The concept of field and lab data were introduced to measure web performance. PageSpeed Insights is a critical tool that helps webmasters measure their page performance on mobile and desktop. The tool offers both lab and field data.
Field data is critical for capturing real-world user experience whereas lab data is useful for debugging performance issues in a controlled environment.
Field Data
Field data represents the ‘real’ browsing experience of users accessing and interacting with your website. It unearths the data that’s otherwise tough to capture in a lab environment.
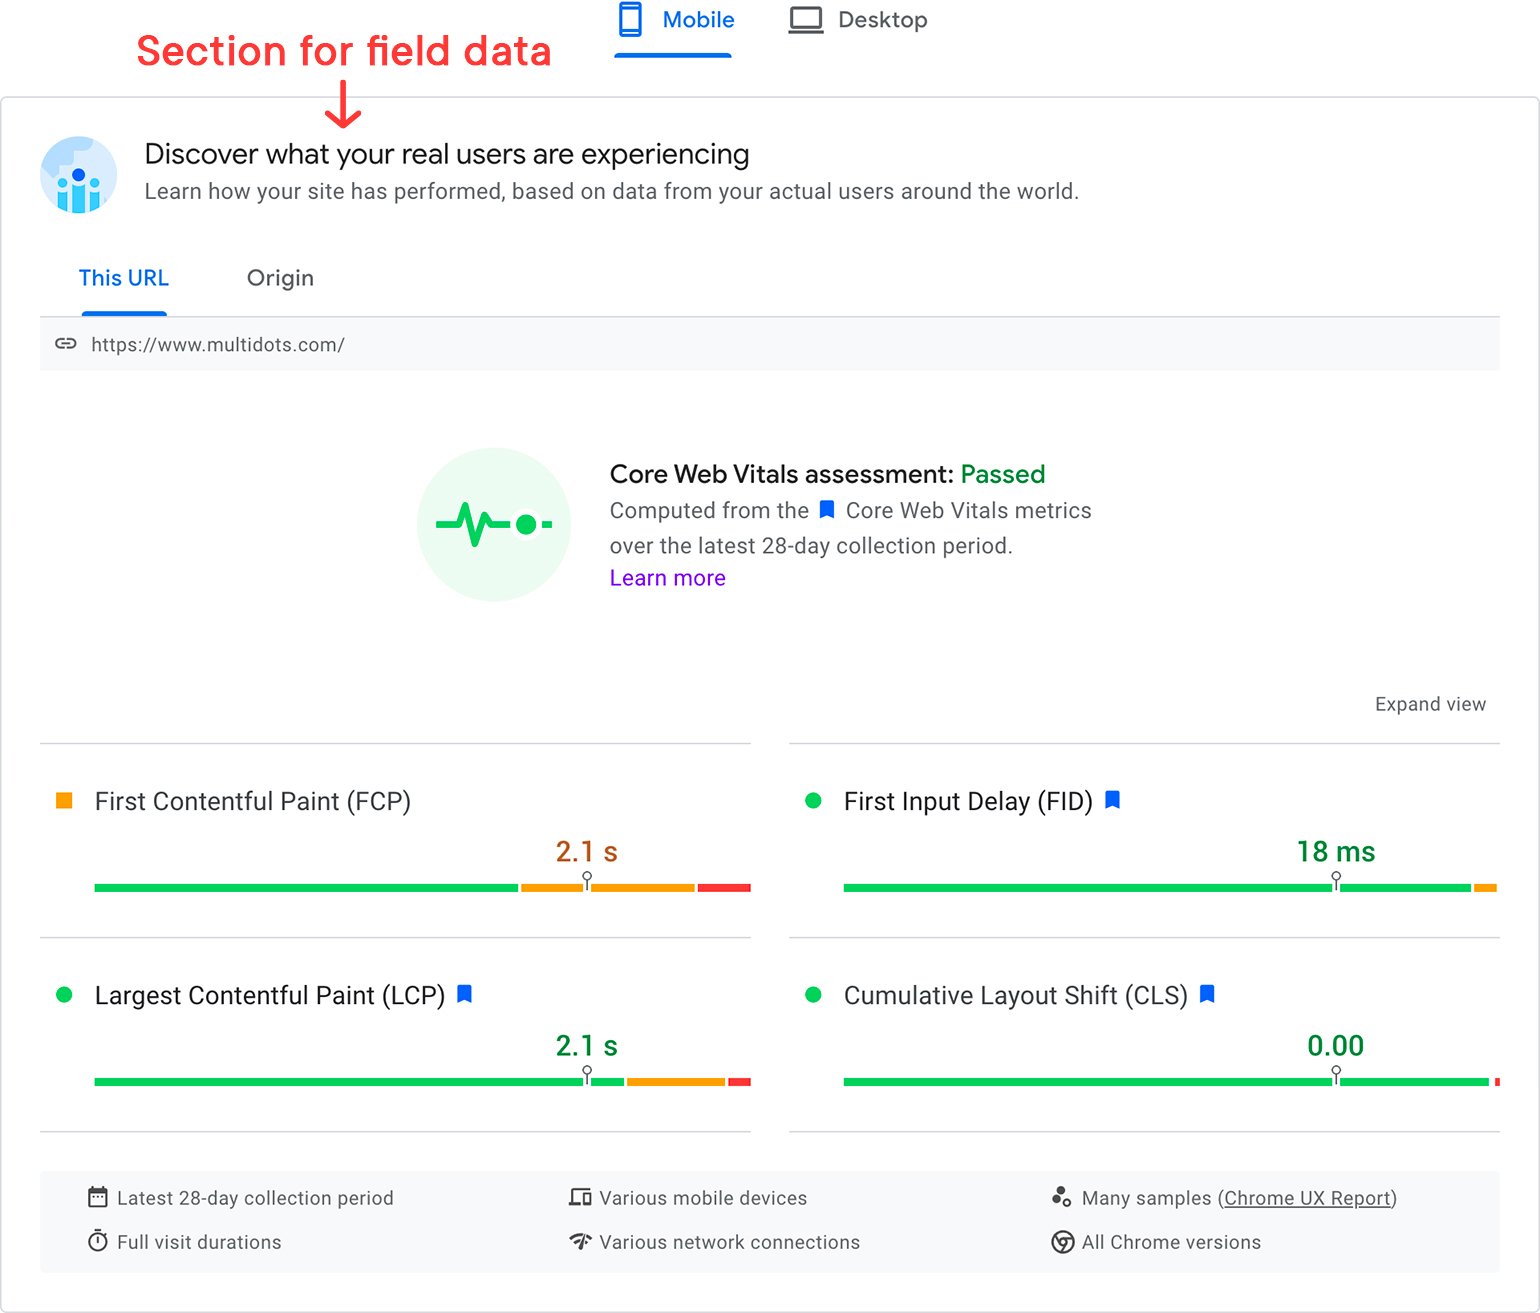
This data is also referred to as real user measurement, real user monitoring, or simply RUM. Since this data is procured from real users interacting with the website under certain conditions, it is more reliable when compared to lab data.
This data is affected by the device and connection used for browsing. Thus, the lab data may look great because developers usually work with modern devices and stable internet connections. But if the users are located in areas with unstable internet connections or a legacy system, the field data will show a different picture.
Hence, field data is a better indicator of whether or not your site’s user experience is good.
Lab Data
Lab data is captured in a controlled environment. It uses a predefined set of devices and network specifications. The process is referred to as synthetic monitoring.
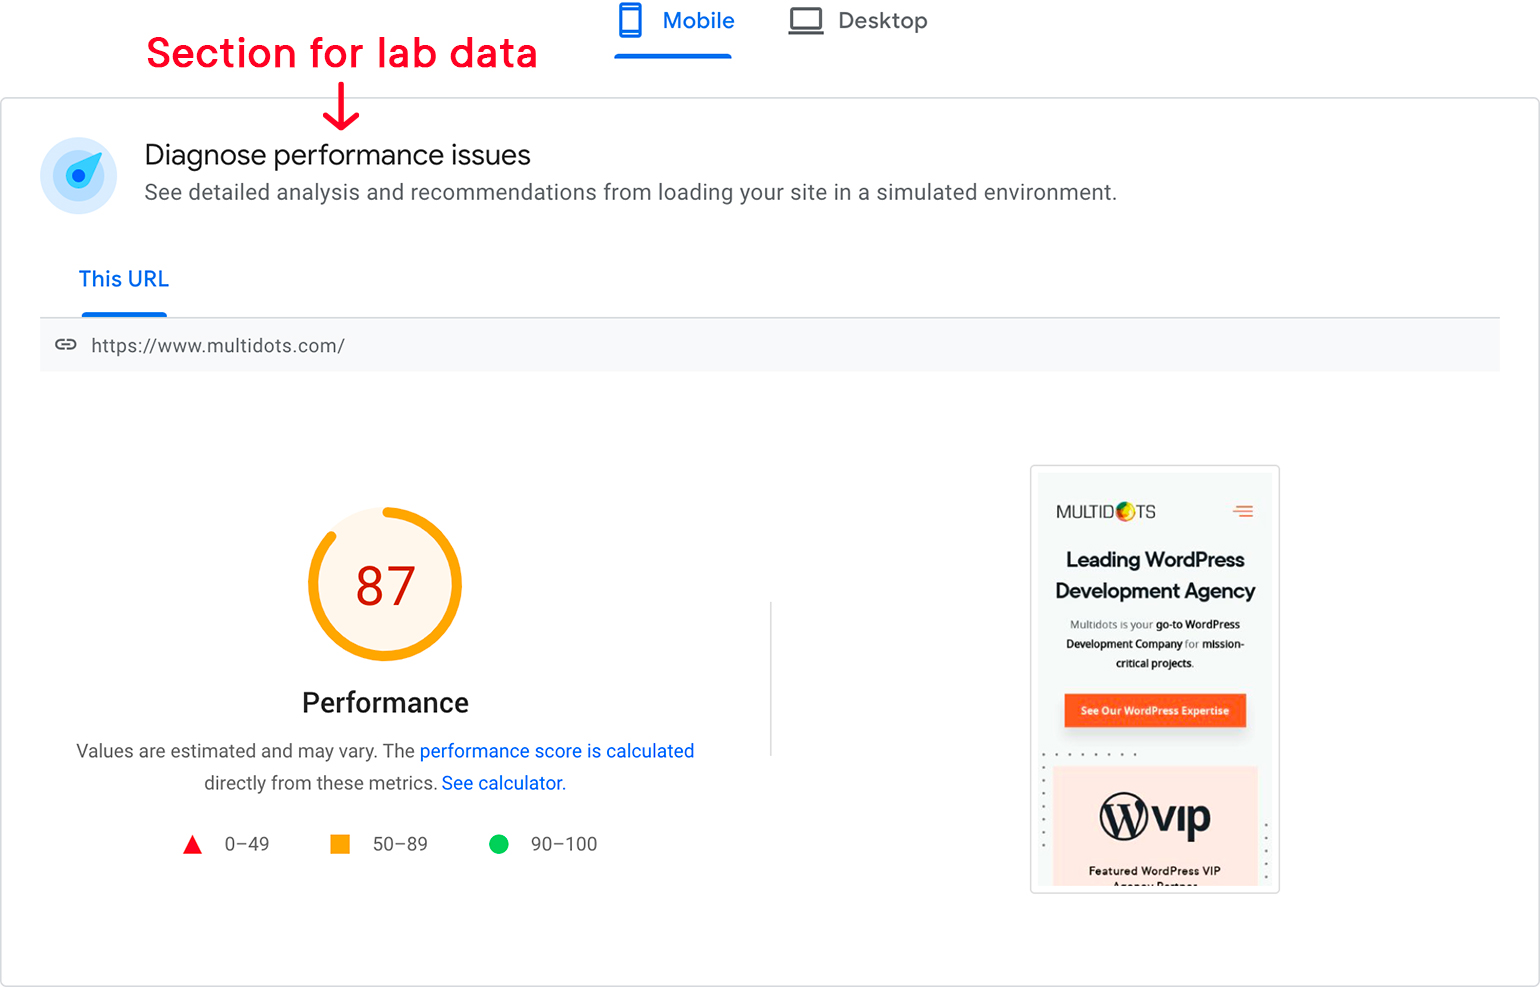
As shown in this image, lab data is used for diagnosing and debugging possible performance issues. However, it doesn’t caption real-world experiences.
Yet, lab data is a great option for developers when they don’t have access to real user data.
Google’s Martin Splitt recently explained that field data is more reliable than lab data as it is an indicator of how real users experience and interact with a website.
Here’s what Splitt said -
‘Field data is coming from real users, whereas lab data comes from a quite strong machine with probably good internet from somewhere around the world. So you might not see the same results.’
Now that we are clear on how field and lab data compare, let’s look at each of these Core Web Vitals in detail.
Large Contentful Paint (LCP)
Page loading time is a huge factor in user experience. Slow loading pages negatively affect the experience, thereby ruining brand perception and ranking.
Hence, the LCP metric is a critical one as it reports the render time of the most meaningful content or image block visible within the viewport relative to when the page begins loading. This is usually for the hero section of the site or the featured image.
Imagine you land on a page and wait patiently for the featured image to load fully. If it takes a long time to load, you’d be annoyed. You’d also be tempted to leave the page.

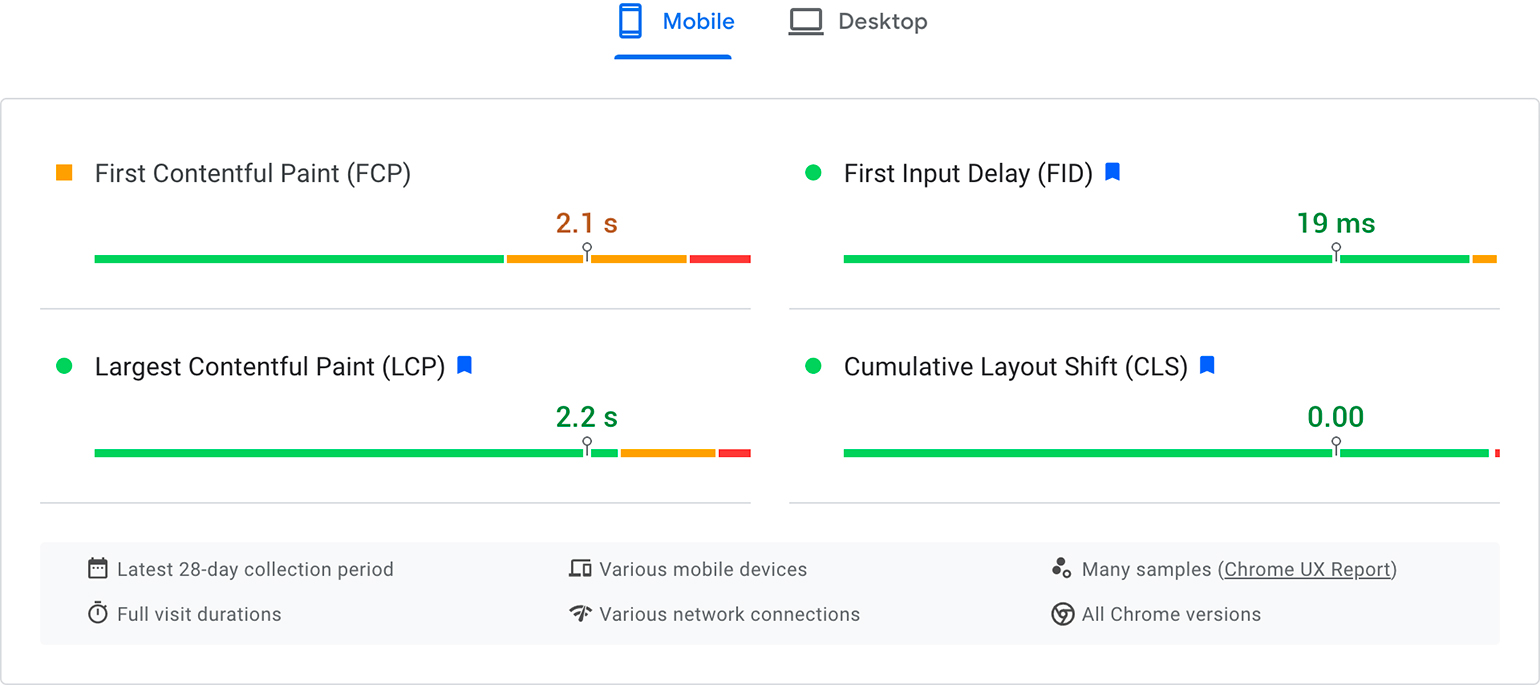
Hence, webmasters should aim at an LCP score of 2.5 seconds or lower.
LCP is pretty similar to FCP or First Contentful Paint, another metric in the PageSpeed Insights. The key difference between the two is that LCP measures when the ‘main’ content loads.
On the other hand, FCP focuses on when the ‘first’ content loads. This could be anything (not necessarily the main content); hence, this metric is less relevant to the UX element of a website.
Elements Considered for LCP
Here are the types of elements considered for LCP.
- <img> elements
- <image> elements inside an <svg> element
- <video> elements - Here, the poster image is used
- An element with a background image loaded through the url() function
- Block-level elements that contain text nodes or other inline-level text elements children.
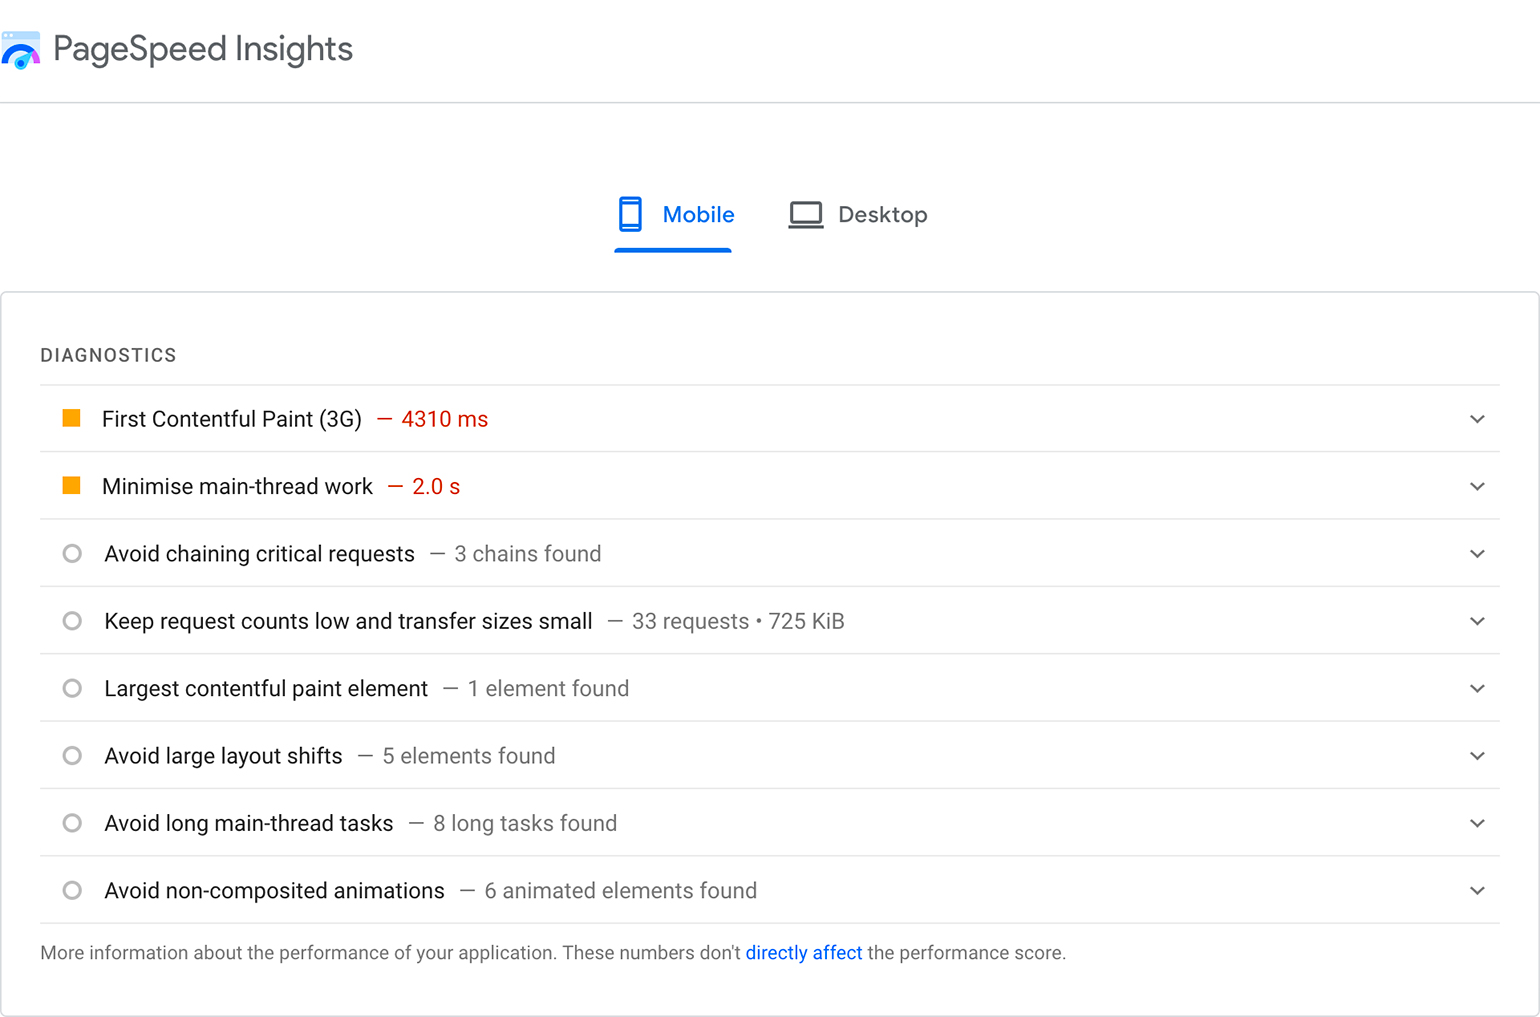
Where Can You Monitor LCP?
The LCP element is specified in the Diagnostics section of Google PageSpeed Insights. The tool reports the real user data collected by Google while triggering a lab-based test of the site. The results are reported under Field Data and Lab Data, respectively.
What Else Should You Know about LCP?
LCP is by far the most challenging CWV metric to improve.
Why?
Because LCP depends on TTFB (the Time to First Byte) which relies on how fast the server responds. Depending on the framework used, it can be challenging to reduce the server response time.
This is particularly challenging in the case of ecommerce websites and sites with tons of images, graphics, and illustrations. Ecommerce websites are dynamic and often possess thousands of product and category pages that make caching tough to implement.
In such cases, we recommend using a premium WordPress caching plugin that helps with load times. The plugin also comes with other features like page caching and lazy loading that help improve LCP.
First Input Delay (FID)
One big mistake WordPress developers commit is to believe that once written, the code is immediately going to run. However, more often than not, users are frustrated when a page is slow to respond after an interaction.
One of the biggest reasons for input latency is that the browser is busy parsing and executing a large JavaScript file loaded by your app. FID is one metric that measures such ‘delays’ in event processing.
First input delay or FID is meant to track the time passing between when a user interacts with an element on the page and the browser responding to or processing that request. This interaction could be a click on the link or a button or choosing an option in the menu.
For instance, when you click on the ‘Submit’ button, how long does it take for the details to be submitted? Or when you click on a link to expand the accordion section, how long does it take to display the content?
Websites hosting large pieces of content may not have to worry a lot about this core web vital. However, it is important for those sites that include an interactive call to action at the end of their pages, having a signup page, or sharing gated content.
A slow response when the user clicks on the CTA could negatively affect user experience, causing them to leave. Hence, Google recommends aiming for an FID score of 100 milliseconds or less.

The possible interactions considered in First Input Delay are -
- Clicking on a link or button
- Adding input text into a blank field
- Selecting a drop-down menu
- Clicking a checkbox
Where Can You Monitor FID?
First input delay is a field metric that can be monitored using two tools, PageSpeed Insights (PSI) and Google Search Console Core Web Vitals Report.
- PageSpeed Insights
Google’s PSI is a Chrome User Experience Report or CrUX tool that shares insights related to all the core web vitals.
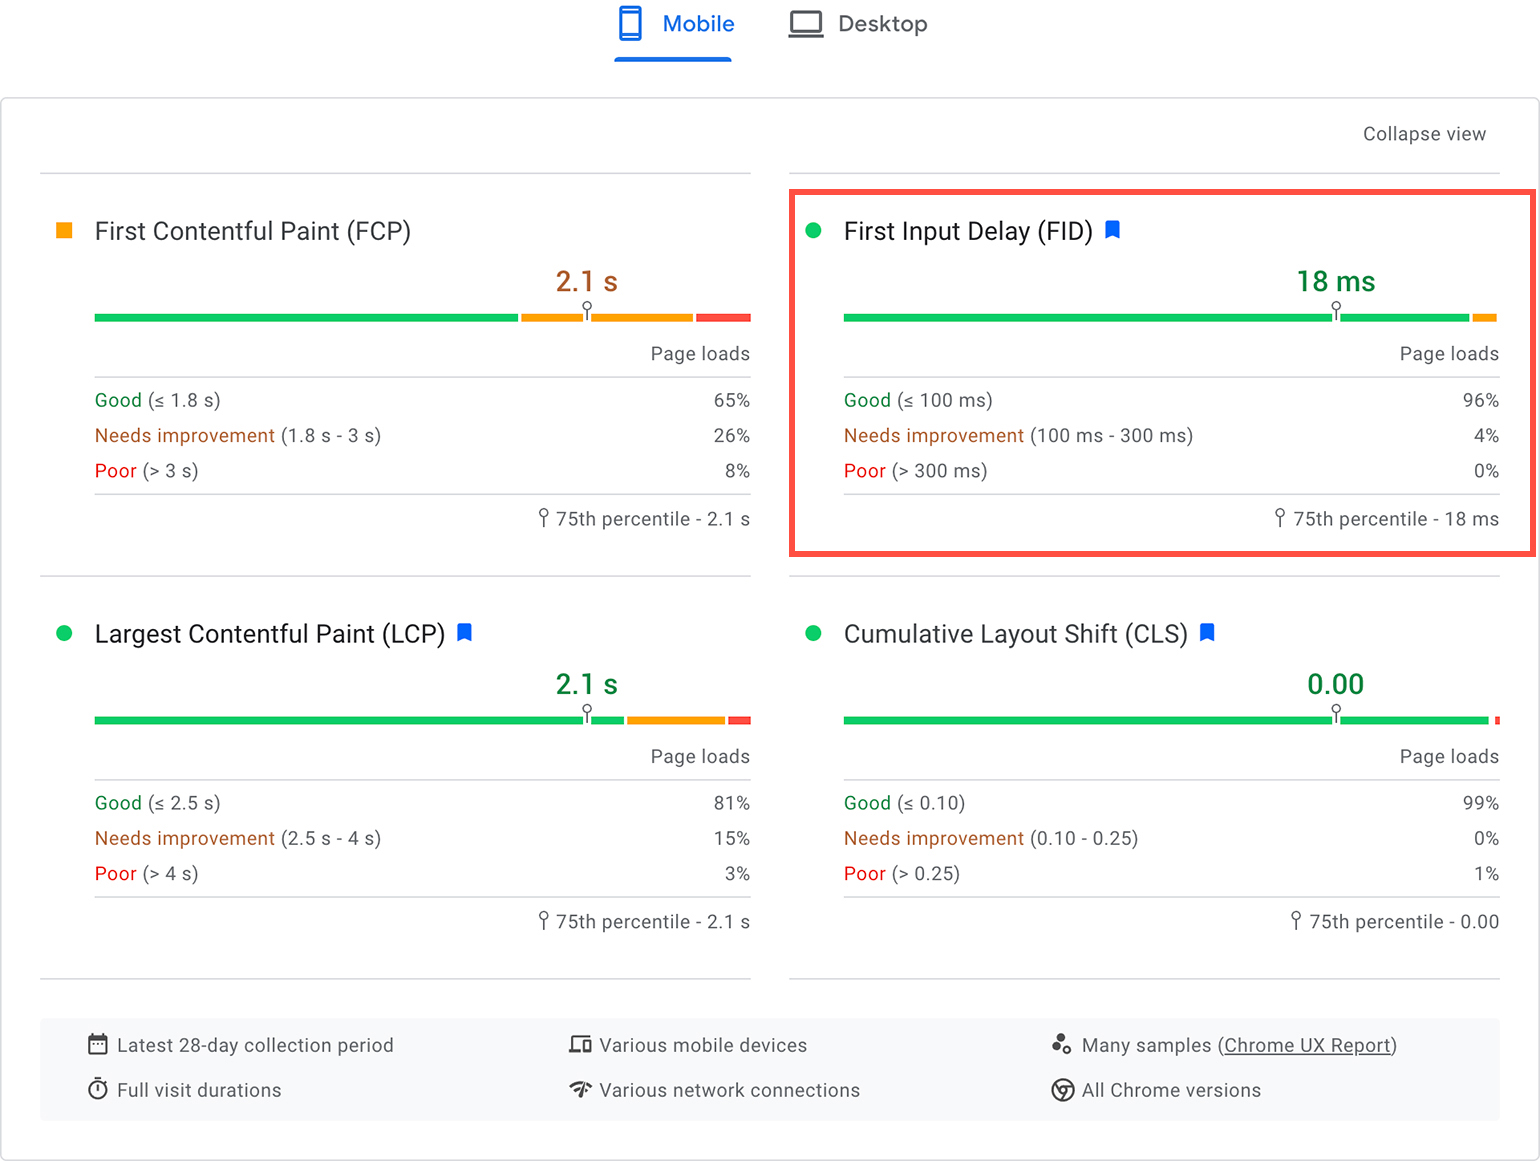
- The Google Search Console Core Web Vitals Report
The Core Web Vitals report in Search Console allows you to identify pages that need immediate attention. The URL performance is assessed using the real-world (field) data and is grouped by status, metric type, and URL group.
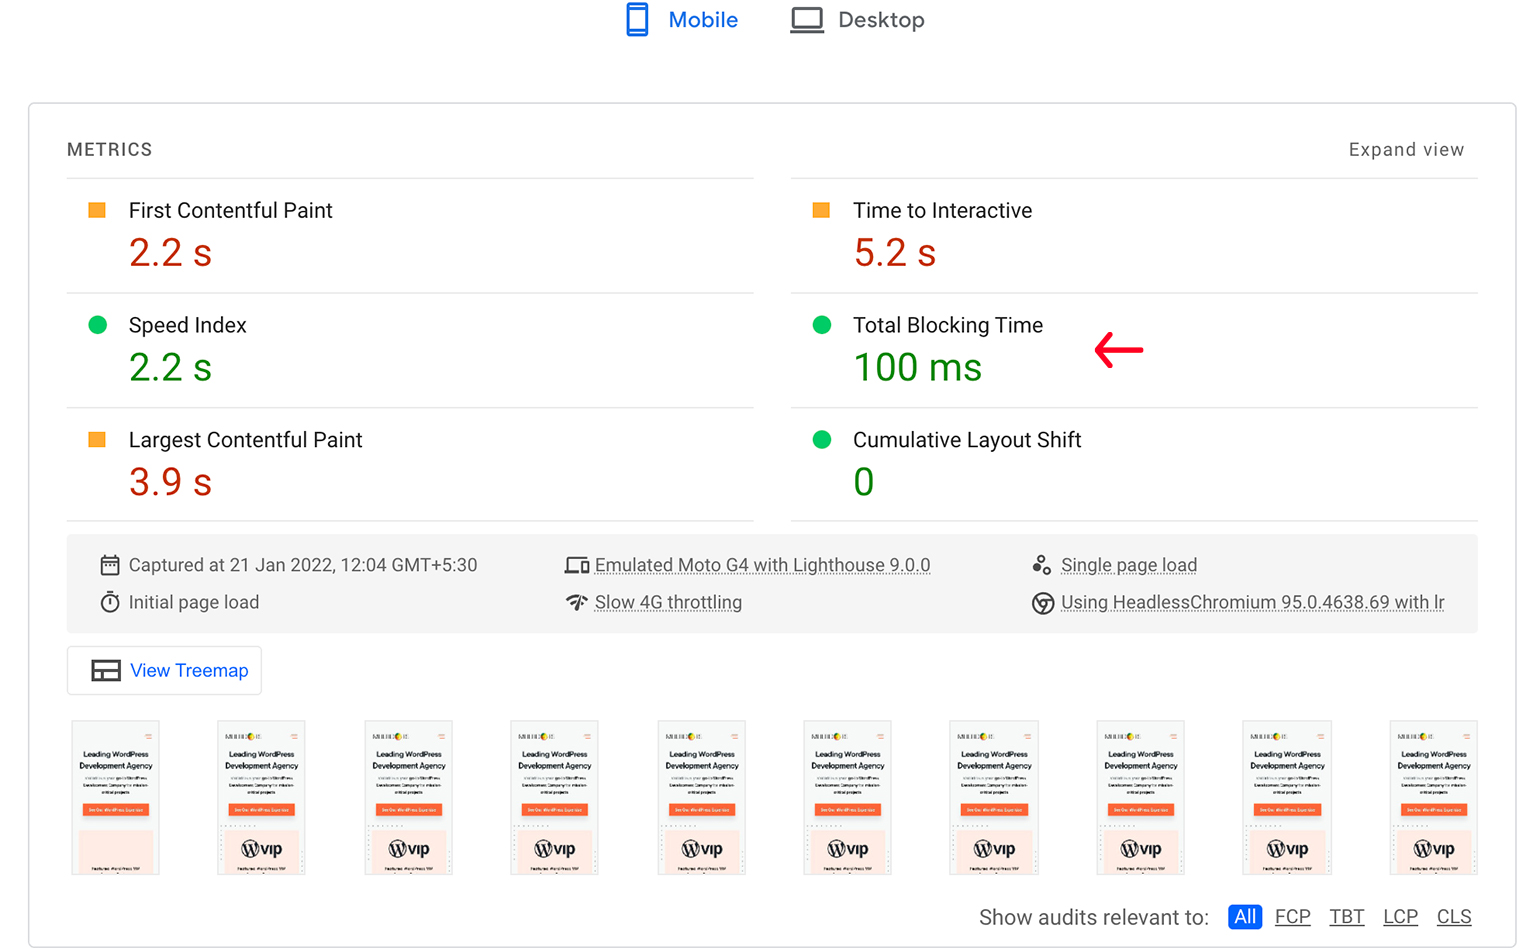
FID can also be measured in the lab using a metric in the lab tools, Total Blocking Time (TBT). However, we recommend using this only to make sure that the FID optimizations are good to go.
Cumulative Layout Shift (CLS)
Have you ever accessed a website only to find that a block of content or image suddenly shifts? Usually, this happens without prior warning, thus interfering with your experience on the page. That’s referred to as layout shift.
The same thing happens when you click on a CTA but end up clicking on a useless ad because the late-loading has caused the CTA to shift.
These experiences are downright annoying, causing the user to leave the website for good.
The cumulative layout shift is a critical user-centric metric that measures the extent to which a site’s content has shifted as the page loads. A low CLS score relates to a delightful user experience.
A good CLS score can be as low as 0 for static pages and goes up as the layout shifts increase. The more stable your page the lower is the CLS score.
Google recommends a CLS score of 0.1 or less.

Why Does the CLS Score Go Up?
Here are the most common reasons why your site’s CLS score is high.
- Images without dimensions
- Ads, embeds, and iframes without dimensions
- Web fonts causing FOIT/FOUT (Flash of Invisible Text and Flash of Unstyled Text)
- Dynamically injected content
- Actions waiting for a network response before updating the DOM
How to Measure CLS?
CLS can be measured both in a lab and during real user interactions. Yet, as a webmaster, it’s critical to consider both data to get a realistic picture.
CLS in Field Data (RUM)
CLS can be monitored using CrUX, the Web Vitals report on Search Console, and the PageSpeed Insights.
Web Vitals report on Search Console

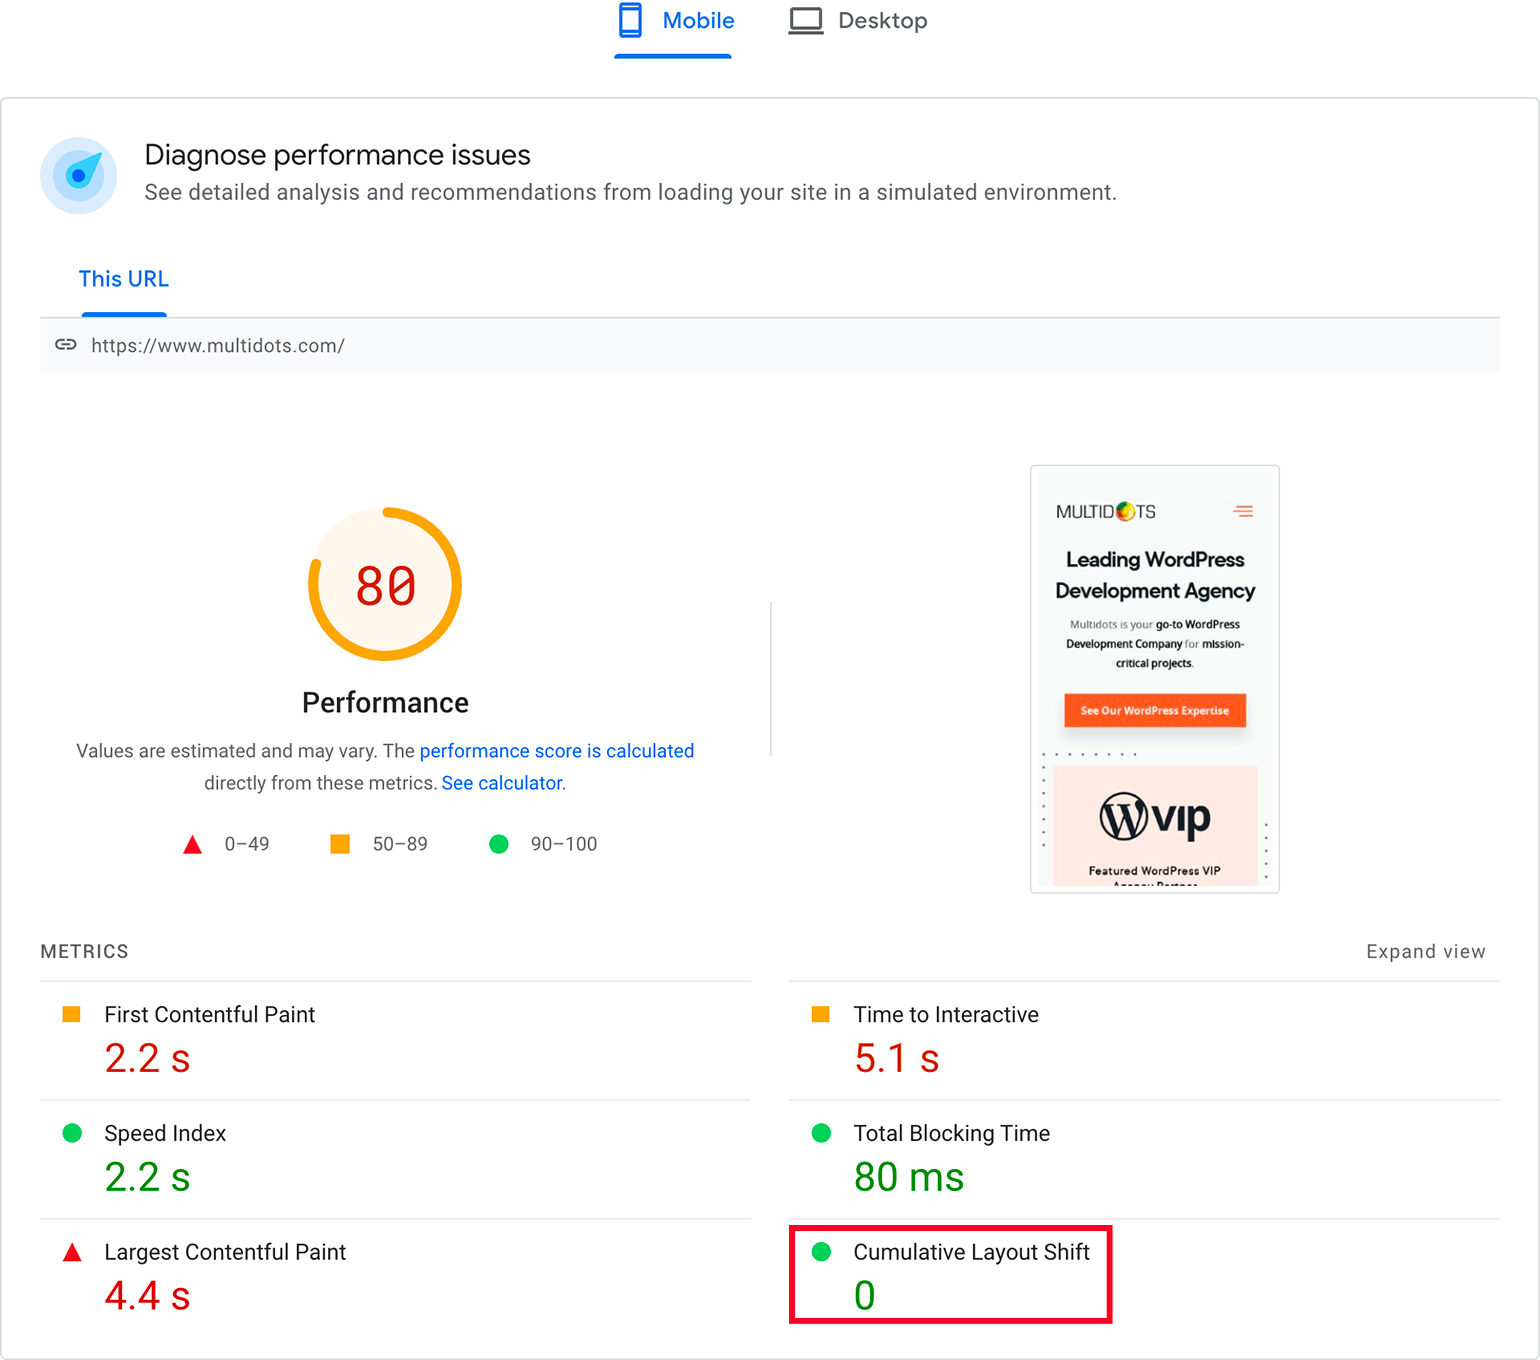
CLS in PageSpeed Insights
Significance of Core Web Vitals to WordPress Users
As a website owner, delivering an awesome user experience is critical for the success of your business. A poor page experience like slow loading time or poor navigation can frustrate your visitors, thus increasing your bounce rate and reducing conversions.
Core Web Vitals are important because you can use them to measure your WordPress website performance.
Google has been using Core Web Vitals as a search ranking factor ever since their page experience algorithm update in June 2021.
So, core web vitals now impact both mobile and desktop organic search results. Plus, Google will be combining them with other signals like HTTPS, mobile-friendliness, intrusive interstitial guidelines, and safe browsing to assess the performance of pages.
The CWV offers a set of concrete metrics that help webmasters track and test their page experience, thereby ensuring a better ranking in the SERPs. So, if you care about your SEO performance, you must improve your CWV scores.
But despite its significance, most webmasters haven’t prioritized core web vitals.
A recent Google Core Web Vitals Study April 2021 by Searchmetrics revealed that 96% of the websites crawled failed the CWV test.
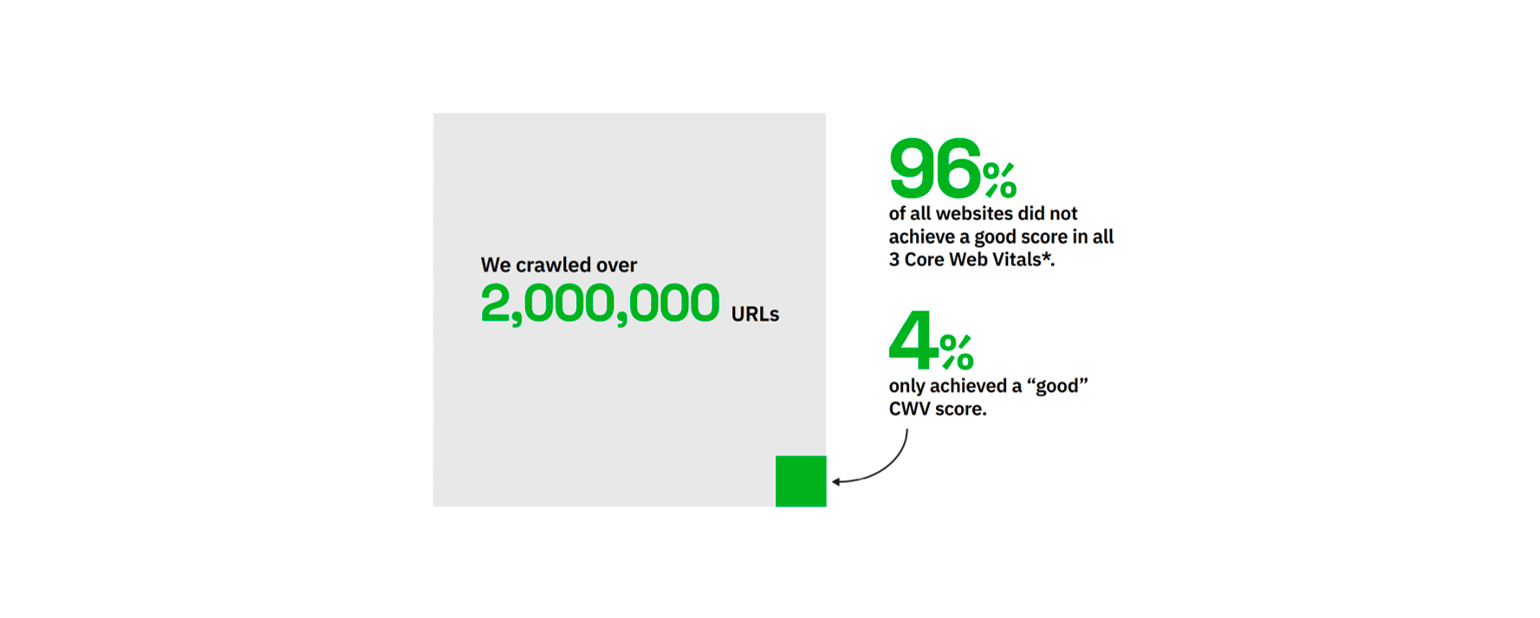
The question is, is your WordPress website among the 4% who achieved a ‘good’ score?
The chances are you aren’t. So, read on to know how you can optimize your WordPress website for Google’s Core Web Vitals.
How to Improve Your WordPress Site’s Core Web Vitals?
When getting your WordPress site ready for Core Web Vitals, you need to pay attention to various aspects of page experience.
One of the easiest and fastest ways to optimize your WordPress site for the page experience update is to count on an open-source web performance caching plugin. These plugins can apply caching and server-level compression to optimize your website’s code and performance. All of these can improve your site’s LCP, FID, and CLS scores.
Moreover, the strategies for each metric in the core web vitals are different. These strategies coupled with the other WordPress performance best practices will help you optimize your site for improving the core web vitals scores.
Let’s look at each of these in detail.
Tactics to Improve Largest Contentful Paint Scores on WordPress
1. Go for Page Caching
As your WordPress website grows you are likely to see a dip in its performance, despite the efforts you put in. That’s when we recommend page caching because it can make your site load faster and in many cases, reduce the load on the server.
Hence, you should reduce server effort, remove the unnecessary code and CMS plugins, and enable effective caching.
Page caching is the most popular type of caching for WordPress sites where your website stores a static HTML version of each page. The other types of caching WordPress sites can benefit from are -
- Database caching - Here, the most common queries are cached to avoid redundant database queries.
- Object caching - This involves storing a bunch of objects (files, documents, scripts, and images) locally.
- Browser caching - In this, files are stored on the browser for quick rendering. By doing so, you will address the PageSpeed Insights recommendation - Serve static assets with an efficient cache policy.
Page caching speeds up server response and reduces TTFB, thus improving the LCP. WordPress caching plugins like WP Fastest Cache, WP Rocket, and WP Super Cache offer a simple and easy-to-use interface that helps with all types of caching. These plugins are a quick fix to enable caching on your site.
Finally, make sure that the browser can cache files effectively. Set appropriate Expires, Last-Modified, and/or ETag hashes in the HTTP header to prevent files from being requested again.
2. Optimize Images
Images are a critical element for every website. However, heavy images like high-resolution pictures, photo widgets, and hefty image sliders can quickly become a burden when we talk of website performance and PageSpeed score.
Even with caching or using a CDN, unoptimized images can drag down your loading time, negatively affecting your LCP score.
Optimizing the image will speed up the website and address the following PageSpeed recommendations -
- Properly size images on your website. Better still, reduce them to their smallest dimensions.
- Defer offscreen images.
- Use an appropriate format to minimize file sizes and serve images in next-gen formats.
- Efficiently encode images.
- Images in the largest content block are requested early; in such cases, a preload could help.
Optimize your site’s images using Imagify, an advanced WordPress plugin that automatically optimizes at the desired level of compression without losing quality.
Serve images in the WebP format that allow you to create smaller and richer images that are about 26% smaller than PNGs and up to 34% smaller than JPEG files. Use the free WebP Express plugin to serve auto-generated WebP images on your website.
3. Optimize Your Code
Loading JavaScript and CSS before the main site content will unnecessarily slow down your pages. This can negatively affect your LCP score.
Fix this by eliminating render-blocking resources on your website.
Deferring JavaScript is by far the most overlooked optimization technique. CSS and JavaScript files are render-blocking resources because they slow down the rendering of the page for no valid reason.
Hence, it is wise to defer these resources. For instance, CSS @import statements are render-blocking and load styles in series. Hence, you should avoid them.
That way the CSS and JS files will be only downloaded when the browser parses the HTML code. The browser will parse these files only after the HTML parsing is complete.
Deferring JS files is the safest tactic when you have interdependent website files.
Concatenate or minify CSS and Javascript files and remove unused CSS. Address the ‘Avoid chaining critical requests’ in the PageSpeed recommendations by optimizing your site code.
Finally, implement asynchronous, deferred, or ES module JavaScript to run scripts later. Also, execute long-running JavaScript processes in a service worker.
4. Enable Server-Level Compression and HTTP/2+
One of the most effortless ways to speed up your WordPress website and improve your LCP score is to compress its resources. Enable GZIP compression on your server to speed up your WordPress website on different server setups.
Follow these quick tips to check for GZIP compression.
- Use the free Check GZIP Compression or HTTP Compression Test tool to check if GZIP compression is enabled on your website.
- If your server doesn’t have the GZIP compression enabled you can do so using a WordPress plugin like WP Rocket or W3 Total Cache.
These plugins enable the compression by adding Apache’s mod_deflate module to the .htaccess file. They are easy to use and turn on all the essential speed optimization features, including GZIP compression.
5. Implement Preconnect in WordPress
Preconnect instructs browsers to proactively establish an HTTP connection to an external domain linked from your page. Hence, it allows the browser to set up an early connection before the HTTP request is made, thereby eliminating round-trip latency and reducing the wait time.
Thus, preconnect is a critical optimization tool for WordPress webmasters.
Most modern browsers support Preconnect. You can preconnect resources like scripts (jQuery and Google Analytics), stylesheets (font files from Google Fonts and third-party websites), and media files.
Count on plugins like Perfmatters for preconnecting resources on your WordPress website.
6. Invest in a Content Delivery Network (CDN)
Whether global or local, all your audience cares about is their user experience. So, they want to see a website that loads quickly, offers quality content, and has intuitive navigation.
If your website caters to a global audience, a content delivery network (CDN) can significantly improve your LCP and reduce the Time to First Byte (TTFB). A CDN will split the load and host assets on local servers closer to users.
Websites using CDNs do not depend on a single server to serve content to visitors. They comprise multiple geographically distributed servers that help in distributing content like images, videos, audio, HTML, CSS, and JavaScript files to all the servers in the network.,
WordPress CDN services like Bunny.net, Sucuri, Cloudflare, and KeyCDN among others can help you deliver cache static content from websites based on your visitor’s geographic location.
More Tactics to Improve LCP Scores
- Upgrade your server and hosting service. Also, make sure the download speed is high even when there’s high usage.
- Lazy-load images by adding the loading="lazy" attribute. Include the width and height attributes to make sure enough space is reserved on the page.
- Minimize third-party requests and move assets to the primary domain. This will avoid extraneous DNS lookups.
- Minimize the number and size of requested files, especially at the top of the HTML.
- Load required web fonts only. Also, switch to web-safe fonts for maximum performance.
- Concatenate and minify your JavaScript and CSS files.
- Avoid Base64 encoding as it increases file sizes and demands additional processing.
- Consider critical inline CSS. Embed essential "above-the-fold" CSS in a <link> block at the top of the page, then load further stylesheets asynchronously.
Tactics to Improve First Input Delay Scores on WordPress
Improving FID scores is a complex process as it deals with website code. Hence, the first thing you should do is to limit heavy JavaScript execution and eliminate unnecessary JS files, allowing the browser to quickly respond to user interactions.
Besides, you can follow these tips to improve your FID score.
1. Avoid Relying on Client-Side JS Frameworks
Generate and cache static HTML content on the server. Avoid relying on client-side JavaScript frameworks to render the same HTML for everyone.
2. Break down Long Tasks
Long tasks interfere with the main thread, impacting the way user input is processed. Hence, it is wise to break long tasks like long-running code into smaller and asynchronous tasks. These tasks execute after a short requestIdleCallback, setTimeout, or requestAnimationFrame delay.
Try keeping these tasks under 50 ms to reduce the input delay on the site.
3. Eliminate Non-Essential Third-Party Scripts
Third-party scripts and requests like heat maps, tags,, and analytics can interfere with the site loading, thereby impacting the site’s interactivity. These can mount up to several JavaScript megabytes in no time and lower your FID score.
Hence, it is advisable to eliminate any avoidable third-party scripts, requests for analytics, social media widgets, and discussion forums.
4. Implement browser caching
As mentioned earlier, browser caching stores certain elements in a visitor’s browser. This eliminates the need to reload these elements every time the website is accessed.
Set appropriate Expires, Last-Modified, and/or ETag hashes in the HTTP header, so files are not requested again.
More Tactics to Improve FID Scores
- Adopt progressive enhancement techniques. This will ensure that the interface can be used in HTML and CSS before JavaScript runs.
- Get rid of unnecessary JavaScript and CSS files. Also, concatenate and minify these files.
- Avoid excessive use of CSS properties such as box-shadow and filter.
- Use asynchronous, deferred, or ES module JavaScript to run scripts later.
- Lazy-load JavaScript components on demand, like chat widgets, video players, and others.
- Delay loading of less critical scripts such as analytics, advertisements, and social media tools.
- Consider executing long-running JavaScript processes in a web worker as they use a background thread.
Tactics to Improve Cumulative Layout Shift Scores on WordPress
1. Fix images without Dimensions
When adding images to your website, if you use the WordPress editor, the dimensions will be automatically added. However, it is important to manually check the code and ensure that all the images have dimensions.
Include the width and height attributes to HTML <img> and <iframe> tags.
This will significantly reduce the layout shift experienced with most websites using images without dimensions. The same goes for ads, embeds, and iframes without dimensions. Also, ensure that each ad has a ‘reserve’ space. Use the CSS aspect-ratio property to ensure appropriate spacing when the asset downloads.
2. Optimize Web Fonts
If your WordPress website is using custom web fonts or fonts hosted online, you may face issues like Flash of Invisible Text (FOIT) or Flash of Unstyled Text (FOUT). This may be due to a slow-loading font, often displaying blank space until the font loads.
Hence, it’s important to implement web font preloading. Plugins like WP Rocket can automatically optimize web fonts like Google Fonts.
Load web fonts and set CSS font-display to optional or swap. Ensure you use a similarly-sized fallback font to minimize the layout shift.
Alternatively, you can Minify or Combine CSS option that helps in eliminating render-blocking resources on the WordPress site.
Finally, minimize web font usage. Consider using commonly available OS fonts when possible.
3. Avoid Dynamically Injecting Content
Dynamically injecting content can interfere with the layout, thereby pulling down your CLS score. Hence, it should never appear above content that’s already loaded.
Avoid injecting content above existing content. The only exception here is a change is caused by user interaction or in response to a user’s action.
More Tactics to Improve CLS Scores
- Set appropriate dimensions for container elements enclosing slow-loading third-party content like advertisements and widgets.
- Make sure the images and other assets appearing toward the top of the page are requested as early as possible. A preload will help.
- Make sure user interactions are complete within 500 milliseconds of the input trigger.
- Use CSS transform and opacity for more efficient animations that don’t incur a re-layout.
- Consider critical inline CSS. Embed essential "above-the-fold" CSS in a <link> block at the top of the page, then load additional stylesheets asynchronously.
- Where necessary, consider CSS containment to identify isolated subtrees of a page. The browser can optimize processing by rendering or not rendering specific DOM content blocks.
More WordPress Optimization Best Practices for CWV
Besides implementing the metric-specific tactics shared above, we have the following tips for optimizing your WordPress website performance. Considering these will further contribute to improving your core web vitals grades.
1. Optimize WordPress Hosting
The hosting you choose hugely impacts server responsiveness and site performance. Hence, you want to make sure that your hosting can handle the load of your website.
When choosing a high-quality WordPress hosting, consider if they have distributed data centers, better servers, free SSL certificates, and HTTP/2 instead of HTTP/1. Web hosting providers like SiteGround and Bluehost offer these features and are highly recommended because of their affordable pricing.
2. Speed Up Your Server
A fast server is quick to respond, thus improving several site speed metrics. Most complex WordPress websites are slow because they are busy handling requests and serving multiple files and scripts.
To speed up your server, the first thing you need to do is upgrade your hosting plan. We already discussed this in the previous point.
Further, when setting up your server use a recent version of PHP. Finally, enhance the process of how the server pushes files to clients. For example, you can use the link rel=preload.
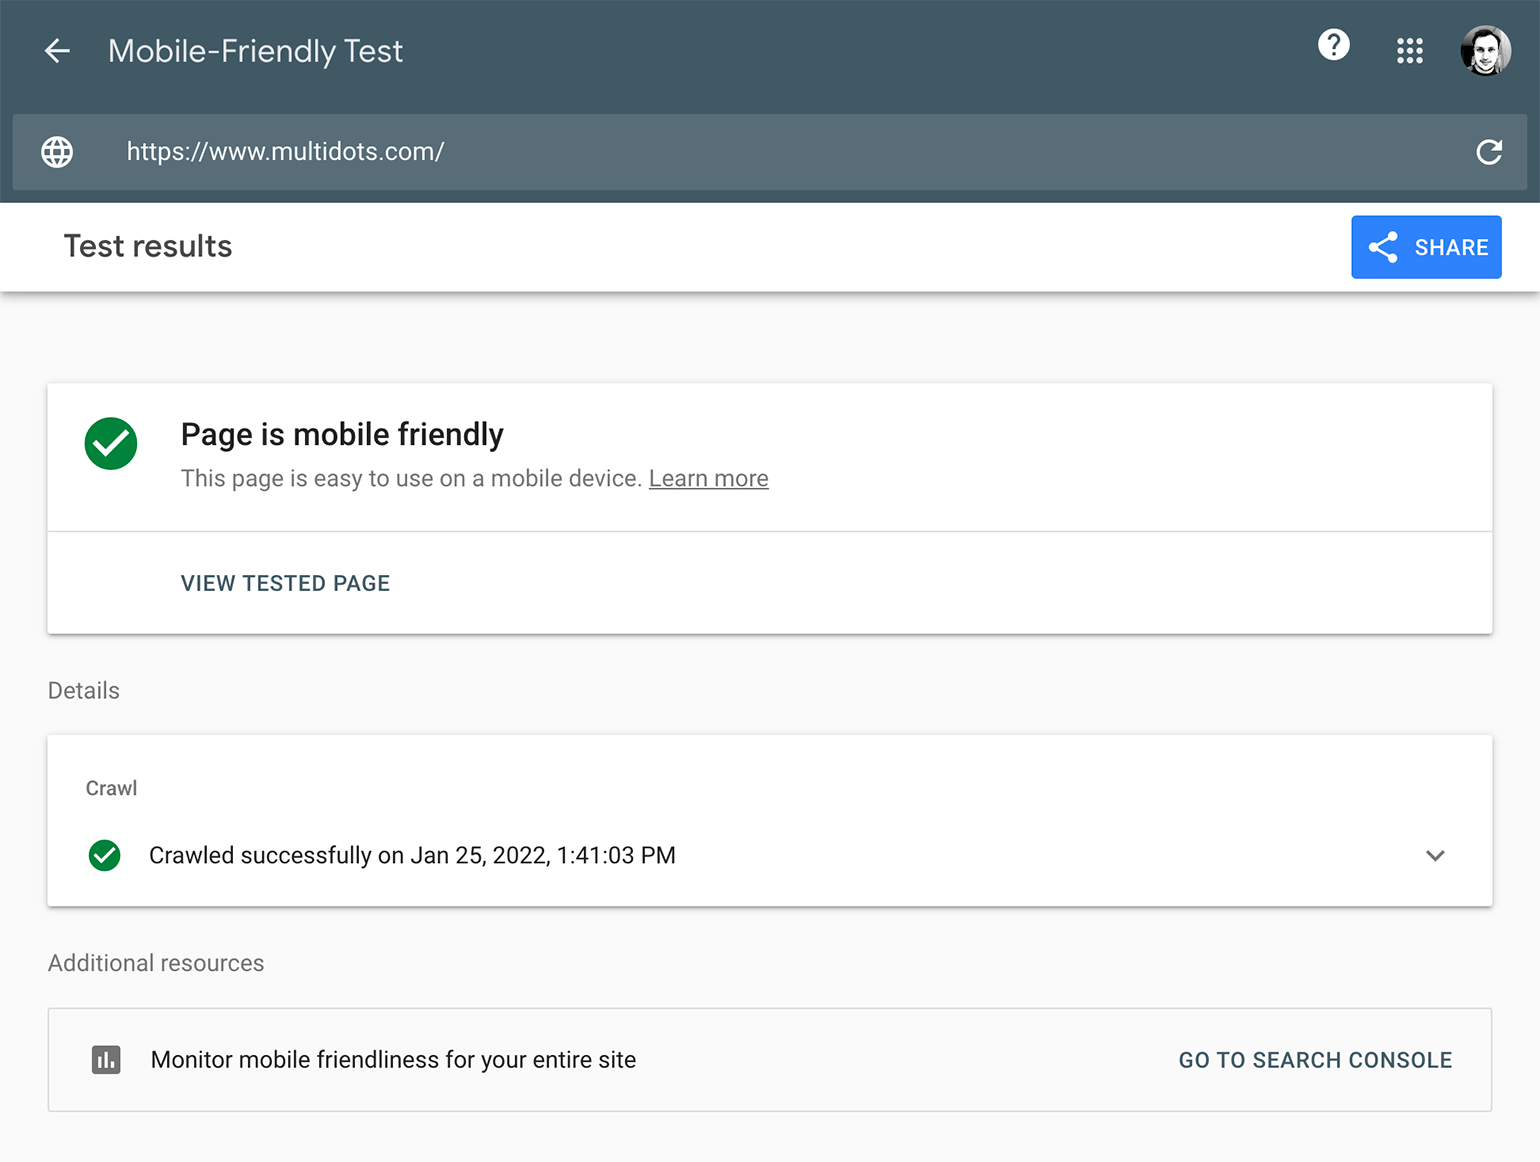
3. Make Sure Your Site Is Mobile-Friendly
The mobile search trend is growing. Hence, your website must be mobile-friendly. In other words, your site should load and render smoothly on mobile devices, allowing users to easily navigate the pages.
First things first, test if your website is mobile-friendly using Google’s mobile-friendly test. If your site fails this test, chances are your website is driving visitors away.
An easy fix is to switch to a mobile-friendly WordPress theme.
Most WordPress themes are responsive across multiple devices and browsers. But if you are still looking for a clean and simple yet highly extensible theme, count on GeneratePress or Divi. They offer awesome features that can be used across industries, from ecommerce to health and beauty.
4. Use Essential and Lightweight Plugins
WordPress website owners tend to use a host of plugins, most of which impact the front end. That’s because these plugins carry JavaScript files that impact site performance.
So, if you have a plugin for building a responsive form on a page, the plugin will load CSS and JS files across the entire site. These files aren’t necessary and interfere with the site’s loading time.
To solve this problem, use plugins like Asset CleanUp and Perfmatters Script Manager. These can enable your plugins only on the relevant pages and solve the issues caused due to the JavaScript file.
5. Optimize AMP
Accelerated Mobile Pages are a living example of how Google prefers light frameworks. They have had a huge contribution to improving the online experience.
Though AMP isn’t a ranking factor, it can help developers meet the recommended performance targets outlined by the Web Vitals. Plus, AMP or no AMP, Google will always prioritize pages with a great experience.

Optimizing AMP and core web vitals go hand in hand. So, make sure you follow these quick tips to optimize your AMP.
- Invest in the best server to ensure that your content is delivered as quickly as possible.
- Invest in a content delivery network.
- Invest in AMP optimizers that allow you to serve AMP pages like Google-served AMP Cache pages.
Tools to Measure Core Web Vitals on WordPress Website
Google offers an array of tools that can help webmasters monitor their site’s core web vitals. Though we have already discussed them in detail above, here’s a table that summarizes them.
| LCP | FID | CLS | |
|---|---|---|---|
| PageSpeed Insights | Yes | Yes | Yes |
| CrUX | Yes | Yes | Yes |
| Google Search Console | Yes | Yes | Yes |
| Web.dev | Yes | Yes for TBT | Yes |
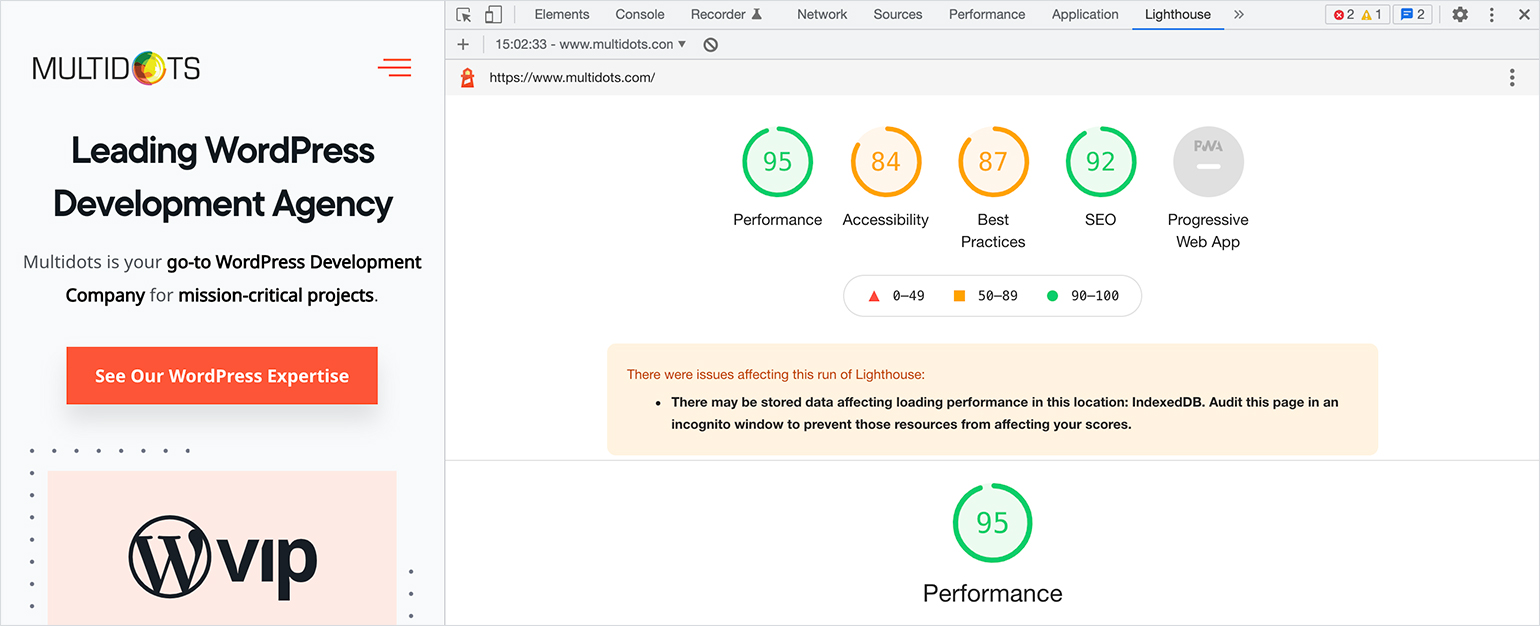
| Lighthouse | Yes | Yes for TBT | Yes |
| Web Vitals Extension | Yes | Yes | Yes |
As you can see, web.dev and Lighthouse use Total Blocking Time (TBT) as an alternative to FID.
Concluding Message: Every Small Step Counts!
In this post, we have mentioned several tactics to improve your core web vital grades and optimize your WordPress site performance. The key objective of each of these tactics is to prioritize speed and user experience, just as Google has been doing all these years.
The information shared in this post will help you improve your core web vitals. However, remember that the bigger goal is to offer your visitors a better page experience, thereby encouraging them to stick with you.
So, go ahead and boost your website’s page experience, thus improving your online ranking, brand reputation, and conversions.
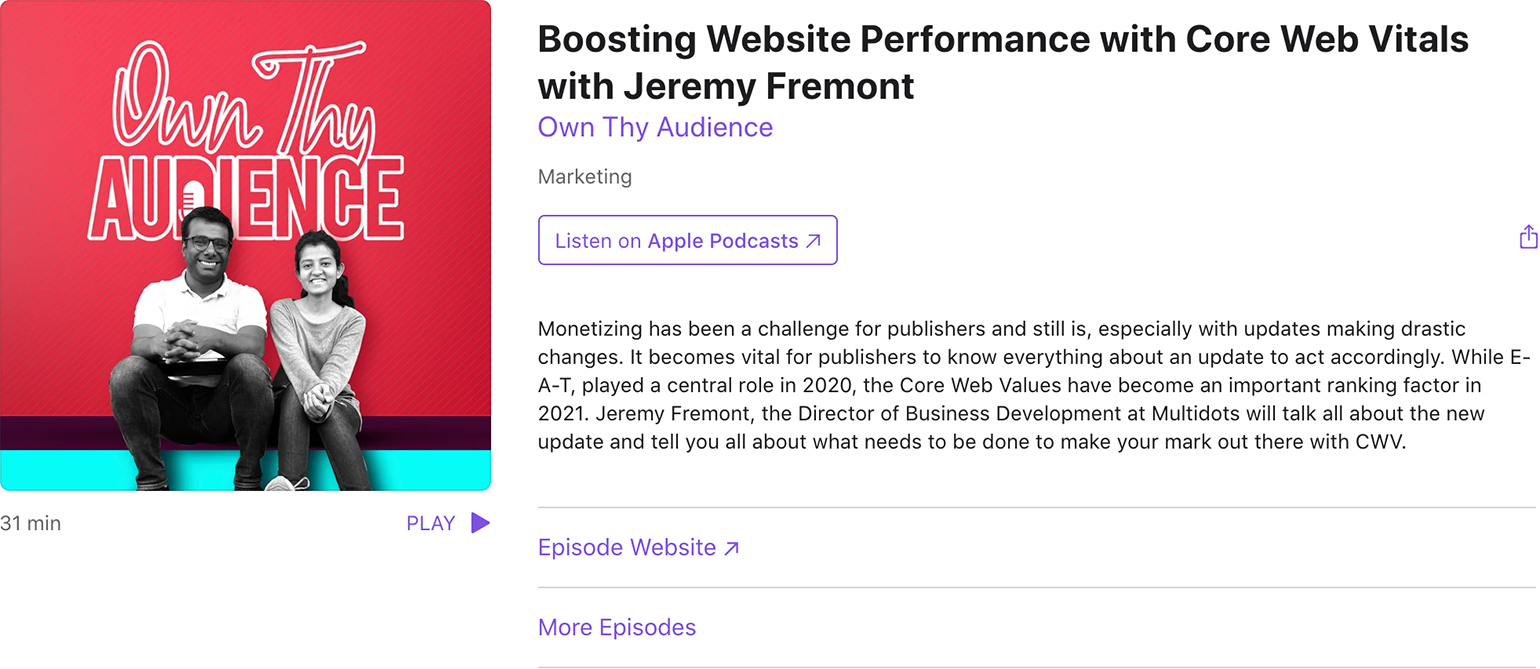
Are you looking for more interesting insights on Core Web Vitals? Are you wondering how to stand out from the crowd with CWV? We recommend listening to this podcast -
Boosting Website Performance with Core Web Vitals with Jeremy Fremont
In this podcast, Jeremy Fremont, the Director of Business Development at Multidots, will help you navigate the world of Core Web Vitals.
Embed Podcast -
https://podcasts.apple.com/us/podcast/boosting-website-performance-with-core-web-vitals/id1505371360?i=1000536278394
Frequently Asked Questions
1. What is page experience?
Page experience is Google’s way of measuring a site’s overall performance and usability. Each page on your WordPress website should achieve minimum scores in the five categories of page experience described by Google -
- Core web vitals
These are page experience categories that comprise three signals, namely largest contentful paint (LCP), first input delay (FID), and cumulative layout shift (CLS).
- Mobile usability
Since mobile web traffic is showing an upward trend, Google prefers websites that possess strong mobile usability. This category has three signals, namely element clickability, text size, and content width.
Most WordPress themes are built with mobile usability as a priority. For instance, they help WordPress site owners offer enough space for navigation links and buttons.
Such features help in improving the page experience of the WordPress website.
- Security issues
Websites having security issues are marked with warning tags in the search results. This causes users to avoid these sites completely.
Hence, WordPress webmasters should use strong and unique passwords and get rid of accounts that aren’t in use.
- HTTPS
Visitors expect websites to be served on HTTPS to protect their data. Hence, you need an SSL certificate to serve your WordPress website over HTTPS.
- Ad experience
This is the final page experience category that all WordPress webmasters should consider. Avoid distasteful ads or pop-ups that interfere with the page experience.
For instance, ads that force shifts the main content, making it tough for visitors to navigate the site.
Similarly, misleading ads or click baits aren’t appreciated and negatively impact page experience.
Avoiding such ads is important for delivering a positive experience.
2. What are Core Web Vitals?
Google introduced the Core Web Vitals to measure and improve page experience on the web. These metrics focus on how a WordPress site’s performance connects to delivering a high-quality experience.
At present, we have three Core Web Vitals, namely Largest Contentful Paint (loading performance), Cumulative Layout Shift (visual stability), and First Input Delay (interactivity).
Core web vitals report uses field and lab data to help webmasters and developers assess how their pages are performing in terms of user experience. Use them as measurable SEO performance metrics that offer measurable data points for improving the overall user experience on your website.
3. Where on WordPress can I review my site’s page experience?
The best place to review your site’s page experience is on Google Search Console. It is a free tool that monitors all the page experience categories once you have registered your website.
Navigate to the Page Experience tab in Search Console to know how your pages are performing.
Besides, you can use tools like PageSpeed Insights and Chrome’s Lighthouse to assess changes in your WordPress page experience in real-time.
4. Should all my WordPress pages hit the page experience thresholds?
We recommend that you use these user-centric metrics as a guidepost for offering an optimal page experience. Since Core Web Vitals are assessed at a per-page level, you may find that a few pages are above this threshold and others below.
Nevertheless, using these thresholds as a benchmark you can improve the overall page experience of your website.
5. Has Google made Page Experience its ranking signal?
In May 2021, Google announced that the page experience signals in ranking will roll out in May 2021. Google now evaluates the page experience metrics for individual URLs on a website and uses them as a ranking signal in Google search results on mobile devices.
6. How are field data and lab data different?
The field data is a historical report that shows how a particular URL has performed. The data is derived from users in the real world using a variety of devices and network conditions.
On the other hand, lab data is based on a simulated load of a page on a single device and a fixed set of network conditions. The data is procured in a controlled environment.
Since both these data types are derived under different conditions, the values may differ.
7. Do noindex pages affect Core Web Vitals?
Several websites have slower, more complex pages that are not included in the search index. Whether they will affect the score or not depends on if Google categorizes the pages together with pages that are in the search index.
If there’s less data Google could draw on the performance data collected for the noindex pages.
8. If I created AMP pages, will they meet the recommended CWV thresholds?
Accelerated Mobile Pages are all about delivering a high-quality page experience. So, their goals are closely aligned with those of the Core Web Vitals.
Hence, there is a high likelihood of these pages meeting the thresholds.
References
- PWC - Future of Customer Experience
- WP VIP
- WordPress Cache
- W3.org
- Mozilla - Preloading Content
- Imagify Plugins
- WebP Express plugin
- Giftofspeed
- HTTP Compression Test tool
- WP Fastest Cache
- requestIdleCallback
- setTimeout
- requestAnimationFrame
- W3.org - Expired
- W3 Last-Modified
- ES module JavaScript
- CSS aspect-ratio property
- CSS-font display
- Font-Style-Matcher
- Preloading Content
- CSS containment
- Boosting Website Performance
Schedule a meeting to discuss the potential of your website and how you can turbocharge it!
Contact Us