The ABCs of Importing CSV & SQL Files into WordPress
Master the essentials of importing CSV and SQL files into WordPress to streamline your data management process

Table of Contents
Managing or migrating a website can be challenging, especially when transferring data. For WordPress users, understanding how to import CSV and SQL files is vital.
These files are known for efficiently handling large datasets, making them ideal for site migrations and updates. However, this procedure often comes with its own obstacles:
- File size constraints.
- Execution timeouts.
- Permission complexities.
- Navigating through intricate hosting configurations.
In this article, we will show you the process of importing CSV and SQL files into WordPress using three key tools: WP Migrate DB Pro, phpMyAdmin, and WP-CLI.
Selecting the Right Tools for CSV and SQL Imports to WordPress
Choosing the right import tools is crucial for an efficient WordPress database migration. These tools prevent data loss, corruption, and compatibility problems. Some factors to consider when choosing a tool are: Ease of use, compatibility with SQL file structure, scalability, support, and regular updates.
When importing CSV and SQL files, challenges like handling large files and recurrent timeouts may arise. Look for tools designed for large datasets, and prioritize performance and timeout prevention. User-friendly interfaces simplify the importation process. By selecting the right tools, you can save time, enhance website performance, and safeguard your data, ensuring a smooth and secure migration experience.
Overview of WP Migrate DB Pro, phpMyAdmin, and WP_CLI
WP Migrate DB Pro, phpMyAdmin, and WP-CLI are the primary tools used for importing CSV and SQL files. Each tool has its own unique advantages and disadvantages:
WP Migrate DB Pro
WP Migrate DB Pro is a user-friendly plugin that excels at smoothly transporting large datasets. However, it's exclusively for moving between two WordPress sites. This means it is perfect for moving from one WordPress site to another, but if you’re looking to import from any other CMS, this won’t work for you.
phpMyAdmin
phpMyAdmin is a free and open-source administration tool for MySQL and MariaDB. This is one of the most popular database management tools, which enables users to create, modify, and delete databases, as well as manage tables, columns, indexes, and foreign keys.
The installation process of phpMyAdmin can be complex, and it’s important to understand the difference between encrypting data at rest and in transit. While phpMyAdmin does not inherently encrypt databases at rest, it should use secure connections like HTTPS for data transmission.
To ensure security, implement strong passwords, regularly update software, restrict access, enable secure connections, and consider additional security measures like firewalls and intrusion detection/prevention systems.
WP-CLI
WP-CLI (WordPress Command Line Interface) is a command-line tool for managing WordPress installations. It offers a fast and efficient way to perform many tasks that you would otherwise carry out via the WordPress admin dashboard.
If you're comfortable with technical jargon, this may be the one for you. Although efficient, fast, and powerful, it requires a certain level of expertise.
Preparing Your Files for Import
Optimizing your CSV and SQL files before diving into the WordPress import process is vital for the safety of your files.
Unoptimized files might lead to longer import times or failed transfers. Optimizing ensures integration into WordPress, saving you time and reducing headaches. Here are some tips:
- Remove unused tables and metadata.
- Optimize database indexes.
- Compress database files.
- Reduce image sizes.
- Delete unused tags to simplify your data structure.
- Remove spam comments to declutter your database.
- Delete post revisions in order to reduce file sizes.
Before starting the import process, create a reliable backup system. This step acts as a safety net in case of data loss. Importing data can be overwhelming, but with Multidots, you can be sure of a smooth transition. Our expert team is equipped to handle all the complexities, ensuring a secure and stress-free experience.
Handling Large Files and Avoiding Timeouts
Timeouts during the import of larger files halts progress and adds frustration. Let's look through why this happens, the importance of avoiding timeouts, and tips to keep your import process flowing smoothly.
Understanding Timeout Challenges
When files are large, they take longer to process. Timeouts occur when the server imposes a limit on the execution time for a task, and if the import process exceeds this limit, it gets cut off.
The Importance of Minimizing Timeouts
Timeouts can lead to incomplete transfers, data inconsistencies, or system crashes. A smooth import process ensures that your data arrives at its destination intact and ready to contribute seamlessly to your WordPress site.
Here are some tips for handling large files:
Tip 1: Segmentation of Databases: Divide large databases into smaller, manageable chunks and import segments separately to avoid overwhelming the server.
Tip 2: Effective Use of Tools or Plugins: Use tools like WP Migrate DB Pro designed for handling large datasets. Optimize settings in plugins to accommodate the size of your files.
Here are ways you can avoid timeouts:
- Adjust Server Timeout Settings: Extend server timeout limits to match the demands of your import. Collaborate with your hosting provider to make necessary adjustments.
- Increase PHP Memory Limit: Boost the PHP memory limit to accommodate larger file sizes. Again, always coordinate with your hosting provider.
- Use Background Processing: Use tools or plugins that support background processing, like the WP Background Processing Library or the Action Scheduler plugin. This allows the import to continue even if it exceeds the standard execution time.
Navigating large file imports is about planning and using the right tools. By segmenting databases, optimizing settings, and adjusting server configurations, you can steer clear of timeouts.
Step-by-Step Guide to Importing With WP Migrate DB Pro
- Purchasing, Downloading, and Activating the Plugin
- Purchase the plugin.
- Go to the WordPress dashboard.
- From here, go to Plugins → Add New.
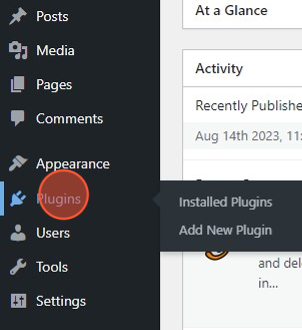
The plugins section found within the WordPress dashboard
From Plugins, press the Add New button
- Search for WP Migrate DB Pro and install the plugin.
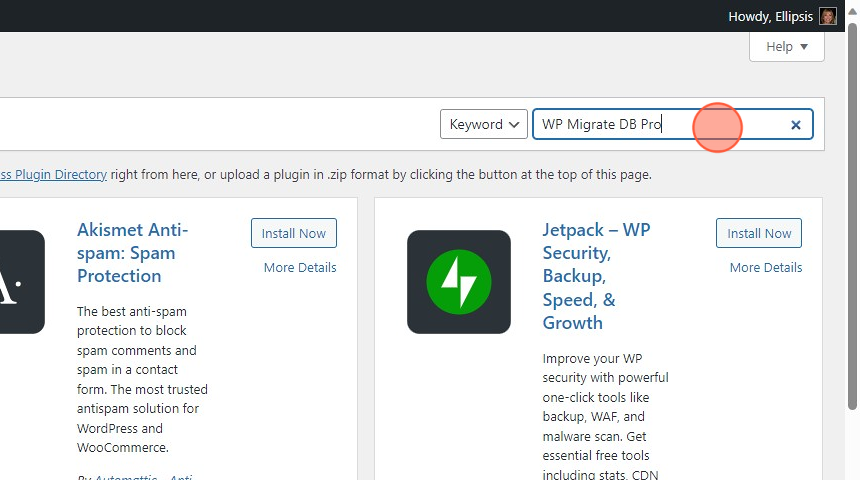
Look up the plugin in the search bar at the top - Activate the plugin once installed.
- Configuring Settings for Effective Migration:
- Access the WP Migrate DB Pro settings via the WordPress dashboard.
- Familiarize yourself with these settings:
- Data Replacement: Choose whether to replace URLs or file paths.
- Advanced Options: Customize migration behavior, including exclusions.
- Push/Pull Settings: Determine if you're pushing data to the current site or pulling it to another.
- Uploading CSV or SQL Files to the WordPress Database:
- Go to the WP Migrate DB Pro tab in the dashboard.
- Choose the Export option if you are pushing data or Import if pulling data.
- Find the desired options for your migration.
- Click Go to initiate the migration process.
Bonus Tips
- Review Advanced Options: Tailor your migration by exploring advanced options such as serialized string replacements and selective data exclusions.
- Use Find & Replace: Efficiently update URLs or paths during migration to ensure seamless integration.
Step-by-Step Guide to Importing With phpMyAdmin
- Accessing phpMyAdmin
- Log in to your hosting account's control panel (such as cPanel).
- Find and click on the phpMyAdmin icon under the Databases section.
- Locating the WordPress Database
- On the phpMyAdmin dashboard, look for the left-hand sidebar.
- Identify and click on the database associated with your WordPress site.
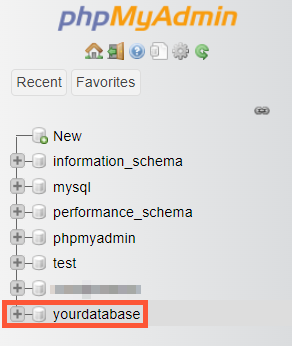
Identify and click on the database associated with your WordPress site in phpMyAdmin.
- Using the Import Function
- Within the selected database, navigate to the Import tab.
- Choose the SQL file you want to import by clicking Choose File.
- Ensure the character set is set to utf-8 or as specified in your database.
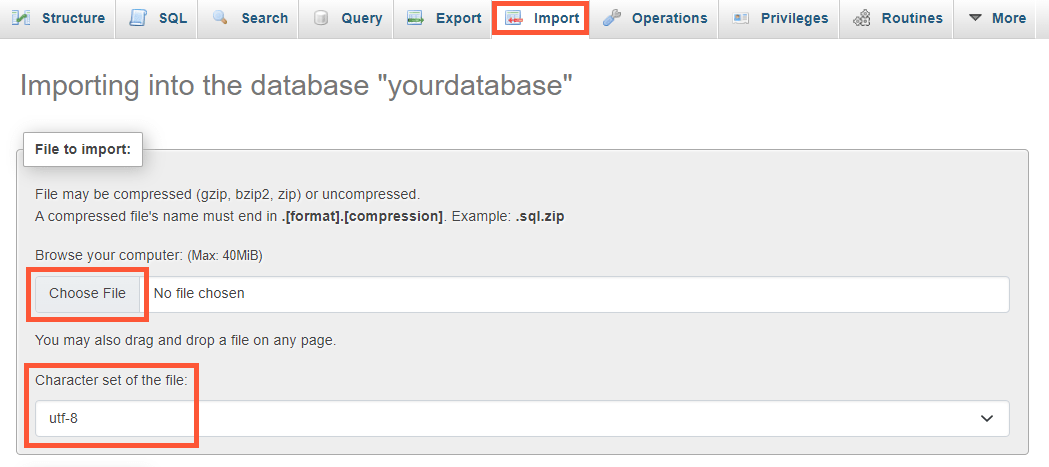
Importing an SQL file via phpMyAdmin.
- Reviewing Partial Import Options
- For larger files, consider reviewing the Partial Import option. This allows you to import a portion of the file, useful in preventing timeouts.
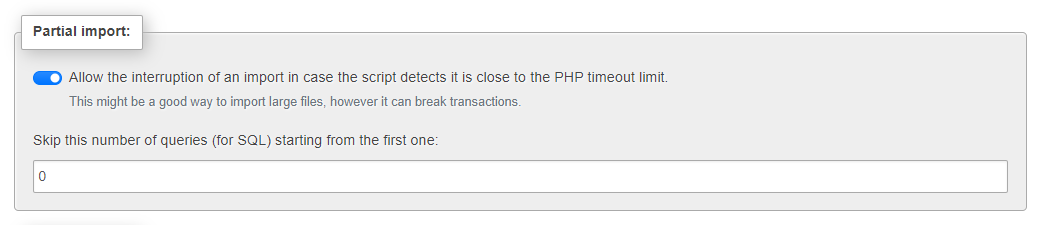
Checking the Partial Import capability in phpMyAdmin.
- For larger files, consider reviewing the Partial Import option. This allows you to import a portion of the file, useful in preventing timeouts.
- SQL Compatibility Mode and Foreign Key Constraints
- Check the compatibility mode for SQL statements, adjusting as needed.
- Consider handling foreign key constraints by disabling checks during the import.
Additional Considerations
- File Size Limits: Be aware of file size limits imposed by your hosting provider. If necessary, break larger files into manageable segments.
- Execution Timeouts: Adjust PHP settings to prevent timeouts during lengthy imports. Consult with your hosting provider or access PHP settings within cPanel.
Bonus Tips
- Review Server Requirements: Ensure your hosting environment meets the necessary requirements for the SQL file you're importing.
- Backup Your Database: Always create a backup before importing to safeguard against unexpected issues.
Step-by-Step Guide to Importing With WP_CLI
- Installing WP-CLI:
- Ensure you have a hosting environment that supports WP-CLI. This will have to be a UNIX-like environment because there might be limitations in Windows environments.
- Open your terminal or command prompt.
- Install WP-CLI using the recommended method for your operating system. The most common way is to download the WP-CLI phar file:
- Run this command in the terminal to download the WP-CLI phar file.
curl -O https://raw.githubusercontent.com/wp-cli/builds/gh-pages/phar/wp-cli.phar. - Make the phar file executable so it can run as a program.
chmod +x wp-cli.phar - Move it to a directory in your PATH (e.g., /usr/local/bin/).
sudo mv wp-cli.phar /usr/local/bin/wp
- Run this command in the terminal to download the WP-CLI phar file.
- Navigating to the Correct Directory:
- Open your terminal or command prompt.
- Navigate to the root directory of your WordPress installation using the cd command.
- Using the Correct Command Syntax:
- Once in the WordPress directory, use the following command syntax to import an SQL file:
wp db import [file] - Replace [file] with the name of your SQL file, including the path if it's not in the current directory.
- Once in the WordPress directory, use the following command syntax to import an SQL file:
- Specifying the Correct SQL File to Import:
- If the SQL file is in the same directory, you can simply provide the file name.
- If the file is in a different directory, include the path in the command.
Bonus Tips
- Check WP-CLI Version: Ensure you have the latest version of WP-CLI installed for optimal compatibility.
- Backup Your Database: Before any command-line operation, create a backup to prevent data loss in case of unexpected issues.
Troubleshooting Common Issues During the Import Process
Navigating the import process for CSV and SQL files can often feel daunting and overwhelming. Here are some common issues you might encounter:
File Format Incompatibility
| Problem | Solution |
|---|---|
| Uploading a file in an incompatible format may result in errors. | Verify that your file is in the correct format – CSV for CSV imports and SQL for SQL imports. Check for any inconsistencies in delimiters and column structures. |
Connectivity Errors
| Problem | Solution |
|---|---|
| Disruptions in connectivity can lead to failed imports. | Ensure a stable internet connection. If the issue persists, consider reaching out to your hosting provider to confirm server stability. |
Common Error Messages – 'MySQL Server Has Gone Away'
| Problem | Solution |
|---|---|
| This error often occurs during long-running processes, such as importing large files. | Increase the max_allowed_packet setting in your MySQL configuration. Alternatively, break large files into smaller chunks to avoid timeouts. |
Verifying a Successful Import and Checking Data Integrity
Once the database has been imported, it is vital to undertake thorough checks to establish the import was successful and there was no data loss.
- Verification Steps:
- Confirm the number of records imported matches the expected count.
- Check for any error logs generated during the import process.
- Data Integrity Check:
- Examine a sample of imported data to ensure accuracy.
- Run data validation scripts to identify any discrepancies.
The import process, especially with large databases, can be intricate. For a reliable and stress-free import, consider using Multidots, an award-winning agency and expert in enterprise-level migrations.
Multidots' experts specialize in the efficient handling of complex migrations, ensuring projects are completed without disruptions. With a commitment to 100% data integrity, we conduct manual migration processes, providing a reliable solution for your needs.
Next Steps After Successful CSV and SQL File Importation into WordPress
A successful import opens avenues for performance enhancements and heightened control over your content. Think about:
- Exploring performance improvements such as optimizing database queries and indexing. Use caching mechanisms to enhance website speed.
- Using advanced features of WordPress to exert greater control over your content. Implement custom taxonomies and categories for efficient content organization.
Post-import, take care of potential issues that may arise. Update URLs to ensure consistency and proper linking. Adapt to various hosting setups to maintain website functionality.
For a worry-free, error-free database migration, reach out to Multidots to benefit from our expertise in handling complex migrations! Your data in secure hands.
Schedule a consultation call and discuss your migration requirements.
Contact Us
